


16
JulAngular Cheat Sheet – Quick Reference Guide for 2025
14 Jul 2025
Beginner
4.74K Views
52 min read

Learn with an interactive course and practical hands-on labs
Angular Course Free with Certificate - Beginner Level
Angular is a powerful TypeScript-based framework maintained by Google. It's widely used for building enterprise-grade, scalable, and maintainable Single Page Applications (SPAs). Angular provides a full suite of tools out-of-the-box, components, services, routing, forms, testing, and more—all based on a solid architectural pattern and reactive programming.
This in-depth Angular cheat sheet is for developers who want to:
- Understand Angular deeply, not just use it.
- Write efficient, modular, and testable code.
- Scale Angular apps confidently.
So let's start with an overview of the cheat sheet
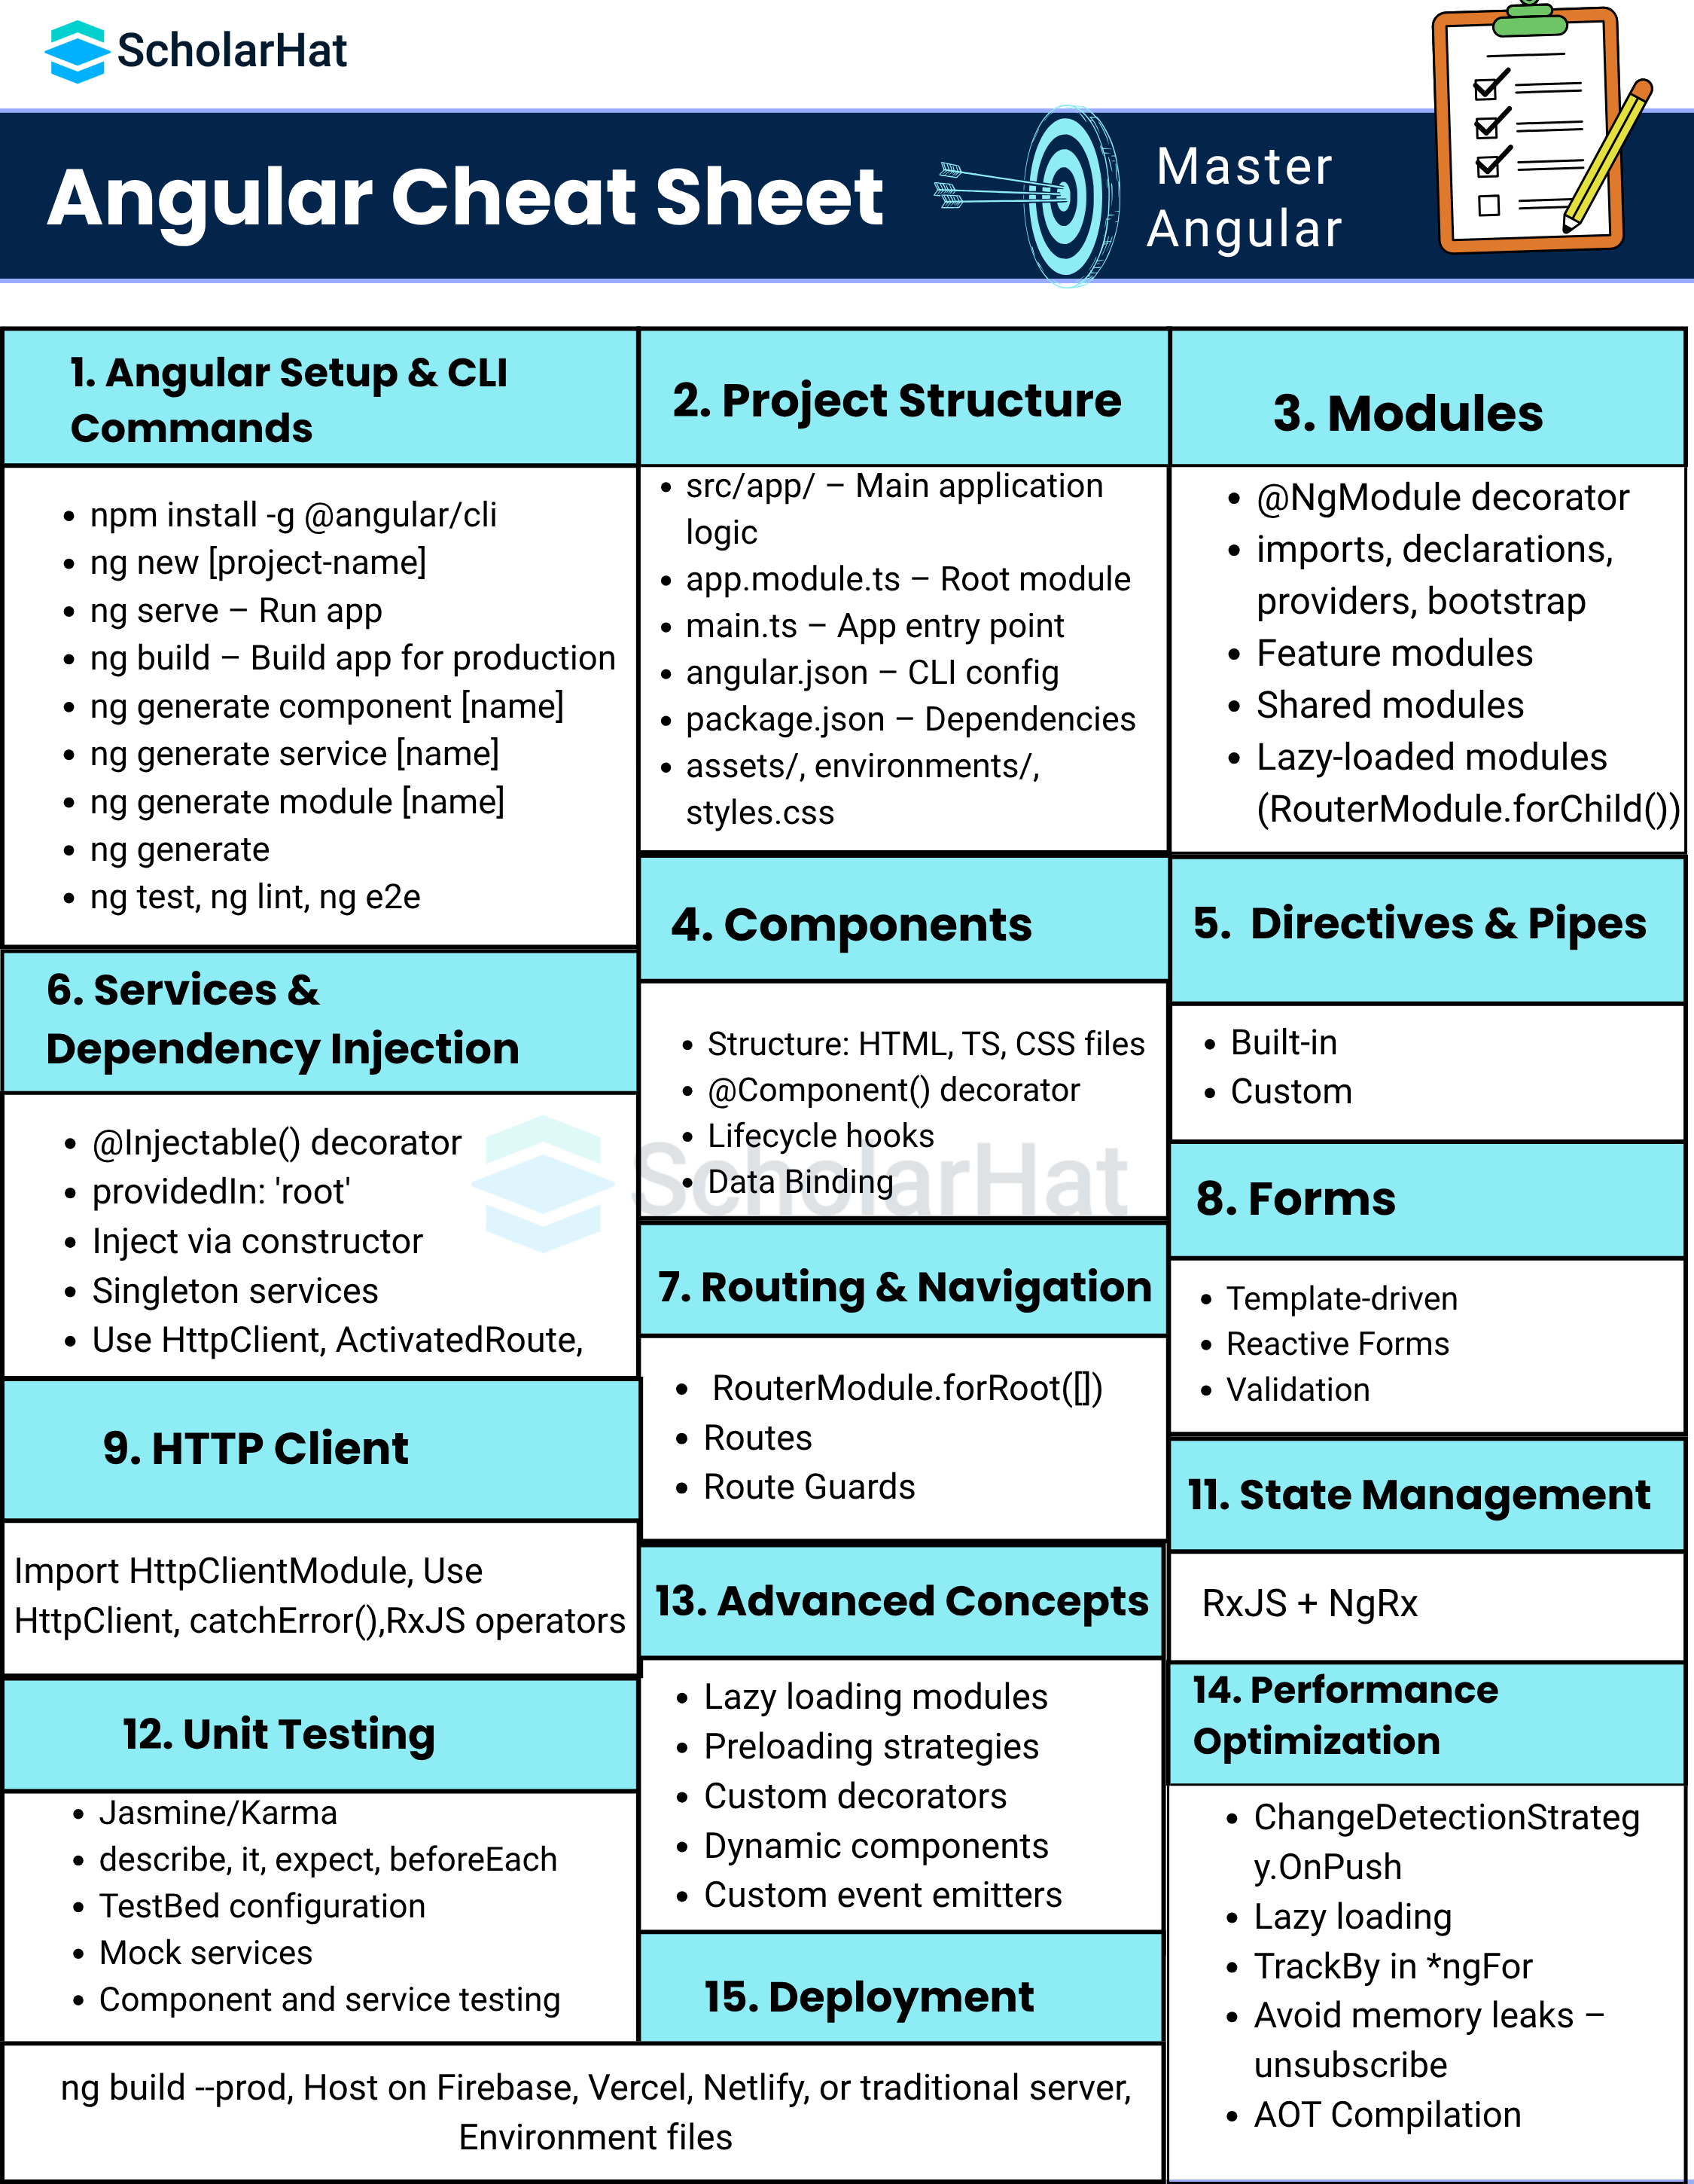
Angular Cheat Sheet: Full Guide
Let's see all the concepts one by one in steps:Step 1: Angular Setup and Angular CLI Mastery
The Angular CLI (Command Line Interface) is a powerful and efficient tool that simplifies many tasks in an Angular project through easy-to-use commands. It takes care of everything behind the scenes, allowing developers to focus more on building features.
For instance, when you want to create a new Angular project, the CLI automatically sets up the application, compiles it, and gets it ready for testing. It also runs a development server that continuously watches your source files for any changes. As soon as you update your code, the CLI recompiles the application and instantly refreshes it in the browser, making development smooth and seamless.
| Command | Description |
|---|---|
| ng new app-name | Create a new Angular project |
| ng serve | Run the dev server |
| ng generate component xyz | Generate a new component |
| ng generate service xyz | Create a new service |
| ng build | Build app for production |
| ng test | Run unit tests |
1. Installing Angular CLI
The Angular CLI (Command Line Interface) is a tool to initialize, develop, scaffold, and maintain Angular applications.
npm install -g @angular/cli-g installs it globally so you can use it anywhere from the terminal.
2. Creating a New Angular Project
ng new my-appPrompts you to choose:
- Whether to add Angular routing.
- Which stylesheet format (CSS, SCSS, etc.).
Creates a well-structured Angular project with default modules and files.
3. Running the Application
cd my-app
ng serve
Compiles the app and starts a dev server at http://localhost:4200.Watches for file changes and automatically reloads the browser.
4. Building the App for Production
ng build --prodOptimizes and compiles the app into the dist/ folder.
- Uses Ahead-of-Time (AOT) compilation.
- Minifies and compresses files for better performance.
5. Generating Angular Artifacts
Angular CLI provides scaffolding for components, services, pipes, modules, and more.
ng generate component component-name
ng generate service service-name
ng generate module module-name
ng generate directive directive-name
ng generate pipe pipe-name
Alias: ng g c, ng g s, etc.
6. Running Unit Tests
ng testUses Karma test runner and Jasmine test framework.Opens a browser and runs unit tests with live updates on code changes.
7. Code Linting
ng lintAnalyzes code for potential errors or best practices.Can be customized via angular.json or eslint.json.
8. Running End-to-End Tests
ng e2eUses Protractor (or Cypress if configured) for integration testing.Simulates real user behavior across pages and interactions.
9. Updating Angular
ng updateChecks for the latest Angular versions and updates project dependencies.Use ng update @angular/cli @angular/core to update core packages.
Step 2: Angular Project Structure
When you create a new Angular project using ng new, Angular sets up a complete folder structure to help you scale your app efficiently.Here’s a detailed look at each core part of the structure:
1. e2e/
- End-to-end test folder.
- Contains test cases written using Protractor (or Cypress if configured).
- Ensures full workflows work as expected.
2. node_modules/
- Contains all npm packages your Angular app depends on.
- Automatically created when you run
npm install.
3. src/
Main working directory for your app code.
src/app/
- This is where your actual application code resides.
- Default files:
- app.component.ts/html/css/spec.ts – Root component
- app.module.ts – Root module (bootstraps the app)
src/assets/
- Place to store static files such as images, logos, or JSON files.
- All files here are copied as-is to the output during build.
src/environments/
- Environment-specific configurations.
- Contains:
environment.ts– Dev environment variablesenvironment.prod.ts– Production variables- Used with Angular’s
fileReplacementsDuring the build for--prod.
4. angular.json
Central CLI configuration.
- Defines how your app is built, served, and tested.
- Key sections:
"projects": Your app config"architect": Details like build, serve, and test commands"styles": Global styles to include"fileReplacements": For switching environments
5. package.json
Lists project dependencies, scripts, and versions.
"dependencies"– Needed at runtime"devDependencies"– Needed for development (e.g., testing, building)"scripts"– Commands like start, test, lint
6. tsconfig.json
TypeScript compiler options.
- Controls type-checking, module formats, and includes/excludes.
- Extended by other files like
tsconfig.app.json,tsconfig.spec.json
7. main.ts
The main entry point of the application.Bootstraps AppModule.
platformBrowserDynamic().bootstrapModule(AppModule)
  .catch(err => console.error(err));
8. index.html
Main HTML page that Angular mounts to.Contains the <app-root></app-root> selector where your root component gets loaded.
9. styles.css or styles.scss
Global stylesheet for the application.All global styles (not scoped to components) go here.
10. polyfills.ts
Includes necessary polyfills for browser compatibility.Example: core-js, zone.js
Example Tree (Simplified)
my-app/
├── e2e/
├── node_modules/
├── src/
│   ├── app/
│   │   ├── app.component.ts
│   │   ├── app.module.ts
│   ├── assets/
│   ├── environments/
│   │   ├── environment.ts
│   │   └── environment.prod.ts
│   ├── index.html
│   ├── main.ts
│   ├── styles.css
├── angular.json
├── package.json
├── tsconfig.json
Step 3: Angular Modules
In Angular, modules help you organize your application into cohesive blocks of functionality. The Angular compiler needs at least one module to bootstrap the app: the root module (AppModule).
What is an Angular Module?
An Angular module is defined using the @NgModule() decorator.
@NgModule({
  declarations: [...],  // Components, directives, pipes
  imports: [...],       // Other modules (BrowserModule, RouterModule, etc.)
  providers: [...],     // Services or injectables
  bootstrap: [AppComponent]  // Root component to load
})
export class AppModule { }
Key Properties of @NgModule
| Property | Description |
| declarations | Components, directives, and pipes that belong to this module |
| imports | Other Angular modules needed (e.g., FormsModule, HttpClientModule) |
| exports | Components, directives, or pipes to expose for other modules |
| providers | Services and injectables for the DI system |
| bootstrap | The root component that Angular should load at app start (usually in AppModule) |
Types of Modules
1. Root Module (AppModule)
- Bootstraps the app.
- Loaded via main.ts.
- Declares global providers and components.
2. Feature Modules
- Encapsulates a specific feature of the app.
- Promotes modularization, lazy loading, and reusability.
@NgModule({
  declarations: [UserProfileComponent],
  imports: [CommonModule]
})
export class UserModule {}
3. Shared Module
- Contains reusable components, directives, and pipes.
- Imported by feature modules, not root.
@NgModule({
  declarations: [CustomButtonComponent],
  exports: [CustomButtonComponent, CommonModule]
})
export class SharedModule {}
4. Lazy-Loaded Modules
- Loaded on demand to improve performance and reduce initial load time.
- Loaded using Angular Router.
- Important: Lazy-loaded modules should not be imported in AppModule.
const routes: Routes = [
  { path: 'admin', loadChildren: () => import('./admin/admin.module').then(m => m.AdminModule) }
];
Common Angular Built-in Modules
| Module | Purpose |
| BrowserModule | Required in the root module to run the app in the browser |
| CommonModule | Provides common directives like *ngIf, *ngFor (used in feature modules) |
| FormsModule | Supports template-driven forms |
| ReactiveFormsModule | Supports reactive forms |
| HttpClientModule | Used for making HTTP calls |
| RouterModule | Used to configure routing |
| BrowserAnimationsModule | Enables animations in Angular |
Best Practices
- Keep each module focused on a single responsibility.
- Do not declare components in multiple modules.
- Export only what's necessary in shared modules.
- Use lazy loading for large feature modules.
- Always import CommonModule in feature/shared modules, not BrowserModule.
Real Example: Feature + Shared Module
// shared/shared.module.ts
@NgModule({
  declarations: [CustomPipe],
  exports: [CustomPipe, CommonModule],
  imports: [CommonModule]
})
export class SharedModule { }
// features/user/user.module.ts
@NgModule({
declarations: [UserComponent],
imports: [CommonModule, SharedModule]
})
export class UserModule { }Step 4: Components
In Angular, components are the building blocks of the UI. Every view you see in the app — a page, a form, a button — is typically controlled by a component.
What is a Component?
A component is a TypeScript class marked with the @Component() decorator. It controls a section of the user interface (UI) called a "view."
@Component({
  selector: 'app-hello',
  templateUrl: './hello.component.html',
  styleUrls: ['./hello.component.css']
})
export class HelloComponent {
  title = 'Hello Angular!';
}
Anatomy of a Component
- selector: The custom HTML tag used to embed this component. Example:
<app-hello></app-hello> - templateUrl / template: URL to an external HTML file or inline HTML.
- styleUrls / styles: Array of CSS/SCSS file paths or inline styles.
template: `<h1>Hello {{ title }}</h1>`styles: ['h1 { color: blue; }']Lifecycle Hooks (Execution Phases of a Component)
| Hook | Purpose |
| ngOnInit() | Called once the component is initialized |
| ngOnChanges() | Called when input properties change |
| ngOnDestroy() | Cleanup logic before the component is destroyed |
| ngDoCheck() | Detect and act on changes |
| ngAfterViewInit() | Called after the component’s view is initialized |
Data Binding in Components
- Interpolation –
{{ value }}Bind component class values to HTML.<h1>{{ title }}</h1> - Property Binding –
[property]="value"Bind element properties like src, disabled, value.<input [value]="username"> - Event Binding –
(event)="method()"Call a component method when an event occurs.<button (click)="sayHello()">Click Me</button> - Two-way Binding –
[(ngModel)]Used for two-way data flow (in and out). RequiresFormsModule.<input [(ngModel)]="name">
Passing Data Between Components
- Parent to Child –
@Input() - Child to Parent –
@Output()
@Input() title: string;<app-card [title]="parentTitle"></app-card>@Output() onClick = new EventEmitter<string>();<app-card (onClick)="handleEvent($event)"></app-card>View Encapsulation (Scoped CSS)
Angular provides three encapsulation modes:
- Emulated: Scoped styles using attributes (default)
- None: Global styles
- ShadowDom: Uses native Shadow DOM
@Component({
  ...
  encapsulation: ViewEncapsulation.Emulated
})
Component Communication Patterns
| Use Case | Method |
| Pass data to the child | @Input() |
| Get the event from the child | @Output() |
| Share data across unrelated components | Shared Service |
| Parent calls the child method | @ViewChild() |
| Project content into a component | <ng-content> |
Best Practices
- Follow a naming convention: user.component.ts, user.component.html
- Keep components small and focused.
- Use OnPush change detection when possible for performance.
- Avoid putting business logic inside components (use services instead).
- Use ngOnDestroy to clean up observables/subscriptions.
Sample Example
@Component({
  selector: 'app-product',
  templateUrl: './product.component.html',
  styleUrls: ['./product.component.css']
})
export class ProductComponent {
  @Input() productData: Product;
  @Output() productClicked = new EventEmitter();

  onClick() {
    this.productClicked.emit(this.productData);
  }
}
Real World Example
@Component({
  selector: 'app-greet',
  template: `<h2>Hello, {{ name }}</h2>`,
  styles: [`h2 { color: green; }`]
})
export class GreetComponent {
  @Input() name: string = 'World';
}
Data Binding Types
| Type | Syntax | Description |
|---|---|---|
| Interpolation | {{ title }} | One-way (component to view) |
| Property Binding | [src]="imageUrl" | Bind DOM properties |
| Event Binding | (click)="doSomething()" | Bind to events |
| Two-way Binding | [(ngModel)]="name" | Two-way sync |
Step 5:Directives and Pipes
Directives are instructions in the DOM. In Angular, they enhance HTML by adding behavior, structure, or custom logic. There are three types of directives:
1. Structural Directives
They change the DOM layout by adding or removing elements.
*ngIf
Conditionally includes a template:
<div *ngIf="isLoggedIn">Welcome back!</div>Using else block:
<div *ngIf="isLoggedIn; else loginBlock">Welcome</div>
<ng-template #loginBlock><p>Please log in</p></ng-template>
*ngFor
Loops through data collections:
<li *ngFor="let item of items; let i = index">
  {{ i + 1 }}. {{ item }}
</li>
*ngSwitch, *ngSwitchCase, *ngSwitchDefault
Switch case logic:
<div [ngSwitch]="role">
  <p *ngSwitchCase="'admin'">Admin Panel</p>
  <p *ngSwitchCase="'user'">User Dashboard</p>
  <p *ngSwitchDefault>Guest Page</p>
</div>
2. Attribute Directives
They change the appearance or behavior of elements.
ngClass
Applies CSS classes dynamically:
<div [ngClass]="{ 'active': isActive }">Click Me</div>ngStyle
Applies inline styles dynamically:
<p [ngStyle]="{ 'font-size.px': fontSize, color: fontColor }">
  Styled text
</p>
Custom Attribute Directive
You can create your own directive:
@Directive({
  selector: '[appHighlight]'
})
export class HighlightDirective {
  constructor(private el: ElementRef) {
    el.nativeElement.style.backgroundColor = 'yellow';
  }
}
Usage:
<p appHighlight>Highlighted paragraph</p>3. Component Directives
Technically, every component is a directive with a template.
Best Practices for Directives
- Use attribute directives for behavior (like hover, drag).
- Use structural directives for layout control.
- Keep directive names descriptive and prefix them.
- Clean up event listeners in ngOnDestroy().
Pipes
Pipes transform data in templates, similar to filters.
Built-in Pipes
| Pipe | Usage |
| date | {{ today | date }} |
| uppercase/lowercase | {{ name | uppercase }} |
| currency | {{ amount | currency }} |
| percent | {{ decimal | percent }} |
| json | {{ obj | json }} |
| slice | {{ str | slice:0:5 }} |
| async | {{ data$ | async }} |
Chaining Pipes
You can use multiple pipes together:
{{ name | uppercase | slice:0:3 }}Custom Pipe
Example of a custom pipe:
@Pipe({ name: 'reverse' })
export class ReversePipe implements PipeTransform {
  transform(value: string): string {
    return value.split('').reverse().join('');
  }
}
Usage:
<p>{{ 'Angular' | reverse }}</p> Pure vs Impure Pipes
| Type | Description |
| Pure (default) | Called only when input changes |
| Impure | Called on every change detection cycle (use with caution) |
Example:
@Pipe({ name: 'impurePipe', pure: false })Async Pipe
Auto-subscribes to observable or promise:
data$ = this.http.get('/api/data');<p>{{ data$ | async }}</p>It:
- Subscribes automatically
- Unsubscribes on destroy
- Handles loading values reactively
Best Practices for Pipes
- Use pipes for pure transformation only, not business logic.
- Avoid impure pipes unless really necessary (can impact performance).
- Prefer async pipe over manual subscription.
Step 6: Services and Dependency Injection (DI)
Services in Angular are singleton classes used to encapsulate business logic, reusable data, or shared functionality. Dependency Injection (DI) is how Angular provides instances of these services where needed.
What is a Service?
A service is a plain TypeScript class decorated with @Injectable(), used to:
- Share data across components
- Handle HTTP requests
- Centralized business logic
- Manage state
@Injectable({
  providedIn: 'root'  // Registers it in the root injector
})
export class UserService {
  getUserName() {
    return 'AngularUser';
  }
}
Creating a Service using CLI
Command:
ng generate service userThis creates:
user.service.tsuser.service.spec.ts(test file)
Injecting a Service into a Component
To use a service, inject it via the component's constructor:
constructor(private userService: UserService) {}

ngOnInit() {
  this.name = this.userService.getUserName();
}
Angular's DI system looks for the UserService and provides its instance.
Hierarchical Dependency Injection
Angular has a tree-based DI system:
providedIn: 'root': One global singleton instance- You can also register services at the component or module level (not recommended unless you want different instances)
@Component({
  providers: [CustomService]  // New instance created for this component
})
Use Cases of Services
| Use Case | How a Service Helps |
| Share data across components | Centralized state |
| API communication | Use HttpClient in the service |
| Complex logic | Keep logic out of components |
| Observables | Services can emit values using Subject/BehaviorSubject |
Example: Sharing Data via Service
@Injectable({ providedIn: 'root' })
export class DataService {
  private messageSource = new BehaviorSubject<string>('Default Message');
  currentMessage = this.messageSource.asObservable();

  changeMessage(msg: string) {
    this.messageSource.next(msg);
  }
}
Component A:
this.dataService.changeMessage('New Message');Component B:
this.dataService.currentMessage.subscribe(msg => this.message = msg);Best Practices
- Always use
@Injectable({ providedIn: 'root' })for global services. - Use services to separate concerns — components shouldn't do everything.
- Use RxJS for async operations and real-time data streams.
- Unsubscribe from observables in
ngOnDestroy()if not using async pipe.
Common Built-in Services
| Service | Description |
| HttpClient | Used for HTTP operations |
| ActivatedRoute | Access route information |
| Router | Programmatic navigation |
| FormBuilder | Simplifies reactive form creation |
| Title | Set browser page title dynamically |
Step 7: Angular Routing
Angular’s Router enables single-page applications (SPAs) by loading different views/components based on the URL, without refreshing the whole page.
Why Use Angular Routing?
- Navigate between different components/pages
- Load child or lazy-loaded modules
- Share data via route parameters
- Guard routes with authentication
Setting Up Routing
When you create a project using:
ng new my-app --routingAngular auto-generates: app-routing.module.ts
Basic Routing Configuration
const routes: Routes = [
  { path: '', component: HomeComponent },
  { path: 'about', component: AboutComponent },
  { path: 'products', component: ProductsComponent },
  { path: '**', component: NotFoundComponent }
];

@NgModule({
  imports: [RouterModule.forRoot(routes)],
  exports: [RouterModule]
})
export class AppRoutingModule { }
Router Outlet
The <router-outlet> is a placeholder that Angular uses to display the routed component.
<router-outlet></router-outlet>Router Links (Navigation)
<a routerLink="/about">About Us</a>
<button [routerLink]="['/products']">Go to Products</button>
Active link styling:
<a routerLink="/about" routerLinkActive="active">About</a>Programmatic Navigation (Router Service)
constructor(private router: Router) {}

navigateToProduct(id: number) {
  this.router.navigate(['/products', id]);
}
Route Parameters
Passing Parameters:
{ path: 'product/:id', component: ProductDetailComponent }Reading Parameters:
constructor(private route: ActivatedRoute) {}

ngOnInit() {
  this.route.params.subscribe(params => {
    const id = params['id'];
  });
}
Child Routes (Nested Routing)
{
  path: 'dashboard',
  component: DashboardComponent,
  children: [
    { path: 'stats', component: StatsComponent },
    { path: 'reports', component: ReportsComponent }
  ]
}
Usage in template:
<router-outlet></router-outlet>Redirects and Wildcards
{ path: '', redirectTo: 'home', pathMatch: 'full' }
{ path: '**', component: NotFoundComponent }
Route Guards (Protecting Routes)
You can prevent users from accessing routes unless certain conditions are met.
| Guard | Description |
| CanActivate | Before navigating to a route |
| CanDeactivate | Before leaving a route |
| Resolve | Fetch data before the route activates |
| CanLoad | Control loading of lazy-loaded modules |
Example: CanActivate
@Injectable({ providedIn: 'root' })
export class AuthGuard implements CanActivate {
  constructor(private auth: AuthService, private router: Router) {}

  canActivate(): boolean {
    if (!this.auth.isLoggedIn()) {
      this.router.navigate(['/login']);
      return false;
    }
    return true;
  }
}
Apply it:
{ path: 'dashboard', component: DashboardComponent, canActivate: [AuthGuard] }Lazy Loading Routes
Improves performance by loading features only when needed.
{ path: 'admin', loadChildren: () => import('./admin/admin.module').then(m => m.AdminModule) }Make sure the AdminModule has its own routing configuration using RouterModule.forChild(...).
Best Practices
- Use route guards for protected pages
- Keep route configs in separate routing modules
- Use lazy loading for large or admin features
- Use params, queryParams, and fragments for dynamic routing
- Use resolve to fetch data before the component loads
Step 8: Forms in Angular
Template-Driven:
<form #userForm="ngForm" (ngSubmit)="onSubmit(userForm.value)">
  <input name="username" ngModel required>
  <button type="submit">Submit</button>
</form>
Reactive Forms:
this.userForm = this.fb.group({
  username: ['', Validators.required]
});
Lifecycle Hooks
| Hook | Purpose |
|---|---|
ngOnInit() | Init logic after the constructor |
ngOnDestroy() | Clean up |
ngAfterViewInit() | DOM loaded |
Step 9: HTTP Client in Angular
Setup
Import HttpClientModule from @angular/common/http and add it to app.module.ts imports:
import { HttpClientModule } from '@angular/common/http';Basic Usage
Inject HttpClient in a service:
constructor(private http: HttpClient) {}
getData() {
  return this.http.get('/api/data');
}
Call it in a component:
this.api.getData().subscribe(data => console.log(data));Common Methods
| Method | Usage |
| get() | Get data |
| post() | Send data |
| put() | Update data |
| delete() | Remove data |
Add Headers or Params
this.http.get('/api/data', {
  headers: new HttpHeaders({ 'Auth': 'token' }),
  params: { search: 'angular' }
});
Error Handling
pipe(catchError(error => throwError(() => new Error('Failed'))))Interceptors
Used for setting auth tokens globally:
req.clone({ setHeaders: { Authorization: 'Bearer token' } })Step 10: State Management
RxJS-Based (Simple)
Use BehaviorSubject in services to share data between components.
private data$ = new BehaviorSubject<any>(null);
- Great for small to medium apps
- Easy and reactive
NgRx Store (Advanced)
Redux-style state management:
- Actions
- Reducers
- Selectors
- Effects
Ideal for large-scale apps with complex state.
Step 11: Unit Testing in Angular
Angular uses Karma and Jasmine by default.
Run tests:
ng testTest a Component
it('should create component', () => {
  expect(component).toBeTruthy();
});
Test a Service
Use TestBed to inject services and test methods.
const service = TestBed.inject(MyService);
Use spyOn() to mock dependencies.
Step 12: Advanced Angular Concepts
| Concept | Description |
|---|---|
| Lazy Loading | Load modules only when needed via routes |
| Guards | Protect routes (CanActivate, CanLoad, etc.) |
| Resolvers | Pre-fetch data before routing |
| Dynamic Components | Create components at runtime with ComponentFactoryResolver |
| Custom Pipes/Directives | Extend Angular features |
Step 13: Performance Optimization
| Strategy | Tip |
|---|---|
| ChangeDetectionStrategy.OnPush | Reduces unnecessary checks |
| Lazy Loading | Load routes/modules on demand |
| TrackBy in *ngFor | Boosts rendering speed |
| PreloadStrategy | Preloads important modules in background |
| AOT Compilation | Use ng build --prod for Ahead-of-Time build |
| Tree-shaking | Removes unused code |
| Code Splitting | Break app into chunks for faster load |
Step 14: Deployment
Build for Production
ng build --configuration productionHost Options
- Firebase Hosting (firebase deploy)
- Netlify/Vercel (drag & drop dist/ folder)
- Nginx or Apache (serve contents of dist/)
- Azure, AWS, or GCP for cloud deployment
Step 15: Angular Testing (Jasmine + Karma)
describe('AppComponent', () => {
  let component: AppComponent;
  let fixture: ComponentFixture;

  beforeEach(() => {
    TestBed.configureTestingModule({ declarations: [AppComponent] });
    fixture = TestBed.createComponent(AppComponent);
    component = fixture.componentInstance;
  });

  it('should create', () => {
    expect(component).toBeTruthy();
  });
});
Angular Module Types Summary
- AppModule: Root module
- FeatureModule: Encapsulated feature
- SharedModule: Shared components/pipes
- CoreModule: Singleton services
Advanced Tips & Best Practices
- Use
trackBywith*ngFor - Split features into lazy-loaded modules
- Use
asyncpipe instead of manual subscription - Write logic in components/services, not templates
Conclusion
The Angular Cheat Sheet serves as a handy reference for both beginners and experienced developers looking to build scalable, high-performance web applications using Angular. By consolidating core concepts like components, directives, services, routing, and dependency injection in one place, it enables faster development and fewer errors. Whether you're quickly revisiting syntax or clarifying Angular lifecycle hooks, this cheat sheet is a time-saving tool that enhances your productivity. Use this cheat sheet as your go-to reference for quick insights, best practices, and key Angular concepts as you continue your journey toward becoming a professional Angular developer.
FAQs
Angular is a web framework that empowers developers to build fast, reliable applications.
Mastering Angular usually takes about 2-3 months with a continuous daily effort of 2-3 hours. To grasp angular, we should know its core concepts first and a few of them are listed below.
Take our Angular skill challenge to evaluate yourself!

In less than 5 minutes, with our skill challenge, you can identify your knowledge gaps and strengths in a given skill.