30
JanRouting in Angular - Types of Routing in Angular With Example
Routing in Angular allows developers to create navigation between different views or components in a single-page application (SPA) without reloading the entire page. It maps URLs to specific components, enabling smooth transitions and a better user experience. Angular’s powerful RouterModule helps manage routes, parameters, and lazy loading efficiently. This makes Angular apps fast, dynamic, and highly interactive—ideal for modern web development.
In thisAngular Tutorial,we will lookbrieflyatwhatAngular Routing is. Let's go into how it works!
What is Angular Routing?
Angular Routing is a way to move between different pages or screens in a single-page application without reloading the whole website. It helps show different components based on the URL the user clicks or types. For example, when a user clicks “Home” or “About,” Angular shows the right content without refreshing the browser. This makes the app feel faster and smoother, just like a regular website, but better.

Purpose of Routing in Angular
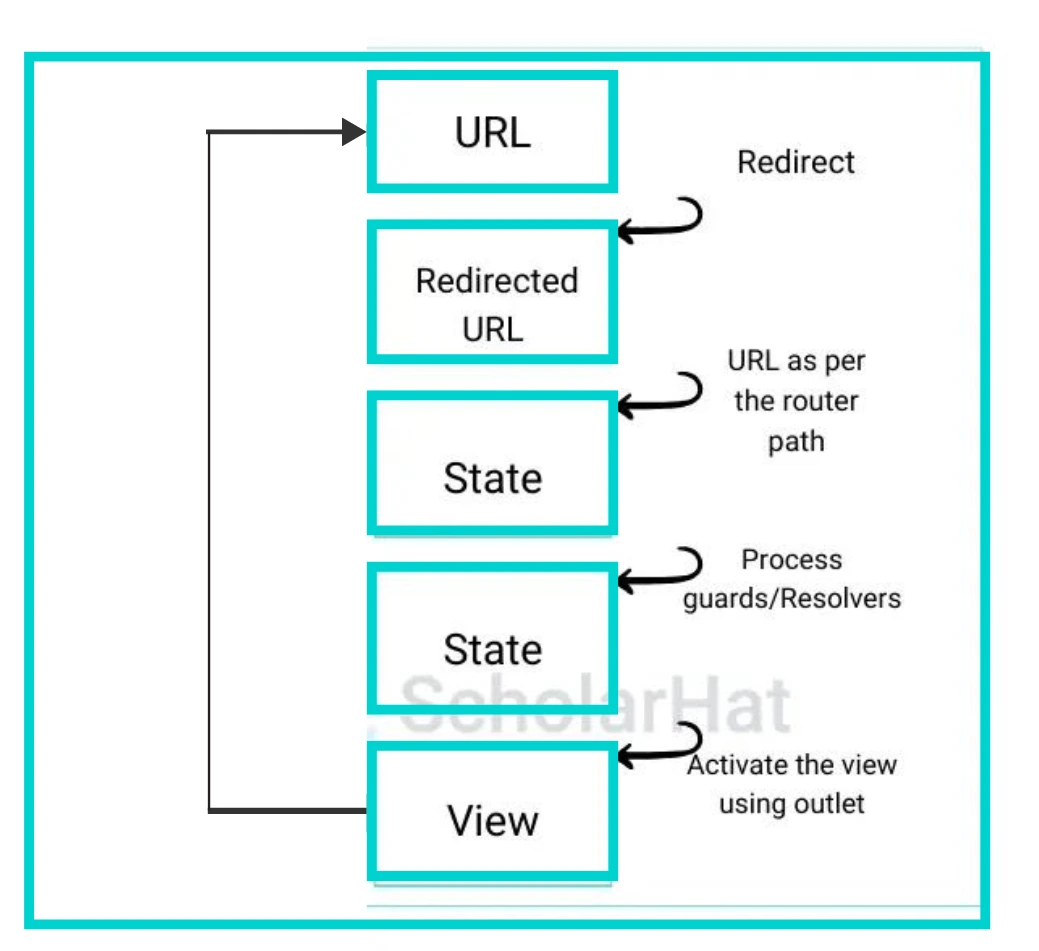
The Angular router can interpret a browser URL as an instruction to navigate from/to a specific view. One can pass the optional parameters along with the supporting view component that helps it decide what specific content to present. We can bind the router to the links on a page, and it will navigate to the defined application view when the user clicks a link. Understanding the functionalities and intricacies of the Angular router is a vital aspect covered in Angular certification Training.
Example of Angular Routing
Let's say we want to create a website with two pages: Home and About.
Step 1: Create Components
Run these commands in the terminal:
 ng generate component home
 ng generate component about
Step 2: Set Up Routes in app-routing.module.ts
Then, define the routes inside app-routing.module.ts to connect URLs with components.
 import { NgModule } from '@angular/core';
 import { RouterModule, Routes } from '@angular/router';
 import { HomeComponent } from './home/home.component';
 import { AboutComponent } from './about/about.component';

 const routes: Routes = [
  { path: 'home', component: HomeComponent },
  { path: 'about', component: AboutComponent },
  { path: '', redirectTo: '/home', pathMatch: 'full' } // Default route
 ];

 @NgModule({
  imports: [RouterModule.forRoot(routes)],
  exports: [RouterModule]
 })
 export class AppRoutingModule {}
Step 3: Add Router Outlet in app.component.html
Finally, use <router-outlet> and routerLink in your HTML to display and navigate between pages.
 <nav>
  <a routerLink="/home">Home</a> |
  <a routerLink="/about">About</a>
 </nav>
 <router-outlet></router-outlet>
When users click on Home or About, Angular shows the correct component without reloading the page. The URL changes smoothly, and the app feels fast and responsive like a normal website.
Steps to Configure Angular Routing
The Angular router has its library package which is @angular/routerSo we need to import what we need from it as we would from any other Angular package. It is an optional service in Angular that presents a particular component view.
The following steps you have to follow to configure routing in Angular.
Step 1: Define the routes
Angular application routes are recommended to be defined within a separate module using an array as given below:
import { NgModule } from '@angular/core';
const routes: Routes = [
 { path: "", component: HomeComponent },
 { path: "about", component: AboutComponent }
];
@NgModule({
 imports: [RouterModule.forRoot(routes)],
 exports: [RouterModule]
 })
 export class AppRoutingModule {}
Step 2: Define the container
RouterOutlet as the container where the router renders the component when the user requests a route.
<div>
 <router-outlet></router-outlet>
 </div>
Step 3: Define the links
RouterLink directive, which is used to define links to a route name.
 <ul class="nav navbar-nav">
 <li>
 <a [routerLink]="['/']">Home</a>
 </li>
 <li>
 <a [routerLink]="['/about']">About</a>
 </li>
 </ul>
Step 4: Define Route for 404
In Angular, you can define a route that will be served, if the requested URL doesn't match any paths in the route configuration. The ** characters are used to define the path for the route not found. You can define this path as given below:
 const routes: Routes = [
 { path: "", component: HomeComponent },
 { path: "about", component: AboutComponent },

 { path: "notfound", component: NotfoundComponent },
 { path: "**", redirectTo: "notfound" }
 ];
Note
In Angular route configuration, the order of the routes matters. The angular router uses a first-match wins strategy when matching routes.
So, more specific routes should be placed at the top level, and less specific routes should be placed at the bottom in the routes configuration.
Common Routing Tasks
There are many ways to integrate the Angular router into your application.They are as follows:
1. Generate an Application
The first step when working with Angular routing is to create a new Angular application using the Angular CLI.
ng new my-appThis command creates a new Angular project called my-app. You’ll be prompted to enable Angular routing during the setup. Type Y to enable it.
Once the application is generated, you will have a basic folder structure along with a app-routing.module.ts file, where you can define your routes.
2. Defining a Basic Route
To define routes for navigating between views, use the RouterModule in app-routing.module.ts:
import { NgModule } from '@angular/core';
import { RouterModule, Routes } from '@angular/router';
import { HomeComponent } from './home/home.component';
import { AboutComponent } from './about/about.component';

const routes: Routes = [
  { path: '', component: HomeComponent },  // Default route
  { path: 'about', component: AboutComponent }
];

@NgModule({
  imports: [RouterModule.forRoot(routes)],
  exports: [RouterModule]
})
export class AppRoutingModule { }
3. Getting Route Information
You can retrieve information about the current route such as route parameters or query parameters by injecting ActivatedRoute into your component.
import { ActivatedRoute } from '@angular/router';

export class UserComponent {
  constructor(private route: ActivatedRoute) {}

  ngOnInit() {
    // Get route parameter (e.g., /user/:id)
    this.route.params.subscribe(params => {
      console.log('User ID:', params['id']);
    });

    // Get query parameters (e.g., /user?id=123)
    this.route.queryParams.subscribe(params => {
      console.log('Query params:', params);
    });
  }
}
4. Setting up Wildcard Routes
Wildcard routes are used to catch any undefined routes in your application and display a 404 page.
const routes: Routes = [
  { path: 'home', component: HomeComponent },
  { path: 'about', component: AboutComponent },
  { path: '**', component: PageNotFoundComponent }  // Wildcard route
];
5. Displaying a 404 Page
Create a 404 error page using a component that shows an error message when a user navigates to an undefined route.
// page-not-found.component.ts
import { Component } from '@angular/core';

@Component({
  selector: 'app-page-not-found',
  template: `404 Page Not Found`,
  styles: [`h1 { color: red; }`]
})
export class PageNotFoundComponent {}
6. Setting up Redirects
Sometimes, you want to redirect a user from one route to another. Use the redirectTo property in your route configuration to do this:
const routes: Routes = [
  { path: '', redirectTo: '/home', pathMatch: 'full' },  // Redirect empty path to /home
  { path: 'home', component: HomeComponent },
  { path: 'about', component: AboutComponent },
  { path: '**', component: PageNotFoundComponent }  // Wildcard route
];
What are Location Strategies?
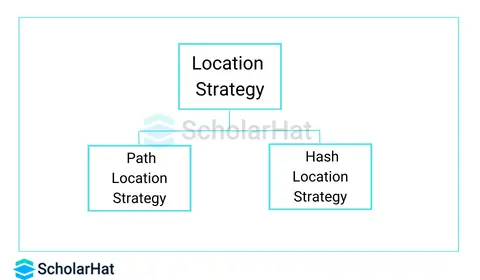
Location Strategies in Angular define how the URL/Request is being resolved and determine how your URL will look in the browser. Angular supports two types of Location Strategies. There are two types of location strategies
- PathLocation Strategy
- HashLocation Strategy

1. PathLocation Strategy
The PathLocation strategy is the default location strategy in Angular. In this strategy, the URL looks like the multi-page application as http://localhost:4200/product. This strategy can be configured as given below:
 //step1: src/index.html
 <base href="/"> Use at main page i.e. index.html page

 //step2: src/app/app.routing.ts
 RouterModule.forRoot(appRoutes) in routing module
Advantages and Disadvantages of PathLocation Strategy
- Supports Server-Side Rendering
- SEO Friendly
- Older browsers don’t support
2. HashLocation Strategy
The hashLocation strategy you have to configure in Angular. In this strategy, the URL contains a hash character as http://localhost:4200/#/product. This strategy can be configured as given below:
//step1: src/index.html
 <base href="/"> Use at main page i.e. index.html page

 //step2: src/app/app.routing.ts
 RouterModule.forRoot(appRoutes, {useHash: true}) in routing module
Advantages and Disadvantages of HashLocation Strategy
- Supported by all browsers
- Doesn't Support Server-Side Rendering
- Not SEO Friendly because of special character Hash
Child/Nested Routes
Sometimes you need to render one or more components on request on a component. In that case, child/nested routing helps us. This is a powerful feature in Angular router to render child/nested components in Angular using the route.
Configuring Child/Nested Routes
To define a child/nested route a Children option is used in the routes array as given below:
 const routes: Routes = [
 { path: "", component: HomeComponent },
 { path: "about", component: AboutComponent,
 children: [
 { path: "profile", component: ProfileComponent },
 { path: "changepassword", component: ChangepasswordComponent }
 ]
 }
 ];
 <h2>About Us</h2>
 <hr>
 <p>This is about us page for the company!</p>

 Activating the Child Routes
 <a [routerLink]="['profile']">Profile</a>
 <a [routerLink]="['changepassword']">Change Password</a>
 <router-outlet></router-outlet>
Read More:
Summary
In Conclusion, Angular Routing makes it easy to create smooth navigation within single-page applications. It lets users move between pages without reloading the whole site, making the experience faster and more user-friendly. With routing, your Angular app becomes more organized, dynamic, and easier to manage.
FAQs
- Enhanced User Experience: Navigate between views with ease, just like in desktop apps, without having to reload the entire page.
- Faster Page Transitions: Load only the necessary components, resulting in faster transitions and improved performance.
- Modularity and Maintainability: Organise code effectively by associating components with specific routes, hence increasing reusability.
- SEO-Friendly URLs: Improve discoverability by using URLs that represent view content, which helps with search engine optimization.
- Advanced Navigation: Handle complex scenarios with support for route parameters, child routes, and route guards to improve security.
Take our Angular skill challenge to evaluate yourself!

In less than 5 minutes, with our skill challenge, you can identify your knowledge gaps and strengths in a given skill.


