13
FebWhat is Dapper? How to Use Dapper in ASP.Net Core?
What is Dapper and How to use Dapper in ASP.NET core: An Overview
Getting started with Dapper becomes necessary when we know working with data in the .NET world was dominated by ADO.NET for many years. With the advent of ORMs, many new database access frameworks(ORMs) emerged.
In this Tutorial, we will learn about Micro ORM called Dapper. Feeling lost in the world of random ASP.NET. Master ASP.NET to unlock high-demand web development roles, valued by 75% of tech employers. Start our Free Dot Net Training Online now!
Read More: Top 50 ASP.NET Core Interview Questions and Answers for 2025
What is Dapper
Dapper is simple/ micro ORM for the .NET world. It's a NuGet library that can be added to any .NET project for database operations. ORM stands for Object Relational Mapping, meaning the entire database can be operated in terms of OO classes, Interfaces etc. ORM creates a "virtual database" in terms of classes and provides methods to work with those classes. Dapper is a Micro ORM as it's architected to focus on the most important task of working with database tables instead of creating, modifying the database schema, tracking changes etc.
Hey, I never heard of Dapper, who uses it? Dapper is in production use at Stack Overflow. Really? Yes, Dapper was created by StackOverflow team to address their issues and open source it. Dapper used at Stack Overflow itself showcases its strength.
Why use Dapper
Dapper is a NuGet library, can be used with any .NET project. Quite lightweight, high performance.
Drastically reduces the database access code.
Focus on getting database tasks done instead of being full-on ORM. We cover more on this
Work with any database - SQL Server, Oracle, SQLite, MySQL, PostgreSQL etc.
For an existing database, using Dapper is an optimal choice.
When Should You Use Dapper?
- When there are performance critical parts in your application or you're working with comparatively larger datasets.
- When you want to write SQL queries in its raw form and also map the results to the objects.
- When you want more control over your database operations like SQL queries, transactions and connection management.
- Dapper also gives you the freedom to use it with other ORM too such as EF Core so when you want to work collaboratively, use Dapper.
Read More: Why you need ASP.NET Core in your tech stack?
Choosing Dapper over EF Core
EF Core and Dapper are both great technologies, but choosing Dapper would be based on your requirements and here are mine
Existing database with lots of stored procedure fetching a good amount of records.
Developer's familiarity in working with raw SQL or ADO.NET.
The application mainly involves fetching for dashboards, reports.
Dapper uses underlying SQLConnection to work with the database, so easy it's quite easy to use a different database at the same time i.e. I would use Dapper for SQL Server, Oracle or MySQL in the same application. In real world apps, we usually don't deal with a single database.
How Dapper Works
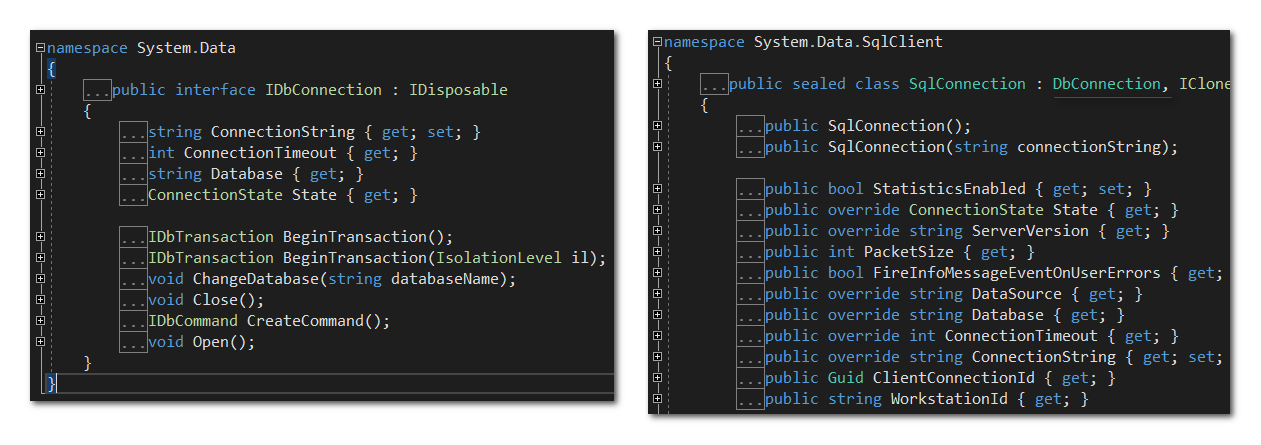
Dapper is a NuGet library that can be added to any project. It extends the IDbConnection interface. The IDbConnection interface represents an open connection to data source implemented by the .NET framework. Every database provider extends this interface to for their database i.e. SQL Server, Oracle, MySQL etc. Dapper uses this connection, has its own set of methods to work with database independent of which database being chosen. This design goal of Dapper makes it easy to with any database almost in its own way. The following image shows the IDbConnection extended in the SQLConnection class (SQL Server provider).
Benefits of Dapper
- It is lightweight and provides a higher quality performance as compared to the other ORMs.
- It is simpler, allows developers to write SQL queries in its raw form.
- You can do mapping easily as it supports multi-mapping too which makes it easier to map query results to multiple objects.
- Dapper also gives freedom of not using coding rather, it directly connects you with your existing database schema.
Dapper Extension Methods
- Query<T>- It is used to retrieve data from the database.
- QueryFirstOrDefault<T>- It is same as Query<T> but in the case, where no rows are returned, it results a default value or the first row of the result set.
- Execute- It is used for execution of the non-query SQL statements like INSERT, UPDATE or DELETE.
- Insert<T>- It is used to insert a record into the database.
- Update<T>- It is used to update a record existing in the database.
- Delete<T>- It is used to delete a record from the database.
- BulkInsert<T>- It is used to insert a group of entities into the database at once.
IEnumerable<T> Query<T>(this IDbConnection cnn, string sql, object param = null, IDbTransaction transaction = null, bool buffered = true, int? commandTimeout = null, CommandType? commandType = null);T QueryFirstOrDefault<T>(this IDbConnection cnn, string sql, object param = null, IDbTransaction transaction = null, int? commandTimeout = null, CommandType? commandType = null);int Execute(this IDbConnection cnn, string sql, object param = null, IDbTransaction transaction = null, int? commandTimeout = null, CommandType? commandType = null); TKey Insert<TKey, T>(this IDbConnection connection, T entityToInsert, IDbTransaction transaction = null, int? commandTimeout = null); bool Update<T>(this IDbConnection connection, T entityToUpdate, IDbTransaction transaction = null, int? commandTimeout = null); bool Delete<T>(this IDbConnection connection, T entityToDelete, IDbTransaction transaction = null, int? commandTimeout = null); void BulkInsert<T>(this IDbConnection connection, IEnumerable<T> entities, IDbTransaction transaction = null, int? commandTimeout = null); Where can you get Dapper?
- Open Visual Studio
- In the Solution Explorer, right-click on your project
- Click on 'Manage NuGet Packages'
- Search for 'Dapper' in the 'Browse' tab
- Select Dapper and click on 'Install'
2. Using GitHub Repository- You can find Dapper's source code on GitHub and clone or download the repository from Dapper's GitHub page.
3. Manual Installation- You can also download the source code from various sources manually and use them in your project.
CRUD demo with Dapper in ASP.NET Core
Let's get into an example by writing CRUD based ASP.NET Core web application with Dapper as data access technology.
What's in the demo
Demo scope.
Creating Entities aka Models, Data access library.
Create a web application using ASP.NET Core.
CRUD operations in action
This demo is written in ASP.NET Core 2.1 on Visual Studio IDE 2017 Preview 15.9 on Windows 10 with SQL Server. However, you can use Visual Studio Code on Windows 7/8/10. The sample database used is the NorthWind database, available freely on this link.
Demo scope
The NorthWind database is a sample store database consisting of employees, products, orders, customers and their order. In this demo, we will create an ASP.NET Core MVC project to showcase CRUD operations for Northwind store employees. We will start by creating Northwind entities (POCO) classes, data access consisting of the Dapper library and ASP.NET Core MVC web application.
NorthWind Entities
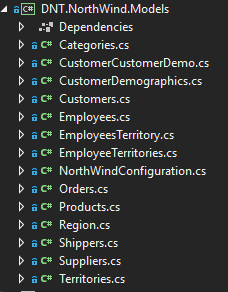
Dapper being an ORM (micro), it maps classes with tables. The Dapper execution of SQL (raw or SP) is mapped to strongly typed classes to database result. A simple example class Employee containing properties like Id, Name, Designation, Location would map with respective columns of the Employee table. Other columns will not be mapped to class Employee even if they are part of SQL execution results. To generate Entities (C# class), recommend using any reverse engineering database tools and copy all the classes into a .NET Core class library as shown here.
Database Access library
Create a .NET Core class library, install the Dapper package using NuGet package manager. In this library, we will work on two aspects i.e. Connection factory and EmployeeRepository

DNTConnectionFactory (implements IDNTConnectionFactory) class has two methods GetConnection() and CloseConnection(). The GetConnection() method creates SqlConnection and opens the connection. The SqlConnection takes a connection string to the SQL Server database.
  public class DNTConnectionFactory : IDNTConnectionFactory
 {
 private IDbConnection _connection;
 private readonly IOptions<NorthWindConfiguration> _configs;

 public DNTConnectionFactory(IOptions<NorthWindConfiguration> Configs)
 {
 _configs = Configs;
 }

 public IDbConnection GetConnection
 {
 get
 {
 if (_connection == null)
 {
 _connection = new SqlConnection(_configs.Value.DbConnectionString);
 }
 if (_connection.State != ConnectionState.Open)
 {
 _connection.Open();
 }
 return _connection;
 }
 }

 public void CloseConnection()
 {
 if (_connection != null && _connection.State == ConnectionState.Open)
 {
 _connection.Close();
 }
 }
 }
The EmployeeRepository class is Repository type of class implementing IEmployeeRepository, it has five methods as shown. They essential perform our CRUD operation on the Employee class i.e. Employee table in NorthWind database.
using DNT.NorthWind.Models;
 using System.Collections.Generic;

 namespace DNT.NorthWind.DataAccess.Interface
 {
 public interface IEmployeesRepository
 {
 IList<Employees>GetEmployeesByQuery();
 Employees GetEmployeesById(int employeeId);
 int AddEmployee(Employees employees);
 bool UpdateEmployee(int employeeId, Employees employees);
 bool DeleteEmployee(int employeeId);
 }
 }
We will learn how Dapper is used with the various use case in detail. The GetEmployeesByQuery() method is the simplest way of fetching the records using raw SQL.
public IList<Employees> GetEmployeesByQuery()
 {
 var EmpList = new List<Employees>();
 var SqlQuery = @"SELECT [EmployeeID],[LastName],[FirstName],[Title],[TitleOfCourtesy],[City],[Country] FROM [Northwind].[dbo].[Employees]";

 using (IDbConnection conn = _connectionFactory.GetConnection)
 {
 var result = conn.Query(SqlQuery);
 return result.ToList();
 }
 }
the variable "SqlQuery" is the string containing SQL query. Dapper's(SqlMapper) Query method over the Connection factory runs the SQL query, then maps the database result to Employee class and returns as a list of employees.
Note : Only matching class and table properties are mapped to list of employee, they are case sensitive.
The GetEmployeesById() method gets Employee based on its EmployeeId. We use a stored procedure by passing EmployeeId as SQL parameter.
public Employees GetEmployeesById(int empId)
 {
 var Employees = new Employees();
 var procName = "spEmployeesFetch";
 var param = new DynamicParameters();
 param.Add("@EmployeeId", empId);

 try
 {
 using (var multiResult = SqlMapper.QueryMultiple(_connectionFactory.GetConnection,
 procName, param, commandType: CommandType.StoredProcedure))
 {
 Employees = multiResult.ReadFirstOrDefault<Employees>();
 Employees.Territories = multiResult.Read<EmployeesTerritory>().ToList();
 }
 }
 finally
 {
 _connectionFactory.CloseConnection();
 }

 return Employees;
 }
In this method, we get multiple result sets of SP, map them to respective classes.
The QueryMultiple method of Dapper takes in connection object, SP name, SQL parameters and command type as SP.
A single employee is mapped in the first result set and list of EmployeesTerritory are mapped in the second result set.
The AddEmployee method takes an Employee object with new employee details, prepares SQL parameters as per the SP (Just like ADO.NET days).
public int AddEmployee(Employees employees)
 {
 string procName = "spEmployeeInsert";
 var param = new DynamicParameters();
 int EmployeeId = 0;

 param.Add("@EmployeeId", employees.EmployeeID, null, ParameterDirection.Output);
 param.Add("@Title", employees.Title);
 param.Add("@TitleOfCourtesy", employees.TitleOfCourtesy);
 param.Add("@FirstName", employees.FirstName);
 param.Add("@LastName", employees.LastName);
 param.Add("@Address", employees.Address);
 param.Add("@City", employees.City);
 param.Add("@Region", employees.Region);
 param.Add("@PostalCode", employees.PostalCode);
 param.Add("@HomePhone", employees.HomePhone);
 param.Add("@Country", employees.Country);

 try
 {
 SqlMapper.Execute(_connectionFactory.GetConnection,
 procName, param, commandType: CommandType.StoredProcedure);

 EmployeeId = param.Get<int>("@EmployeeId");
 }
 finally
 {
 _connectionFactory.CloseConnection();
 }

 return EmployeeId;
 }
The Dapper's (SQLMapper) Execute method takes connection object, SP name, parameters and run's it to save the employee and return generated EmployeeId.
The UpdateEmployee method does the same operation as Add method but only checking here is how many rows affected. It does Dapper's Execute method with the connection object, SP name etc.
public bool UpdateEmployee(int EmployeeId, Employees employees)
 {
 string procName = "spEmployeeUpdate";
 var param = new DynamicParameters();
 bool IsSuccess = true;

 param.Add("@EmployeeId", EmployeeId, null, ParameterDirection.Input);
 param.Add("@Title", employees.Title);
 param.Add("@TitleOfCourtesy", employees.TitleOfCourtesy);
 param.Add("@FirstName", employees.FirstName);
 param.Add("@LastName", employees.LastName);
 param.Add("@Address", employees.Address);
 param.Add("@City", employees.City);
 param.Add("@Region", employees.Region);
 param.Add("@PostalCode", employees.PostalCode);
 param.Add("@HomePhone", employees.HomePhone);
 param.Add("@Country", employees.Country);

 try
 {
 var rowsAffected = SqlMapper.Execute(_connectionFactory.GetConnection,
 procName, param, commandType: CommandType.StoredProcedure);
 if (rowsAffected <= 0)
 {
 IsSuccess = false;
 }
 }
 finally
 {
 _connectionFactory.CloseConnection();
 }

 return IsSuccess;
 }
The DeleteEmployee method uses Dapper(SQLMapper) Execute method to run a SQL string which is parameterized i.e. EmployeeId is passed on. This approach avoids SQL injection hacks
public bool DeleteEmployee(int employeeId)
 {
 bool IsDeleted = true;
 var SqlQuery = @"DELETE FROM Employees WHERE EmployeeID = @Id";

 using (IDbConnection conn = _connectionFactory.GetConnection)
 {
 var rowsaffected = conn.Execute(SqlQuery, new { Id = employeeId });
 if (rowsaffected <= 0)
 {
 IsDeleted = false;
 }
 }
 return IsDeleted;
 }
It returns Boolean indicating it's success or failure by comparing rows affected return type of Execute method.
In the EmployeesRepository class, the IDNTConnectionFactory implementation is dependency injected into the constructor (DI - Default feature of ASP.NET Core).
DNT.NorthWind.Web - ASP.NET Core MVC project
Till now we created the entities, build the Employee repository to perform the CRUD operation. Now let's create an MVC project in ASP.NET Core to include the Employee Data Access library. Once done with creating the project, add both the libraries into this project. As the data library, we built using database connection string. Create an appsettings.json file, place a connection string to connect to the database.
{
 "ConnectionStrings": {
 "DbConnectionString": "server=localhost\\SQLEXPRESS;Database=Northwind;Trusted_Connection=True;"
 }
 }
An essential part here is, the connection factory and the Employee repository needs to be configured so that ASP.NET Core will DI them at appropriate places and the connection string need to be added. The Options pattern of strongly typed configuration settings is used here.
public void ConfigureServices(IServiceCollection services)
 {
 services.AddMvc();

 services.AddOptions();

 services.Configure<NorthWindConfiguration>(Configuration.GetSection("ConnectionStrings"));

 services.AddTransient<IDNTConnectionFactory, DNTConnectionFactory>();
 services.AddScoped<IEmployeesRepository, EmployeesRepository>();
 }
CRUD in action
Until now we have done the groundwork for getting the back-end work for CRUD work. In the EmployeeController, DI the IEmployeesRepository, call the respective methods.
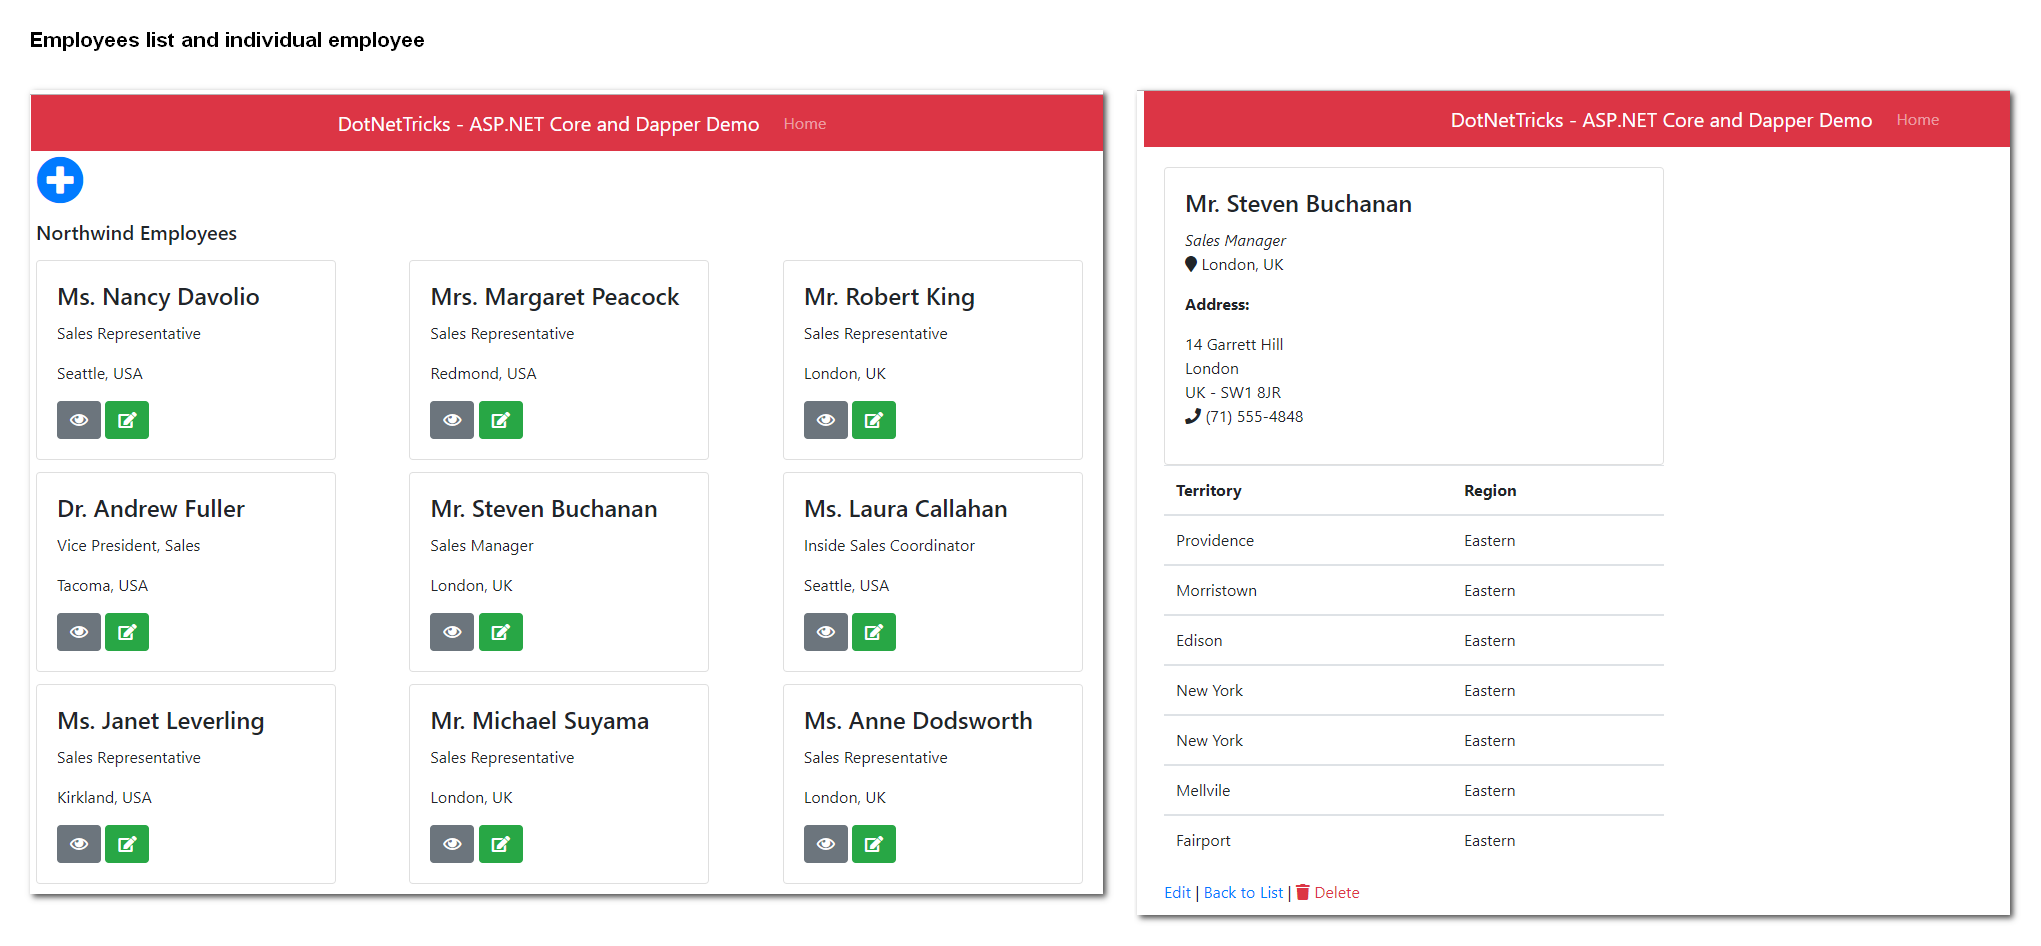
Read Employee
The code snippet shows that we are getting the full list of Employees as well as a employee.
public ActionResult Index()
 {
 var AllEmployees = _employeeRepository.GetEmployeesByQuery();
 return View(AllEmployees);
 }

 // GET: Home/Details/5
 public ActionResult Details(int id)
 {
 var Employee = _employeeRepository.GetEmployeesById(id);
 return View(Employee);
 }
List of Employees and an employee is shown here
Create Employee
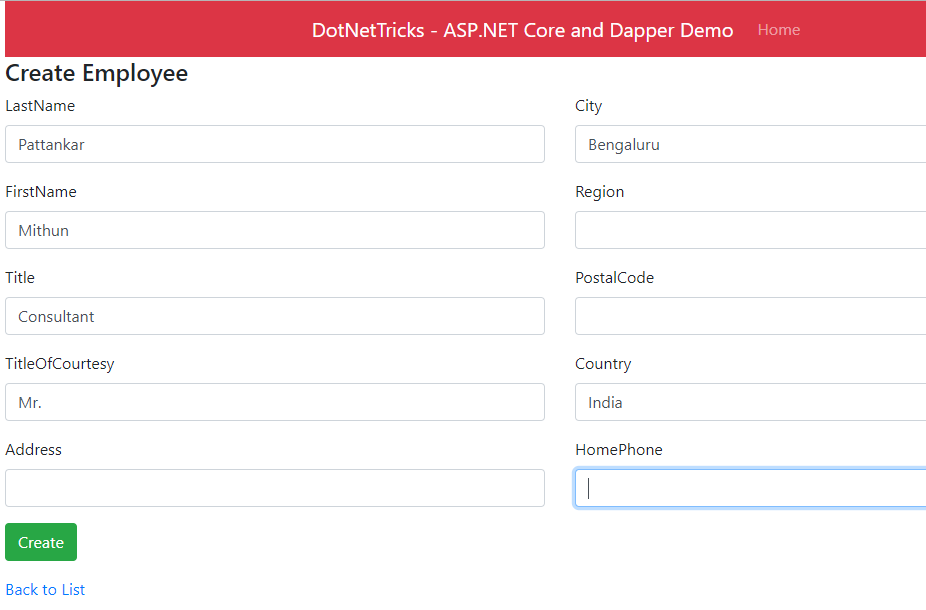
The Create method posts the data collected from MVC form to the repository method and to then add to the database.
[HttpPost]
 [ValidateAntiForgeryToken]
 public ActionResult Edit(int id, Employees data)
 {
 var employeeUpdated = _employeeRepository.UpdateEmployee(id, data);
 if (employeeUpdated)
 {
 return RedirectToAction(nameof(Index));
 }
 else
 {
 return View();
 }
 }
An employee entry form is shown here
Update Employee
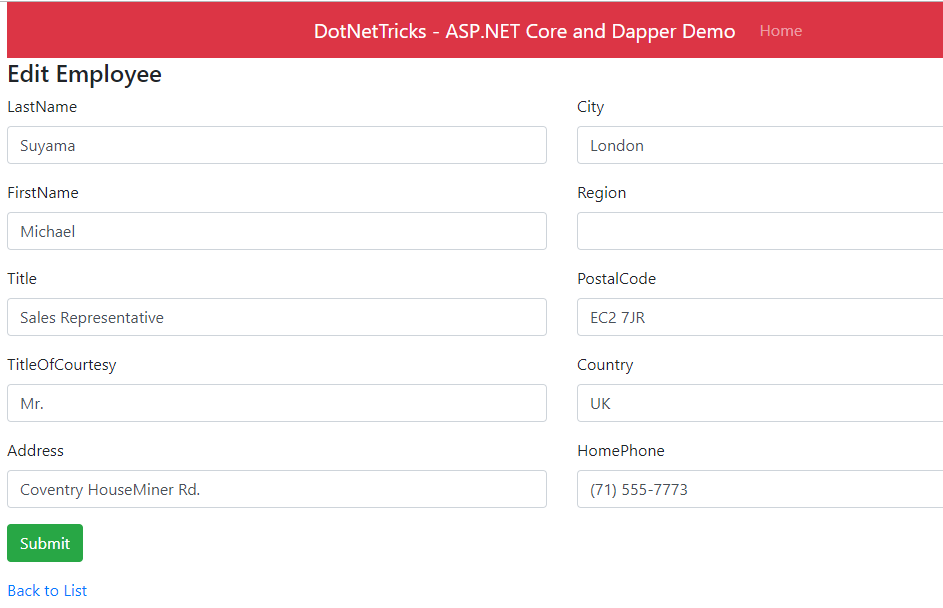
The Update method puts the data collected from MVC form to the repository method and to then updates the database.
[HttpPost]
 [ValidateAntiForgeryToken]
 public ActionResult Edit(int id, Employees data)
 {
 var employeeUpdated = _employeeRepository.UpdateEmployee(id, data);
 if (employeeUpdated)
 {
 return RedirectToAction(nameof(Index));
 }
 else
 {
 return View();
 }
 }
An editing of an employee shown here
Delete Employee
The Delete method calls the repository method and deletes the records in the database by clicking “Delete” from view page.
public ActionResult Delete(int id)
 {
 var deleted = _employeeRepository.DeleteEmployee(id);
 if (deleted)
 {
 return RedirectToAction(nameof(Index));
 }
 else
 {
 return View();
 }
 }
Remember to run the NorthWind database script (includes SP's written for this demo) from the data folder in the Data Access library project.
Advantages of Using Dapper
- Dapper is designed in a way that it optimizes and provides high performance making it faster than other ORMs out there.
- It doesn't abstract any SQL queries but it gives an advantage to the developers by letting them write and optimize SQL queries directly.
- Dapper's API is comparatively easier to understand for developers who have freshly started working on it.
- Dapper is compatible with many database providers like SQL Server, MySQL, SQLite, etc.
- It has large number of active users which means you can get many documentations, tutorials and community support for your projects.
Summary
Through this article, we got introduced to Dapper, learned about the advantages and when to use Dapper. We also created entities, data access library using Dapper, integrated it with ASP.NET Core MVC application and ran the application to see Employee CRUD in action of NorthWind database.
Boost your salary by 30% with in-demand ASP.NET Core skills. Join our ASP.NET Core Course now!
FAQs
- Create- It helps in inserting data into a database with the help of SQL Queries or stored procedures.
- Read- It helps in retrieving data from the database with the help of SELECT queries.
- Update/Delete- It helps in updating or deleting existing data in the database with the help of UPDATE or DELETE queries.
- Writing raw SQL queries may lead to risks like SQL injection.
- Dapper provides lesser high level abstractions as compared to other OMRs.
Take our Aspnet skill challenge to evaluate yourself!

In less than 5 minutes, with our skill challenge, you can identify your knowledge gaps and strengths in a given skill.

