27
FebCommand Design Pattern
Understanding the Command Design Pattern
Understanding the Command Design Pattern is a crucial concept in software design. It allows for the encapsulation of a request as an object, enabling parameterization of clients with queues, logs, and operations. This decouples the sender of the request from the receiver, promoting flexibility, reuse, and scalability, which is especially valuable in undo/redo functionalities and transactional systems.
In this design pattern tutorial, we will look at the Command Design Pattern, answering the question "What is the Command Design Pattern?". In "When should I use the Command Design Pattern?" we will also explore examples of the Command Design Pattern in action. Companies using .NET frameworks report 30% faster development with design pattern knowledge. Start our Free .NET Design Patterns Training today!
What is Command Pattern
- The Command Design Pattern is a behavioral design pattern that converts a request into a stand-alone object, allowing clients to be parameterized with different requests, queuing requests, and supporting irreversible activities.
- The Command Pattern wraps a request as an object, separating the sender and recipient.
- Commands can be parameterized, which means that you can create several commands with varying parameters without modifying the invoker.
- It separates the sender (client or invoker) from the receiver (object that performs the operation), allowing for greater flexibility and extension.
- By saving the state or reverse commands, the pattern provides undoable operations (an action or a series of actions that can be reversed or undone in a system).
Command Pattern - UML Diagram & Implementation
The UML class diagram for the implementation of the command design pattern is given below:
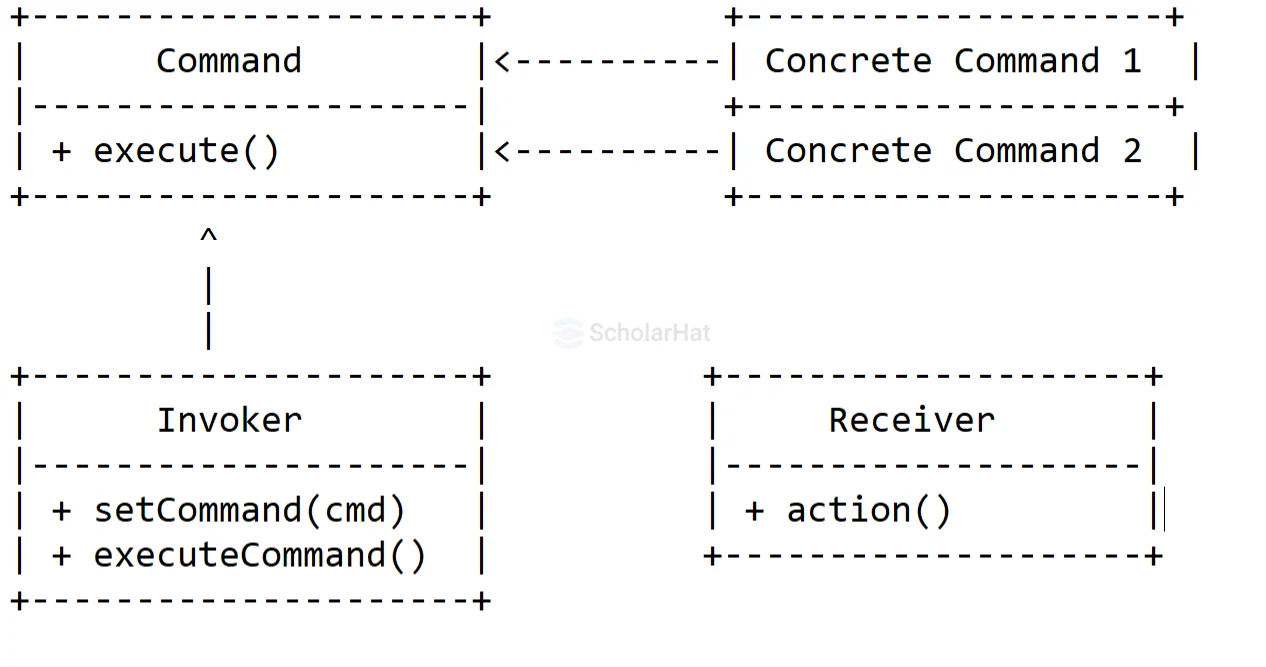
The classes, interfaces, and objects in the above UML class diagram are as follows:
1. Command Interface
- The Command Interface functions similarly to a rulebook for all command types.
- It declares a common function, execute(), which ensures that each concrete command understands how to do its own operation.
- It establishes the standard for all commands, allowing the remote control to manage and execute various tasks without having to know the specifics of each command.
2. Concrete Command Classes
- Concrete Command Classes are specific commands, such as turning on the television or altering the audio volume.
- Each class contains the details of a certain action.
- These classes serve as executable instructions that the remote control can activate without thinking about the specifics of how each command performs its function.
3. Invoker (Remote Control)
- The Invoker, commonly a remote control, is in charge of beginning command execution.
- It references a command but does not go into detail on how each command works.
- It functions similarly to a button.
- The remote control's purpose is to coordinate and execute commands without becoming engaged in the complexity of individual activities.
4. Receiver (Devices)
- The Receiver is the device that knows how to carry out the actual function specified by a command.
- It could be a television, stereo, or another device. Receivers understand the exact duties specified in commands.
- If a command specifies "turn on," the Receiver (device) understands exactly how to carry out that operation.
- The Receiver-Command connection divides responsibilities, making it simple to add new devices or commands without interfering with existing features.
Command Design Pattern Real-Life Example
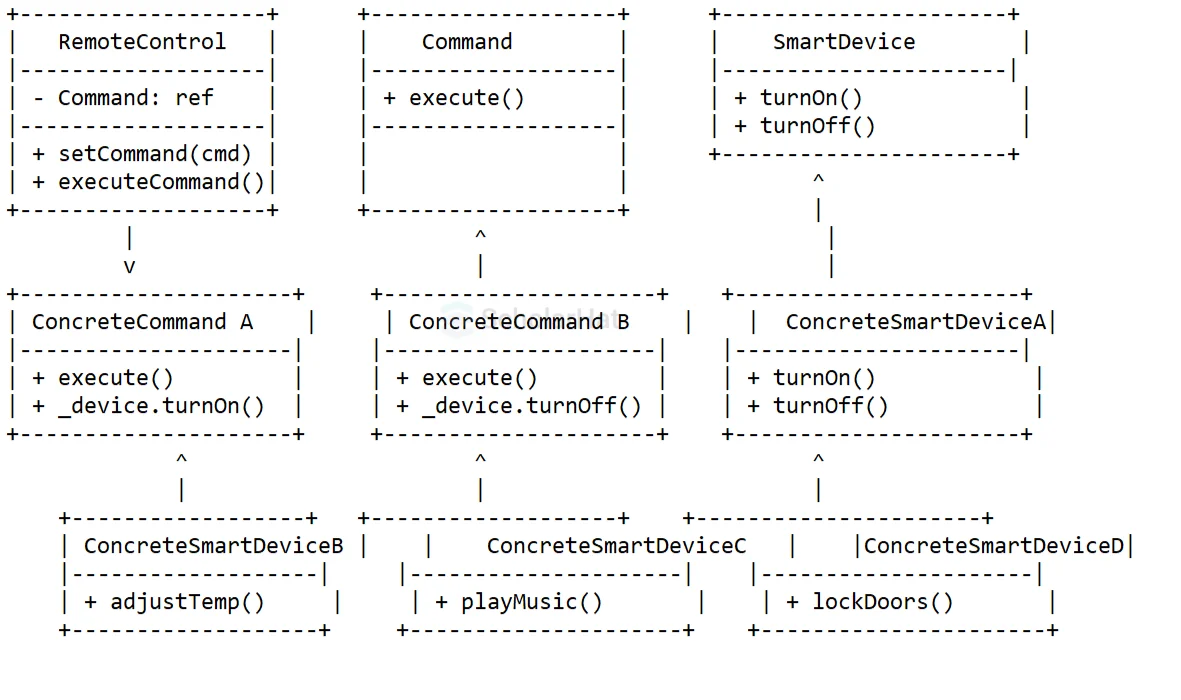
This diagram illustrates the Command Design Pattern within a smart home automation system. Here is a breakdown of the elements:
RemoteControl Class
- Acts as the invoker that holds a reference to command objects.
- It triggers the execution of commands without needing to know the specifics of each action.
- It provides a method for setting and executing commands, like turning on lights or adjusting the thermostat.
SmartDevice Interface
- Defines the interface for all smart devices, such as lights, thermostats, or speakers.
- It ensures that each device can respond to a command in a standardized way.
- It specifies the operations a device should perform, such as turning on or off.
ConcreteSmartDevice A and B Classes
- These are the specific implementations of the SmartDevice interface, like SmartLight or SmartThermostat.
- They encapsulate the actual actions, such as switching the light on or adjusting the temperature.
- They respond to commands initiated by the RemoteControl.
Command Interface
- Serves as the blueprint for creating various commands.
- It specifies the execute() method that all concrete commands must implement.
- It ensures that each command follows the same structure, making it easier to handle diverse actions.
ConcreteCommand Classes
- These classes represent specific commands, such as turning on a light or adjusting the thermostat.
- Each class encapsulates the logic for executing a particular operation on the smart device.
- The execute() method is implemented to invoke the appropriate action on the device.
Key Points
- The Command Design Pattern is useful because it decouples the invoker (remote control) from the receiver (smart devices).
- It makes it easy to add or modify commands without altering the RemoteControl or device classes.
- It provides flexibility in implementing additional features like undo/redo operations or logging command history.
- It's ideal for situations where you want to handle multiple operations without tightly coupling the requester to the device logic.
Example
using System;

// Command Interface
public interface ICommand
{
    void Execute();
}

// Receiver (SmartDevice Interface)
public interface ISmartDevice
{
    void TurnOn();
    void TurnOff();
}

// ConcreteSmartDevice A - Smart Light
public class SmartLight : ISmartDevice
{
    public void TurnOn()
    {
        Console.WriteLine("Smart Light is turned ON.");
    }

    public void TurnOff()
    {
        Console.WriteLine("Smart Light is turned OFF.");
    }
}

// ConcreteSmartDevice B - Smart Thermostat
public class SmartThermostat : ISmartDevice
{
    public void TurnOn()
    {
        Console.WriteLine("Thermostat is set to heating mode.");
    }

    public void TurnOff()
    {
        Console.WriteLine("Thermostat is set to cooling mode.");
    }
}

// Concrete Command for Turning On
public class TurnOnCommand : ICommand
{
    private readonly ISmartDevice _device;

    public TurnOnCommand(ISmartDevice device)
    {
        _device = device;
    }

    public void Execute()
    {
        _device.TurnOn();
    }
}

// Concrete Command for Turning Off
public class TurnOffCommand : ICommand
{
    private readonly ISmartDevice _device;

    public TurnOffCommand(ISmartDevice device)
    {
        _device = device;
    }

    public void Execute()
    {
        _device.TurnOff();
    }
}

// Invoker (Remote Control)
public class RemoteControl
{
    private ICommand _command;

    public void SetCommand(ICommand command)
    {
        _command = command;
    }

    public void ExecuteCommand()
    {
        _command.Execute();
    }
}

// Client
public class Client
{
    public static void Main(string[] args)
    {
        // Create Receivers
        ISmartDevice light = new SmartLight();
        ISmartDevice thermostat = new SmartThermostat();

        // Create Commands
        ICommand lightOnCommand = new TurnOnCommand(light);
        ICommand lightOffCommand = new TurnOffCommand(light);
        ICommand thermostatOnCommand = new TurnOnCommand(thermostat);
        ICommand thermostatOffCommand = new TurnOffCommand(thermostat);

        // Create Invoker (Remote Control)
        RemoteControl remoteControl = new RemoteControl();

        // Turn On Smart Light
        remoteControl.SetCommand(lightOnCommand);
        remoteControl.ExecuteCommand();

        // Turn Off Smart Light
        remoteControl.SetCommand(lightOffCommand);
        remoteControl.ExecuteCommand();

        // Set Thermostat to Heating Mode
        remoteControl.SetCommand(thermostatOnCommand);
        remoteControl.ExecuteCommand();

        // Set Thermostat to Cooling Mode
        remoteControl.SetCommand(thermostatOffCommand);
        remoteControl.ExecuteCommand();
    }
}
interface Command {
    void execute();
}

interface SmartDevice {
    void turnOn();
    void turnOff();
}

class SmartLight implements SmartDevice {
    public void turnOn() {
        System.out.println("Smart Light is turned ON.");
    }

    public void turnOff() {
        System.out.println("Smart Light is turned OFF.");
    }
}

class SmartThermostat implements SmartDevice {
    public void turnOn() {
        System.out.println("Thermostat is set to heating mode.");
    }

    public void turnOff() {
        System.out.println("Thermostat is set to cooling mode.");
    }
}

class TurnOnCommand implements Command {
    private final SmartDevice device;

    public TurnOnCommand(SmartDevice device) {
        this.device = device;
    }

    public void execute() {
        device.turnOn();
    }
}

class TurnOffCommand implements Command {
    private final SmartDevice device;

    public TurnOffCommand(SmartDevice device) {
        this.device = device;
    }

    public void execute() {
        device.turnOff();
    }
}

class RemoteControl {
    private Command command;

    public void setCommand(Command command) {
        this.command = command;
    }

    public void executeCommand() {
        command.execute();
    }
}

public class Client {
    public static void main(String[] args) {
        // Create Receivers
        SmartDevice light = new SmartLight();
        SmartDevice thermostat = new SmartThermostat();

        // Create Commands
        Command lightOnCommand = new TurnOnCommand(light);
        Command lightOffCommand = new TurnOffCommand(light);
        Command thermostatOnCommand = new TurnOnCommand(thermostat);
        Command thermostatOffCommand = new TurnOffCommand(thermostat);

        // Create Invoker (Remote Control)
        RemoteControl remoteControl = new RemoteControl();

        // Turn On Smart Light
        remoteControl.setCommand(lightOnCommand);
        remoteControl.executeCommand();

        // Turn Off Smart Light
        remoteControl.setCommand(lightOffCommand);
        remoteControl.executeCommand();

        // Set Thermostat to Heating Mode
        remoteControl.setCommand(thermostatOnCommand);
        remoteControl.executeCommand();

        // Set Thermostat to Cooling Mode
        remoteControl.setCommand(thermostatOffCommand);
        remoteControl.executeCommand();
    }
}
class ICommand:
    def execute(self):
        pass

class ISmartDevice:
    def turn_on(self):
        pass

    def turn_off(self):
        pass

class SmartLight(ISmartDevice):
    def turn_on(self):
        print("Smart Light is turned ON.")

    def turn_off(self):
        print("Smart Light is turned OFF.")

class SmartThermostat(ISmartDevice):
    def turn_on(self):
        print("Thermostat is set to heating mode.")

    def turn_off(self):
        print("Thermostat is set to cooling mode.")

class TurnOnCommand(ICommand):
    def __init__(self, device: ISmartDevice):
        self.device = device

    def execute(self):
        self.device.turn_on()

class TurnOffCommand(ICommand):
    def __init__(self, device: ISmartDevice):
        self.device = device

    def execute(self):
        self.device.turn_off()

class RemoteControl:
    def __init__(self):
        self.command = None

    def set_command(self, command: ICommand):
        self.command = command

    def execute_command(self):
        self.command.execute()

# Client
light = SmartLight()
thermostat = SmartThermostat()

light_on_command = TurnOnCommand(light)
light_off_command = TurnOffCommand(light)
thermostat_on_command = TurnOnCommand(thermostat)
thermostat_off_command = TurnOffCommand(thermostat)

remote_control = RemoteControl()

# Turn On Smart Light
remote_control.set_command(light_on_command)
remote_control.execute_command()

# Turn Off Smart Light
remote_control.set_command(light_off_command)
remote_control.execute_command()

# Set Thermostat to Heating Mode
remote_control.set_command(thermostat_on_command)
remote_control.execute_command()

# Set Thermostat to Cooling Mode
remote_control.set_command(thermostat_off_command)
remote_control.execute_command()
interface ICommand {
    execute(): void;
}

interface ISmartDevice {
    turnOn(): void;
    turnOff(): void;
}

class SmartLight implements ISmartDevice {
    turnOn() {
        console.log("Smart Light is turned ON.");
    }

    turnOff() {
        console.log("Smart Light is turned OFF.");
    }
}

class SmartThermostat implements ISmartDevice {
    turnOn() {
        console.log("Thermostat is set to heating mode.");
    }

    turnOff() {
        console.log("Thermostat is set to cooling mode.");
    }
}

class TurnOnCommand implements ICommand {
    private device: ISmartDevice;

    constructor(device: ISmartDevice) {
        this.device = device;
    }

    execute() {
        this.device.turnOn();
    }
}

class TurnOffCommand implements ICommand {
    private device: ISmartDevice;

    constructor(device: ISmartDevice) {
        this.device = device;
    }

    execute() {
        this.device.turnOff();
    }
}

class RemoteControl {
    private command: ICommand;

    setCommand(command: ICommand) {
        this.command = command;
    }

    executeCommand() {
        this.command.execute();
    }
}

// Client
const light = new SmartLight();
const thermostat = new SmartThermostat();

const lightOnCommand = new TurnOnCommand(light);
const lightOffCommand = new TurnOffCommand(light);
const thermostatOnCommand = new TurnOnCommand(thermostat);
const thermostatOffCommand = new TurnOffCommand(thermostat);

const remoteControl = new RemoteControl();

// Turn On Smart Light
remoteControl.setCommand(lightOnCommand);
remoteControl.executeCommand();

// Turn Off Smart Light
remoteControl.setCommand(lightOffCommand);
remoteControl.executeCommand();

// Set Thermostat to Heating Mode
remoteControl.setCommand(thermostatOnCommand);
remoteControl.executeCommand();

// Set Thermostat to Cooling Mode
remoteControl.setCommand(thermostatOffCommand);
remoteControl.executeCommand();
class Command {
    execute() {}
}

class SmartLight {
    turnOn() {
        console.log("Smart Light is turned ON.");
    }

    turnOff() {
        console.log("Smart Light is turned OFF.");
    }
}

class SmartThermostat {
    turnOn() {
        console.log("Thermostat is set to heating mode.");
    }

    turnOff() {
        console.log("Thermostat is set to cooling mode.");
    }
}

class TurnOnCommand extends Command {
    constructor(device) {
        super();
        this.device = device;
    }

    execute() {
        this.device.turnOn();
    }
}

class TurnOffCommand extends Command {
    constructor(device) {
        super();
        this.device = device;
    }

    execute() {
        this.device.turnOff();
    }
}

class RemoteControl {
    setCommand(command) {
        this.command = command;
    }

    executeCommand() {
        this.command.execute();
    }
}

// Client
const light = new SmartLight();
const thermostat = new SmartThermostat();

const lightOnCommand = new TurnOnCommand(light);
const lightOffCommand = new TurnOffCommand(light);
const thermostatOnCommand = new TurnOnCommand(thermostat);
const thermostatOffCommand = new TurnOffCommand(thermostat);

const remoteControl = new RemoteControl();

// Turn On Smart Light
remoteControl.setCommand(lightOnCommand);
remoteControl.executeCommand();

// Turn Off Smart Light
remoteControl.setCommand(lightOffCommand);
remoteControl.executeCommand();

// Set Thermostat to Heating Mode
remoteControl.setCommand(thermostatOnCommand);
remoteControl.executeCommand();

// Set Thermostat to Cooling Mode
remoteControl.setCommand(thermostatOffCommand);
remoteControl.executeCommand();
Output
Smart Light is turned ON.
Smart Light is turned OFF.
Thermostat is set to heating mode.
Thermostat is set to cooling mode.
Explanation
- This code demonstrates the Command pattern with smart devices.
- It is where the ICommand interface defines the command structure, and ISmartDevice represents devices like a smart light and thermostat.
- The TurnOnCommand and TurnOffCommand execute actions for these devices.
- The RemoteControl class acts as the invoker, allowing the client to execute commands to turn devices on or off.
When to use the Command Design Pattern
- Undo/redo functionality:It is ideal when you need to implement undo/redo actions, allowing you to store and reverse commands easily.
- Parameterizing actions: It is useful when you want to pass actions (commands) as parameters to other objects, enabling flexible system design.
- Queueing operations: This is effective when commands need to be queued or logged for later execution, such as in task scheduling systems.
- Encapsulating requests: It is helpful when you need to encapsulate a request as an object, making it easier to manage, log, or execute actions at a later time.
- Simple actions: It is unnecessary when actions are straightforward and do not need to be encapsulated into objects or queued for later execution.
- Limited flexibility: It is overkill if your application does not require extensive undo/redo functionality or complex request handling.
- Increased complexity: It is better to avoid when the pattern adds excessive complexity without significant benefits, especially for small, simple tasks.
Summary
The Command Design Pattern encapsulates requests as objects, allowing for parameterization of clients with different requests and supporting undoable operations. It promotes loose coupling between the sender and receiver of commands and is ideal for implementing queues, logging, and transactional systems. However, it may not be suitable for simple operations due to the added complexity.
With 20,000+ Software Architect jobs open in India right now, certified pros are in high demand. Secure yours with our .NET Software Architect Training—start building your future!
FAQs
Take our Designpatterns skill challenge to evaluate yourself!

In less than 5 minutes, with our skill challenge, you can identify your knowledge gaps and strengths in a given skill.

