


27
JunKubernetes Load Balancer - Types, Setup, & Best Practices
24 Jun 2025
Beginner
10 Views
36 min read

Learn with an interactive course and practical hands-on labs
Free Docker Online Course with Certificate - Beginner Level
A Kubernetes Load Balancer distributes incoming network traffic across multiple application instances (pods) within a cluster, ensuring reliability, high availability, and optimal performance. Acting as a smart traffic manager, it routes requests to healthy pods and prevents any single instance from being overwhelmed. Load balancing in Kubernetes can be achieved through external cloud provider load balancers or with Ingress controllers for advanced routing and traffic control.
In this Kubernetes tutorial, we will explore how the Kubernetes LoadBalancer works, when to use it, and how to set it up in your cluster. Whether you're deploying a web app or an API, understanding load balancing in Kubernetes is key to building scalable cloud-native apps.
💡 Bonus: Before diving deep into Kubernetes, it's highly recommended to understand containerization basics. Start with our Docker Free Course With Certification to build a solid foundation!
Understanding Kubernetes Load Balancer
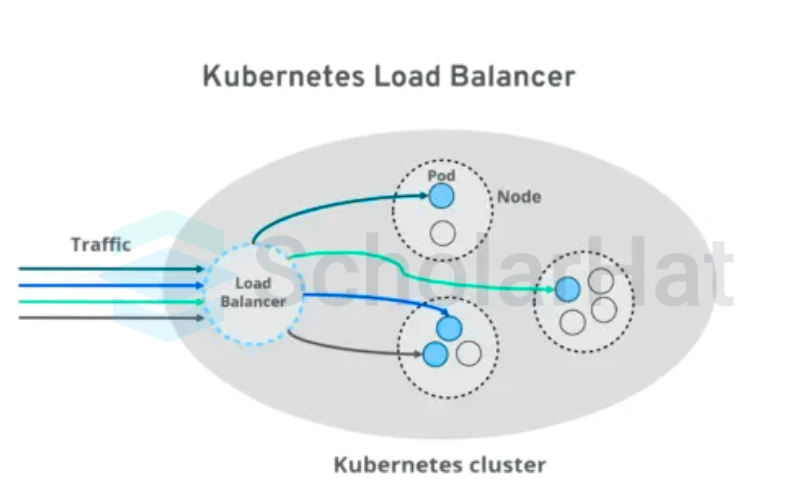
You know when you've got multiple servers running your app, and suddenly one gets slammed while others are barely working? That's where a Kubernetes load balancer comes in. It's like having a really smart traffic manager that makes sure no single server gets overloaded. When requests come in, it automatically spreads them out evenly across all your healthy pods. If one pod goes down, the load balancer notices right away and stops sending traffic its way, no manual fixing required.
The beauty is how hands-off it is once you've got it set up. Your cloud provider (whether it's AWS, Google Cloud, or Azure) hooks it up with its own IP address, so users can reach your app without you needing to play network engineer. When more people start using your app, the load balancer handles the extra traffic without breaking a sweat. And when things quiet down, it scales back automatically. It's one of those things that just works in the background to keep your app running smoothly.
Setting one up isn't nearly as complicated as you might think, just a few lines in your configuration file, and you're good to go. Once it's running, you'll wonder how you ever managed without it.
| Read More: What's the Difference Between AWS vs. Azure vs. Google Cloud? |
What is a Kubernetes Load Balancer?
A Kubernetes Load Balancer helps you send traffic to your app when it's running inside a cluster. When someone tries to reach your app from the internet, the Load Balancer makes sure the request goes to one of the working parts (called pods) of your app. You don’t have to worry about which pod is free it picks one for you automatically, helping your app handle more users without crashing. It’s like having a smart traffic manager that knows where to send each car to avoid traffic jams.
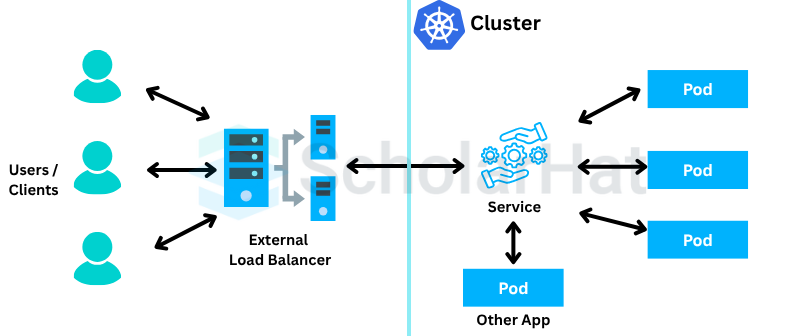
In the cloud, Kubernetes uses services like AWS ELB, Azure Load Balancer, or GCP’s load balancer to handle this. These are set up to work at the network level. If you want more control, like sending traffic based on URLs or hostnames, you can use something called Ingress with an Ingress Controller. These let you pick smarter rules for routing, like “send user A to pod 1 and user B to pod 2.” You can also choose how traffic gets balanced by round-robin, least connections, or other smart ways, depending on what your app needs.
Role of load balancing in Kubernetes clusters.
Here are the key roles of the Kubernetes LoadBalancer:
- You are using load balancing to share traffic across all healthy pods running your app.
- It makes sure no single pod gets too much traffic.
- When users send requests, the load balancer chooses which pod will handle each one.
- This helps your app run smoothly, even when many people are using it.
- Load balancing is also helpful for high availability.
- If one pod is down, the load balancer stops sending traffic to it.
- You are still getting service from the other working pods.
- Your app stays up and running without you fixing things right away.
Key Components of a Kubernetes Load Balancer
Here are the key components of a Kubernetes Load Balancer that work together to manage and route traffic smoothly inside your cluster:
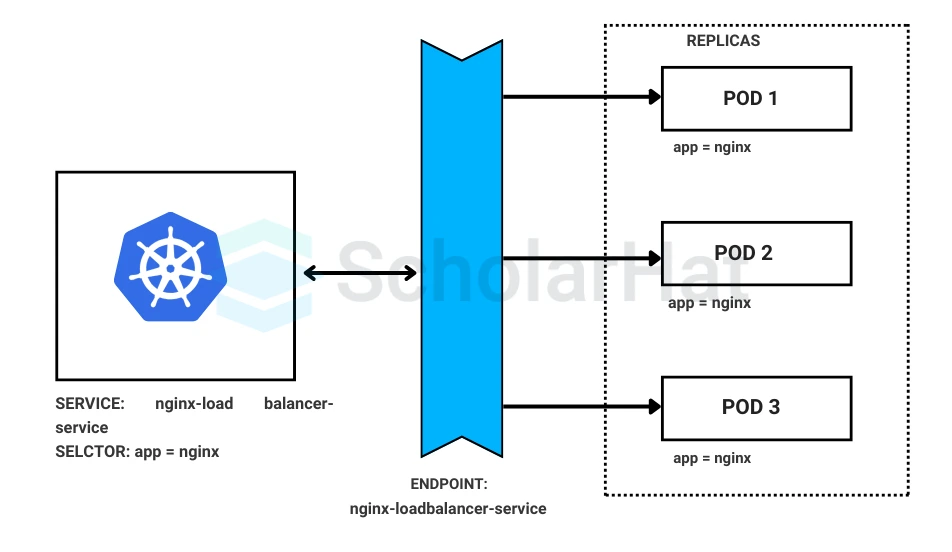
- Services: In Kubernetes, a Service helps you connect to your app. When you use a LoadBalancer service, it gives your app a public IP so people can reach it from outside. It also sends the traffic to the right pods inside the cluster.
- Ingress Controllers: An Ingress Controller is like a smart traffic gate. It lets you set rules like “send traffic from this website to that app.” It's great when you want to handle things like URLs, HTTPS, or multiple apps using one IP.
- Pods: Pods are where your app actually runs. You can think of them as small boxes holding your app. The load balancer sends traffic to these pods so your app can respond to users.
- Nodes : Nodes are the computers (real or virtual) that run the pods. The load balancer connects to these nodes and makes sure traffic reaches the right pod. It helps keep everything organized and working smoothly.
Why Do You Need a Kubernetes Load Balancer?
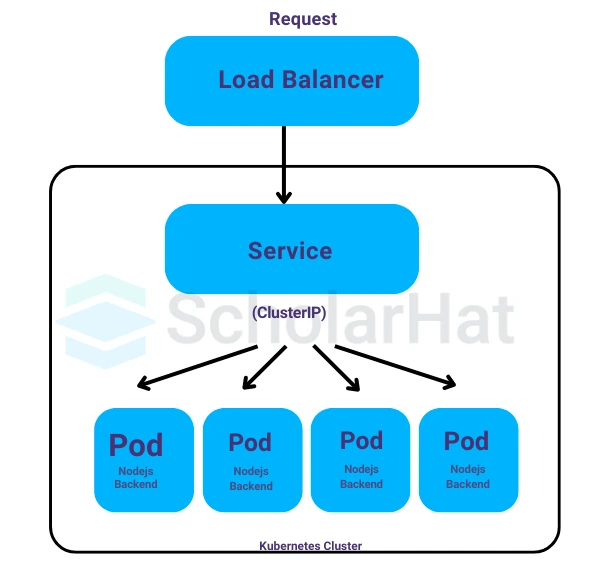
You need a Kubernetes Load Balancer to make sure your app can handle user traffic smoothly and stay available. When many users try to access your app, the load balancer shares the traffic across multiple pods so that no single pod gets overwhelmed. This helps your app stay fast and responsive.
It also helps with reliability. If one pod stops working, the load balancer sends traffic to the healthy ones without any user noticing. So, it keeps your app running even if something breaks behind the scenes. In short, it makes your app stronger, faster, and always ready for users.
Benefits of load balancing in Kubernetes
Here are the benefits of load balancing in Kubernetes that help your app stay fast, reliable, and ready for users.
- Better performance: When many users are in the app at the same time, the load balancer spreads the traffic so your app doesn’t slow down.
- High availability: If one part of the app (a pod) stops working, the load balancer sends users to the healthy ones. Your app stays up and running.
- Scalability: As your app grows, you are able to add more pods. The load balancer will include them and keep everything running smoothly.
- Less downtime: It helps avoid putting too much traffic on one pod. This lowers the chance of crashes or slow response.
- Smart routing: When you use an Ingress controller, you are able to set rules that send traffic to the right place based on the URL or hostname.
Ensuring high availability and fault tolerance
Here’s how load balancing helps in ensuring high availability and fault tolerance in Kubernetes.
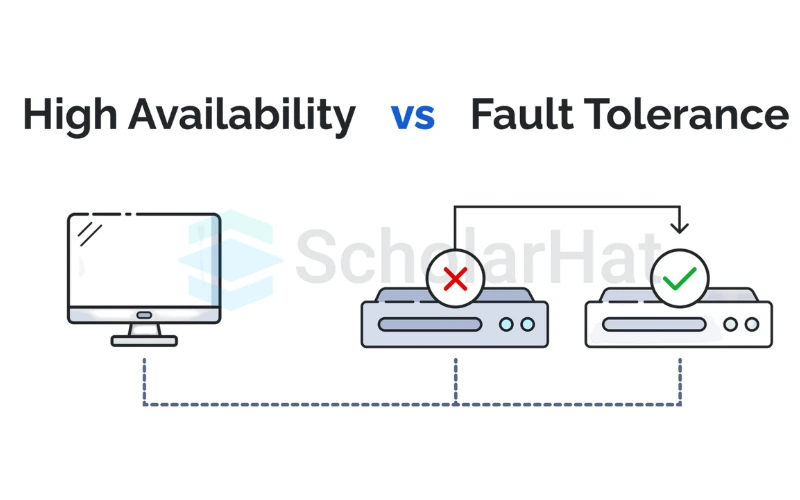
In Kubernetes, high availability means your app stays up and running even if something goes wrong. If one pod fails, the load balancer sends traffic to the healthy pods, so you don’t have to worry about your app going down. Your users are still able to use it without any problems.
Fault tolerance helps your app keep working even if something breaks. If one pod stops, the load balancer quickly redirects traffic to the other working pods. This keeps your app stable and ensures your users don’t face interruptions.
Read More: |
Scalability and traffic distribution
Scalability in Kubernetes means you can grow your app as needed. As your app gets more users, you can add more pods, and the load balancer will automatically start sending traffic to the new pods. This ensures your app can handle more users without slowing down.
Traffic distribution is about making sure the incoming traffic is spread evenly across all the pods. The load balancer checks how many requests each pod is handling and makes sure no pod gets overwhelmed. This way, your app stays fast and responsive, even when traffic increases.
Types of Kubernetes Load Balancers
1. Internal Load Balancer
An Internal Load Balancer (ILB) distributes traffic within a Kubernetes cluster, but only routes traffic internally, keeping it private. It’s useful for services that need to communicate securely within the cluster, without exposing them to the outside world.
Use Cases:
- Microservices Communication: Routes traffic between internal services, like microservices.
- Private Services: Keeps database or cache services accessible only to other internal services.
- Separation of Traffic: Keeps internal and external traffic separate for better security.
2. External Load Balancer
ILBs route traffic to the appropriate pod within the cluster based on set rules. Using a ClusterIP service, it assigns a private IP that ensures traffic stays within the cluster. This keeps internal traffic secure and helps distribute load evenly across pods.
An External Load Balancer distributes traffic from outside the Kubernetes cluster to services within the cluster. It makes your services accessible to external users, acting as a gateway between external traffic and your app’s internal resources.
Use Cases:
- Public-Facing Applications: Expose web applications, APIs, or other services to the internet.
- Scaling Web Traffic: Helps handle increased traffic by directing requests to multiple pods running the same service.
- High Availability: Ensures your app stays online by routing traffic to healthy instances and avoiding down pods.
3. Ingress Controllers
External Load Balancers route incoming requests from outside the cluster to the right services inside the cluster. When users access the service through a public IP or DNS, the load balancer directs the request to an available pod based on the chosen load balancing strategy (like round-robin or least connections). This helps distribute traffic evenly and ensures high availability by rerouting traffic if a pod is down.
An Ingress Controller is a component in Kubernetes that manages external access to services within the cluster, typically via HTTP or HTTPS. It acts as a gateway that routes external traffic to the right services based on rules you define in an Ingress resource. Think of it as a reverse proxy that helps control and manage how external users access your services inside the cluster.
Popular Ingress Controllers
- NGINX Ingress: One of the most widely used ingress controllers, NGINX can handle complex routing, SSL termination, load balancing, and more. It’s known for its performance and flexibility in managing traffic.
- Traefik: A dynamic ingress controller that automatically discovers services and can handle routing for microservices applications. It is known for being easy to configure and integrates well with modern cloud-native apps.
- HAProxy: A high-performance ingress controller that provides load balancing and HTTP routing. It is particularly useful in environments where high availability and minimal latency are critical.
4. NodePort vs. LoadBalancer vs. Ingress
Here’s a simple comparison of NodePort, LoadBalancer, and Ingress to help you understand their differences:
| Service Type | Definition | Use Case |
| NodePort | You expose a service on a static port across all nodes in the cluster. It allows external traffic to reach the service by accessing any node’s IP at the assigned port. | Simple setups where you want to expose a service without a cloud provider. Not ideal for production with many services. |
| LoadBalancer | Automatically provisions an external load balancer (usually cloud provider–specific) that routes traffic to the services in the cluster and provides a public IP. | Ideal for production environments where high availability and load balancing are required, especially in cloud environments. |
| Ingress | Provides HTTP and HTTPS routing rules (URL‑based routing, SSL termination) to manage external access to services within the cluster. | Best for complex applications with multiple services, especially when you want fine‑grained control over routing and SSL management. |
Setting Up a Load Balancer in Kubernetes
1. Prerequisites
- Kubernetes cluster setup: Make sure you have Kubernetes running (like Minikube, or a cloud provider like AWS or GCP).
- Understanding network configurations: You should know about Services and how apps talk to each other inside the cluster
2. Setting Up an External Load Balancer
Here's how you do it:
- You make a Service in Kubernetes and set the type to LoadBalancer.
- If you're using a cloud provider, it will give you a public IP for your app.
- This lets people on the internet access your app directly.
Here's an example YAML file:
apiVersion: v1
kind: Service
metadata:
  name: my-app-service
spec:
  selector:
    app: my-app
  ports:
    - protocol: TCP
      port: 80
      targetPort: 8080
  type: LoadBalancer
3. Setting Up an Internal Load Balancer
Here’s how to keep it inside your network:
- Still use type LoadBalancer, but add an annotation to make it internal only.
- This way, the app is only reachable from inside your private network.
Here’s a sample for AWS:
apiVersion: v1
kind: Service
metadata:
  name: internal-service
  annotations:
    service.beta.kubernetes.io/aws-load-balancer-internal: "true"
spec:
  selector:
    app: my-app
  ports:
    - protocol: TCP
      port: 80
      targetPort: 8080
  type: LoadBalancer
4. Using Ingress to Control Traffic
Set up Nginx Ingress like this:
- You can install it using Helm (a Kubernetes tool).
- This Ingress controller helps manage traffic to different apps by using rules.
Run this command:
helm repo add ingress-nginx https://kubernetes.github.io/ingress-nginx
helm install nginx-ingress ingress-nginx/ingress-nginx
Now let’s add HTTPS (SSL):
- You create a secret in Kubernetes with your SSL certificate and key.
- Then, you point to this secret in your Ingress file to enable HTTPS.
Here’s a simple Ingress example:
apiVersion: networking.k8s.io/v1
kind: Ingress
metadata:
  name: my-app-ingress
  annotations:
    nginx.ingress.kubernetes.io/ssl-redirect: "true"
spec:
  tls:
  - hosts:
      - myapp.example.com
    secretName: myapp-tls
  rules:
  - host: myapp.example.com
    http:
      paths:
      - path: /
        pathType: Prefix
        backend:
          service:
            name: my-app-service
            port:
              number: 80
Integration with Cloud Providers
Load balancers act like traffic cops for your servers, directing visitors so no single server gets overloaded. Here's how they work across different cloud services:
1. AWS Load Balancers
Amazon offers three main types:
- ALB (Application Load Balancer):Perfect for websites and web apps
- NLB (Network Load Balancer) :Handles massive traffic with minimal delay
- Classic Load Balancer :Older option for basic needs
Configuration tips:
- Turn on health checks to avoid sending traffic to broken servers
- ALB is your best bet for most websites
- Use NLB for real-time apps like gaming or trading platforms
2. Google Cloud Load Balancing
Works seamlessly with Google Kubernetes (GKE):
- Automatically finds and uses healthy containers
- Can route traffic based on website addresses
- Shows you performance metrics in Google's dashboard
Best practices:
- Set up proper access rules
- Add CDN for faster content delivery worldwide
- Let the system automatically add more servers when it is busy
3. Azure Load Balancers
Azure Load Balancers Microsoft's options include:
- Public Load Balancer: For websites that everyone accesses
- Internal Load Balancer: For company internal tools
- Gateway Load Balancer: For secure network connections
Integration steps:
- Choose the right type for what you're building
- Set up regular server health checks
- Configure automatic scaling
Monitoring and Troubleshooting Load Balancers
A Kubernetes load balancer routes traffic to your pods, but issues like missing IPs or misrouted requests can occur. Use kubectl commands, logs, and health checks to monitor and fix problems quickly
1. Tools for Monitoring
Prometheus and Grafana
- Prometheus collects real-time metrics (like traffic spikes or slow responses).
- Grafana turns those numbers into easy-to-read dashboards.
- Best for: Custom alerts and deep performance tracking
Cloud provider monitoring tools
- AWS: CloudWatch → Tracks ELB health, errors, and traffic.
- Google Cloud: Operations Suite → Monitors GKE & L7 load balancers.
- Azure: Monitor → Checks LB performance and backend health.
- Best for: Quick setup with no extra tools needed.
2. Common Issues and Solutions
Pod scheduling issues:
Symptoms:
- Containers crash or don’t start.
- "No healthy backends" errors.
Quick Fixes:
- Check Kubernetes events: kubectl get events
- Adjust CPU/memory limits in your deployments.
Load balancing errors:
Symptoms:
- One server gets all the traffic.
- Random 502/504 errors.
Quick Fixes:
- Verify health checks (are they too strict?).
- Check session persistence (sticky sessions might be misconfigured)
Network Problems:
Symptoms:
- Timeouts or "connection refused" errors.
- Slow responses between services.
Quick Fixes:
- Test connectivity: ping, traceroute, or telnet.
- Review security groups/firewalls.
Monitoring in Kubernetes load balancer
You get real‑time insights into traffic patterns and pod health, so you can keep your app performing at its best. By watching key metrics, you’ll catch failures and bottlenecks before they ever affect your users.
Monitoring with Prometheus & Grafana
Key metrics: latency, error rates, connection churn.
| Watch This | Why It Matters | When to Worry |
| Response Time | Slow speeds frustrate users | Over 500ms regularly |
| Error Rate | Broken pages hurt trust | More than 0.5% errors |
| Connection Drops | Frequent disconnects annoy users | Sudden unusual spikes |
| Active Users | Too many users slow everything down | Approaching maximum capacity |
Real-World Use Cases
Imagine your services effortlessly handling a sudden rush of users during a big product launch or flash sale no downtime, no slowdowns. Real-world load balancing keeps your cluster resilient and responsive, whether you’re streaming live events, processing payments, or serving millions of API requests.
1. Microservices Architecture with Kubernetes Load Balancer
Challenge: Managing traffic between dozens of microservices efficiently.
Solution: Kubernetes load balancers distribute requests across services while maintaining low latency.
Key Benefits:
- Dynamic Service Discovery: Automatically routes traffic to healthy pods
- Traffic Splitting: A/B testing, canary deployments
- Internal & External Access Control: Secure east-west traffic
Example YAML for AWS NLB (Network Load Balancer):
apiVersion: v1
kind: Service
metadata:
  name: user-service
  annotations:
    service.beta.kubernetes.io/aws-load-balancer-type: "nlb"
spec:
  selector:
    app: user-service
  ports:
    - protocol: TCP
      port: 80
      targetPort: 8080
  type: LoadBalancer
2. High-Availability Scenarios with Kubernetes Load Balancer
Challenge: Preventing downtime in mission-critical applications.
Solution: Kubernetes load balancers provide fault tolerance and global traffic distribution.
Key Benefits:
- Multi-Region Redundancy:Failover across cloud zones
- Health Checks :Automatically removes unhealthy pods
- Global Server Load Balancing (GSLB) :Routes users to the nearest clusters
Use Cases:
- Financial transaction systems
- Healthcare applications
- E-commerce platforms
3. Scaling Kubernetes Applications with Load Balancers
Challenge: Handling sudden traffic spikes without performance drops.
Solution: Kubernetes load balancers work with Horizontal Pod Autoscaler (HPA) for automatic scaling.
Scaling Methods:
| Type | How It Works | Best For |
| Horizontal | Adds more pods | Stateless apps, web services |
| Vertical | Increases pod CPU/memory | Stateful apps, databases |
Future Trends in Kubernetes Load Balancing
You’ll soon tap into AI-driven traffic routing and smart load prediction that adapts to your app’s needs before demand even spikes. Tomorrow’s Kubernetes load balancers will self-optimize, automatically scaling and securing traffic to keep your services ahead of the curve.
1. Kubernetes Load Balancer Gets Smarter (Ingress V2)
The next-gen Kubernetes load balancer standard (Gateway API) introduces:
Simplified multi-team management
Native support for HTTP/HTTPS/gRPC
Better traffic splitting for canary deployments
2. AI-Optimized Kubernetes Load Balancer
Emerging AI enhancements for Kubernetes load balancer systems: Predictive autoscaling (anticipates traffic spikes),Automatic failure recovery,Real-time cost-performance balancing.
3. Serverless + Kubernetes Load Balance
New serverless integrations allow:
- True pay-per-use load balancing
- Instant scale-to-zero during idle periods
- Simplified configuration for event-driven apps
Conclusion:
A Kubernetes Load Balancer plays a key role in routing traffic efficiently across your applications. Whether you're exposing services externally or internally, understanding different load balancer types and configurations ensures your app stays available and responsive. With cloud provider support like AWS, Azure, and GCP, it's easy to integrate powerful traffic management into your Kubernetes setup.
To take your skills to the next level, consider enrolling in Docker and Kubernetes Certification Training. These courses dive deeper into containerization best practices, hands‑on cluster management, and production‑grade deployments. And if you’re just getting started, check out the Free Docker Online Course with Certificate It’s a great way to learn Docker fundamentals at your own pace and earn a credential to showcase your expertise.
Let the quiz begin! Pick the right answers and climb to the top!
Q 1: Which Kubernetes service type provisions an external IP to expose a service outside the cluster?
Question 1 of 10
FAQs
In Kubernetes, a load balancer is a mechanism for distributing network traffic across multiple pods (virtual machines) within a cluster. This ensures that no single pod gets overwhelmed and improves application availability, scalability, and performance. Load balancers can be internal (within the cluster) or external (for accessing applications from outside the cluster). Externally, this is often achieved using cloud provider-specific load balancers, such as Azure Load Balancer or AWS Network Load Balancer, which are integrated with the Kubernetes API
AWS Load Balancer Controller supports reconciliation for Kubernetes Services resources of type LoadBalancer by Network Load Balancer (NLB) with instance or ip target type. secure by default. Since v2. 2.0 release, the AWS Load balancer controller provisions an internal NLB by default.
The primary purpose of a load balancer is to distribute incoming network traffic across multiple servers, optimizing resource utilization and ensuring high availability. This is achieved by acting as a traffic proxy and intelligently directing requests to available servers within a pool, preventing any single server from being overloaded. Load balancers enhance application performance, reduce latency, and improve overall application responsiveness
Take our Docker skill challenge to evaluate yourself!

In less than 5 minutes, with our skill challenge, you can identify your knowledge gaps and strengths in a given skill.