15
FebUnderstanding Entity Framework Code First Migrations
Code-First approach allows you to define model classes as per the Domain requirements via POCOs. Hence, you have complete control over the classes being written or Implemented. Code First Migrations allow you to create a new database or to update existing database based on your model classes by using Package Manager Console exist within Visual Studio 2013 or Visual Studio 2012.
Code First Database Initializers
Before understanding code first migrations, let's have a look at Code First Database Initializers provided by Entity Framework. When you follow EF code first approach, then you have three options for initializing database as given below–
CreateDatabaseIfNotExists
This is the default database initializer class used by Code First. This class creates a database only if it doesn't exist. This initializer helps you to avoid any accidental deletion of the database.
DropCreateDatabaseWhenModelChanges
This database initializer class drop the existing database and re-creates it if there is a mismatch between the model classes and table schema. This initializer is useful during starting phase of development and testing when models are changing often and there is no concern about the existing database records.
DropCreateDatabaseAlways
This database initializer class always drop and creates a new database, whether it is already present or not with every run of the application. This initializer is useful during testing when you want to run the application with a fresh set of data.
Why Code First Migrations?
The above three database initializing approach become fail when you add new model classes and you want to update existing database without any deletion or change. To achieve this, you need to use EF code first migrations which allow you to update existing database with new model classes changes and your existing database remains same with your database records.
Note
You can also create custom database initializers by implementing the IDatabaseInitializer interface.
Code First Migrations in Entity Framework step by step
Model Classes
Suppose you have the following two entities within your application.
public class Category
{
 public int CategoryID { get; set; }
 public string Name { get; set; }
}

public class Product
{
 public int ProductID { get; set; }
 public string Name { get; set; }
 public decimal Price { get; set; }
 public int CatID { get; set; }

 public virtual Category Category { get; set; }
}
Mapping Details
DataContext class and Fluent API mapping details for above two entities are given below –
public class DataContext : DbContext
{
 public DataContext():base("DefaultConnection"){ }

 protected override void OnModelCreating(DbModelBuilder modelBuilder)
 {
 modelBuilder.Entity<Category>().HasKey(c => c.CategoryID);
 modelBuilder.Entity<Category>().Property(p => p.Name).HasColumnType("VARCHAR").IsRequired().HasMaxLength(50);

 modelBuilder.Entity<Product>().HasKey(p => p.ProductID);
 modelBuilder.Entity<Product>().Property(p => p.Name).HasColumnType("VARCHAR").IsRequired().HasMaxLength(50);
 modelBuilder.Entity<Product>().Property(p => p.Price).HasColumnType("DECIMAL").IsRequired();

 modelBuilder.Entity<Product>().HasRequired(m => m.Category).WithMany().HasForeignKey(c => c.CatID);

 }
 public DbSet<Product> Product { get; set; }
 public DbSet<Category> Category { get; set; }
}
Connection String
And, your database connection string is given below:
<connectionStrings>
 <add name="DefaultConnection" providerName="System.Data.SqlClient" connectionString="data source=SHAILENDRA\SQLEXPRESS;initial catalog=EFCodeFirst;persist security info=True;user id=sa;password=mypassword; App=EntityFramework" /> </connectionStrings>
Visual Studio Package Manager Console
To create the database for these two entities within your application, go to the Package Manager Console option as shown below:
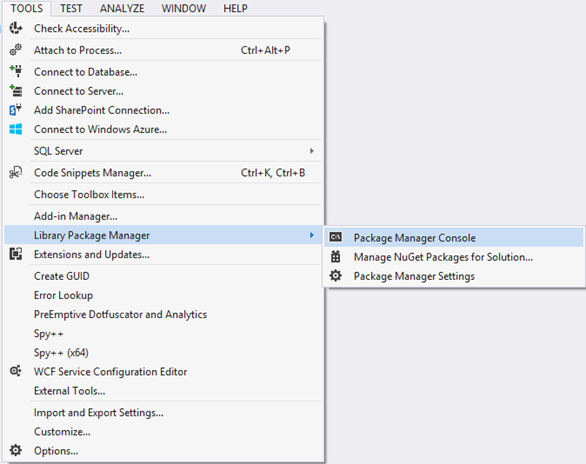
Creating New Database
Running Commands
Run the following command to configure migrations within your project and for creating new database.
Enable migrations
Enable-Migrations
Create migration
Add-Migration MigrationsName
Create upgrade/downgrade script
Update-Database
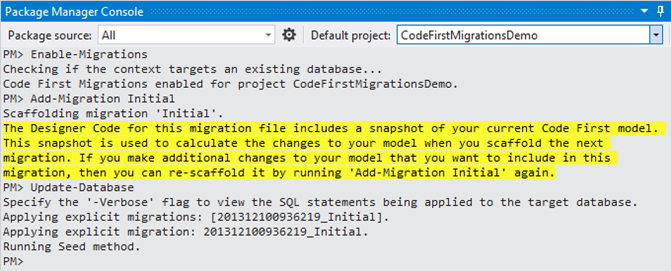
When you run above listed command on the Package Manager Console windows one by one then:
Firstly a Migrations folder will be added into your applications having Configuration.cs file for Migrations configuration setting.
Secondly a class file will be created having name suffix as
MigrationsNamefollowed by underscore and a unique generated number. This file will have all the entities to be created in the database.Thirdly, a new database will be created having initial catalog name
(initial catalog = YourDBName)as given in your connections string.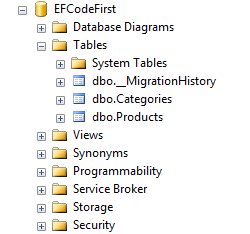
Updating Existing Database
Suppose you have added one more class named as Customer into your data model classes as given below:
Newly added Model Class
public class Customer
{
 public int CustomerID { get; set; }
 public string Name { get; set; }
 public string Address { get; set; }
}
Running Commands
Now for updating the database with new changes run the following commands as given below:
Create migration
Add-Migration MigrationsName
Create upgrade/downgrade script
Update-Database
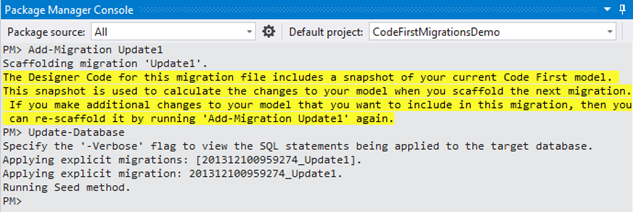
When you run above listed command on the Package Manager Console windows one by one then
Firstly a class file will be created having name suffix as
MigrationsNamefollowed by underscore and a unique generated number. This file will have all the entities to be created or updated in the database.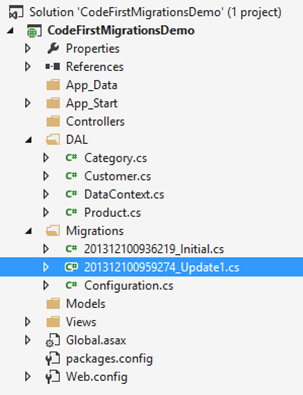
Secondly, the existing database will be updated with new changes.
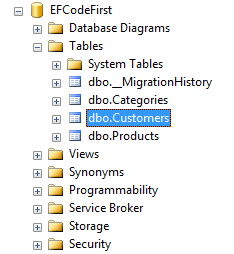
Undo/Rollback a Migrations
You can also Undo/Rollback a specific migrations by using following commands:
Rollback to a specific migrations
Update-Database -TargetMigration:MigrationsName
Rollback all migrations
Update-Database -TargetMigration:0
What do you think?
I hope you will enjoy the tips while programming with Entity Framework. I would like to have feedback from my blog readers. Your valuable feedback, question, or comments about this article are always welcome.
Take our Entityframework skill challenge to evaluate yourself!

In less than 5 minutes, with our skill challenge, you can identify your knowledge gaps and strengths in a given skill.

