


31
JulBuilding AI-Powered APIs with .NET 10 and Azure OpenAI Service: Complete 2026 Guide
27 Apr 2026
Advanced
1.6K Views
9 min read

Learn with an interactive course and practical hands-on labs
Free ASP.NET Core Online Course with Certificate - Start Now
Modern applications are no longer limited to returning static data. Today, you build systems that can understand user intent, generate intelligent responses, and automate complex workflows. With .NET 10 and :contentReference[oaicite:0]{index=0}, you can easily create AI-powered APIs that are fast, scalable, and production-ready. If you are a .NET developer, learning how to integrate AI into your APIs will help you build smarter applications and stay ahead in modern development.
Building AI-Powered APIs with .NET 10 and Azure OpenAI Service
AI-powered APIs allow your application to process natural language, generate responses, and assist users in real time. Instead of writing complex logic manually, you can use AI models to handle dynamic tasks like answering questions, generating content, or summarizing data.
- Create intelligent endpoints that understand user input
- Generate dynamic responses using AI models
- Build chatbots and automation tools
- Improve overall user experience
This approach helps you move from traditional APIs to smart APIs that can think and respond.
Why Build AI APIs in .NET?
.NET provides a powerful and reliable platform for building APIs. When combined with Azure OpenAI, it gives you enterprise-grade AI capabilities with high performance and security.
| Feature | Description | Benefit |
| High Performance | Optimized .NET runtime with faster request handling | Handles large number of requests efficiently |
| Security | Built-in authentication and secure Azure integration | Secure integration with Azure services |
| Minimal APIs | Lightweight API development model | Faster development with less boilerplate |
| Scalability | Cloud-native architecture with flexible deployment | Easy deployment and scaling in cloud |
Prerequisites
Before you start building your AI-powered API, make sure you have the required setup ready.
- Azure account with OpenAI access
- .NET 10 SDK installed
- Basic knowledge of Web APIs
- Visual Studio or VS Code
Step-by-Step Implementation
Step 1: Create a Minimal API Project
.NET 10 simplifies API development using Minimal APIs. You can quickly create a project and start building endpoints without unnecessary complexity.
- Fast project setup
- Clean and minimal structure
- Less boilerplate code
dotnet new web -n AiApiDemo cd AiApiDemo Step 2: Install Required Package
You need a client library to communicate with Azure OpenAI Service. This package helps you send requests and receive responses from AI models.
- Simplifies API communication
- Handles request and response objects
- Provides built-in methods for AI calls
dotnet add package Azure.AI.OpenAI Step 3: Configure Azure OpenAI
You need to configure your API credentials so your application can connect to Azure OpenAI securely.
- Store endpoint URL
- Store API key securely
- Define deployment name
{ "AzureOpenAI": { "Endpoint": "https://your-resource.openai.azure.com/", "ApiKey": "your-api-key", "DeploymentName": "gpt-model" } } Step 4: Build AI Endpoint
Now you create an endpoint that sends user input to the AI model and returns the generated response.
- Accept user input
- Send request to AI model
- Return AI-generated output
using Azure; using Azure.AI.OpenAI; var builder = WebApplication.CreateBuilder(args); var app = builder.Build(); var config = builder.Configuration; string endpoint = config["AzureOpenAI:Endpoint"]; string apiKey = config["AzureOpenAI:ApiKey"]; string deployment = config["AzureOpenAI:DeploymentName"]; OpenAIClient client = new OpenAIClient( new Uri(endpoint), new AzureKeyCredential(apiKey) ); app.MapPost("/ask", async (string prompt) => { var response = await client.GetChatCompletionsAsync( deployment, new ChatCompletionsOptions() { Messages = { new ChatMessage(ChatRole.User, prompt) } }); return response.Value .Choices[0] .Message .Content; }); app.Run(); Step 5: Test Your API
After building the endpoint, you should test your API to ensure it is working correctly.
- Use Postman or Swagger
- Send sample prompts
- Verify AI responses
This step ensures your API is ready for real-world usage.
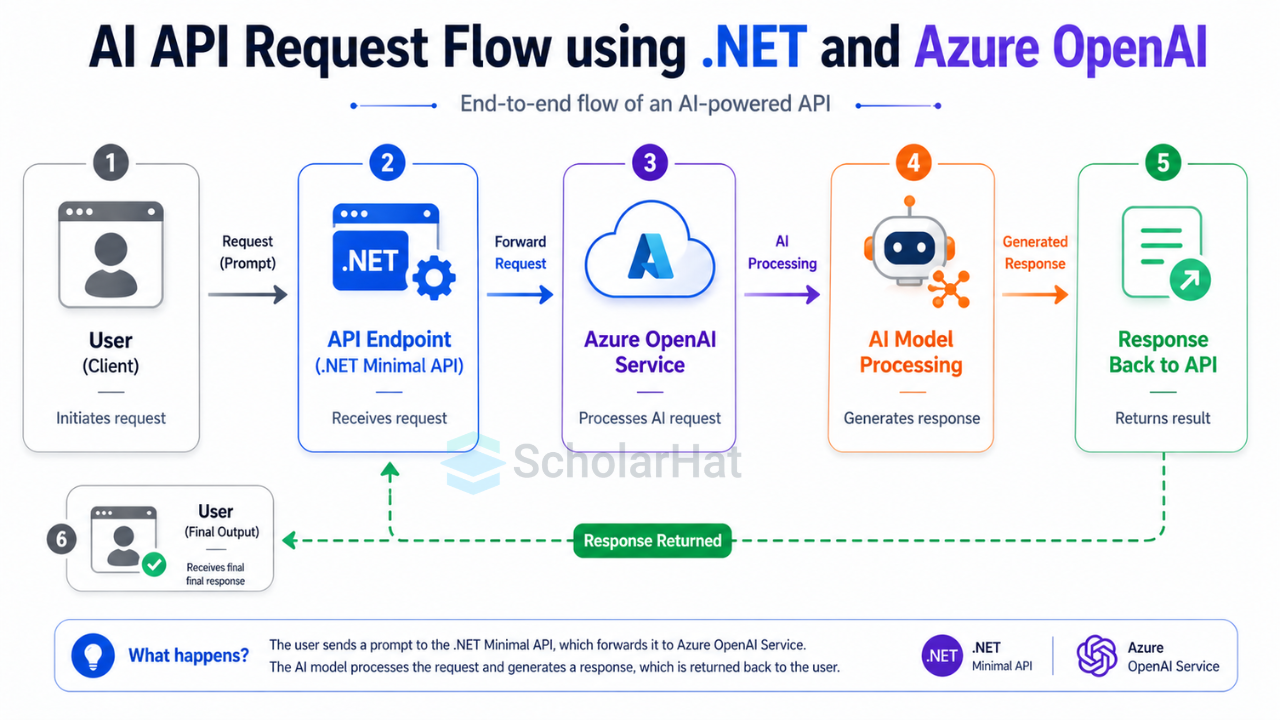
How This AI API Works
The working flow of your AI API is simple and efficient. Each request goes through a structured pipeline before returning a response.
- User sends a prompt
- API forwards it to Azure OpenAI
- AI processes the request
- Response is returned to user
This design keeps your application simple while adding powerful AI capabilities.
AI Configuration Options
You can control how the AI behaves by adjusting different parameters. These settings directly affect the quality and style of responses.
| Parameter | Description | Example |
| Temperature | Controls creativity of response | 0.7 |
| MaxTokens | Limits response length | 100 |
| System Message | Defines AI behavior | You are a helpful assistant |
Enhancing Your API
You can improve your API by adding more control and customization to AI responses. This helps you create better user experiences.
- Add system-level instructions
- Control response size
- Adjust creativity level
Messages = { new ChatMessage(ChatRole.System, "You are a helpful assistant"), new ChatMessage(ChatRole.User, prompt) } MaxTokens = 100, Temperature = 0.7 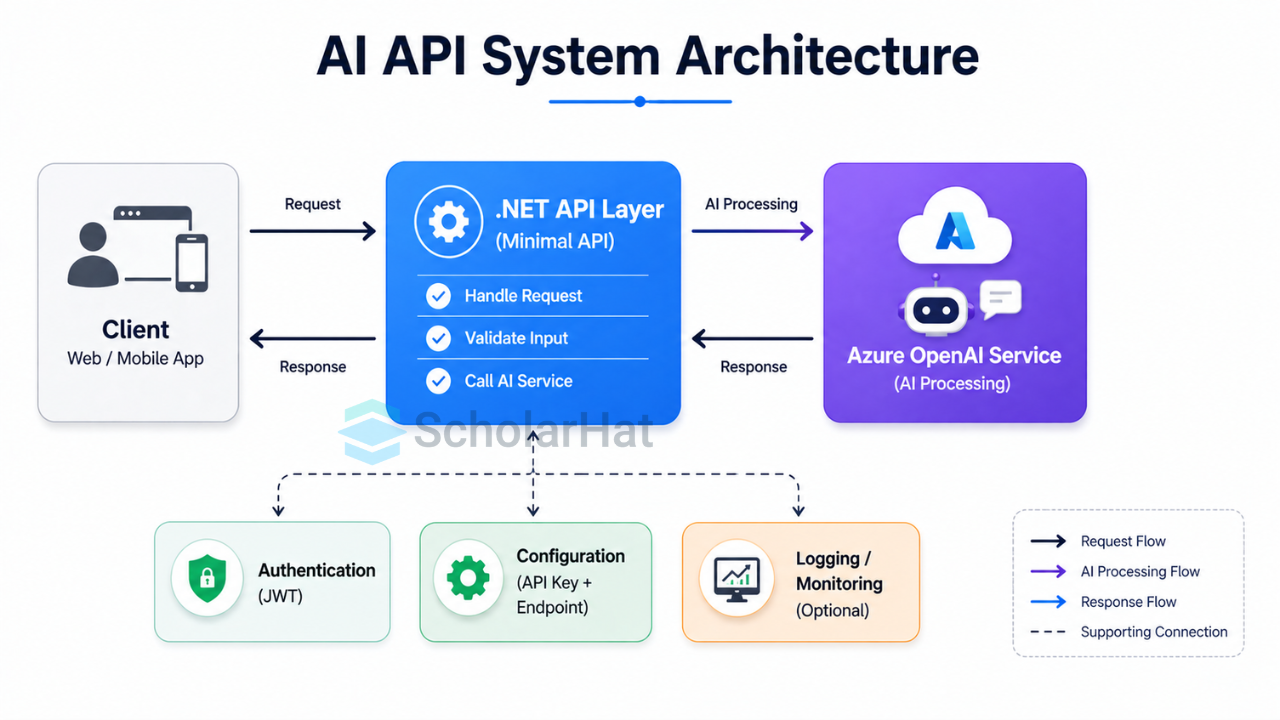
Real-World Use Cases
AI-powered APIs are widely used across industries to automate tasks and improve efficiency.
- Customer support chatbots
- Content generation tools
- Email automation systems
- Code assistants
- Document summarization APIs
Security Best Practices
Security is critical when working with APIs and cloud services. You should always follow best practices to protect your system.
- Do not expose API keys in code
- Use environment variables
- Add authentication (JWT)
- Apply rate limiting
- Monitor API usage
Performance Tips (.NET 10)
.NET 10 provides performance improvements that help your API handle high traffic efficiently.
- Use Minimal APIs for lower overhead
- Optimize asynchronous calls
- Reduce memory allocations
- Handle concurrent requests efficiently
Deployment Options
Once your API is ready, you can deploy it to different platforms depending on your requirements.
| Platform | Best For |
| Azure App Service | Simple applications |
| Container Apps | Scalable microservices |
| Docker | Flexible deployments |
| Kubernetes | Large enterprise systems |
Interview Questions
These are some common interview questions related to AI APIs and .NET development.
- How do you integrate Azure OpenAI with .NET?
- What is a deployment name?
- How do you secure AI APIs?
- What is temperature in AI models?
- How do you optimize cost in AI APIs?
Summary
Today, AI-powered APIs are becoming a standard for modern application development, especially for chatbots, automation tools, content generation, and intelligent backend systems. With .NET 10 you can build high-performance, scalable, and secure APIs that deliver smart responses and improve user experience. This approach reduces development effort while adding powerful AI capabilities to your applications.
However, building effective AI APIs requires proper design, security practices, and cost optimization strategies. You need to understand how to control AI behavior, manage API usage, and scale your applications efficiently. Don’t wait. Learn how to integrate AI into your .NET applications and build real-world intelligent systems. Explore the AI-Powered Full-Stack .NET Developer Certification Training now and take the first step towards your next big career breakthrough.
FAQs
When a prompt exceeds the model's context window, the API will return an error or truncate the data. You should implement a "chunking" strategy to break large documents into smaller pieces or use a library like SharpToken to count tokens before sending the request. This ensures your API stays within limits while maintaining the most relevant context for the AI.
Yes, you can swap the Azure OpenAI endpoint for a local provider like Ollama or LM Studio that supports OpenAI-compatible schemas. By changing the OpenAIClient configuration to point to your local localhost URL, you can develop and test offline without incurring cloud costs. This is an excellent way to maintain data privacy and reduce latency during the early stages of development.
By default, APIs are stateless, meaning the AI won't remember the previous question unless you manually pass the history back. You need to store the list of previous ChatMessage objects in a database or cache and include them in the Messages array of every new request.
Take our Net skill challenge to evaluate yourself!

In less than 5 minutes, with our skill challenge, you can identify your knowledge gaps and strengths in a given skill.