


31
JulReact Cheat Sheet: Quick Refrence Guide
10 Sep 2025
Beginner
2.26K Views
29 min read

Learn with an interactive course and practical hands-on labs
Free React JS Online Course with Certificate - Start Today
React Cheat Sheet is a quick reference guide that summarizes the most important concepts, syntax, hooks, lifecycle methods, and best practices in React. React is one of the most popular JavaScript libraries for building user interfaces, maintained by Facebook (Meta). Its component-based architecture, virtual DOM, and declarative approach make it ideal for creating fast, interactive, and scalable web applications.
In this React tutorial, you will be able to learn React completely through this React Cheat Sheet, which covers all essential topics from basics to advanced concepts. Ready to master React JS? Enroll in Free React JS course today and start building dynamic, responsive web applications!
React Cheat Sheet: Full Guide
Let's see all the concepts one by one in steps:
Step 1:React Basics
What is React?
- React is an open-source JavaScript library used for building dynamic and interactive user interfaces, especially for single-page applications (SPAs).
- It is developed and maintained by Facebook (Meta).
- React makes it easier to create fast, scalable, and simple applications using a component-based architecture.
- It focuses on rendering UI efficiently by updating only the necessary parts of the DOM through its Virtual DOM mechanism
Key Features of React
- Component-Based: React apps are built using independent, reusable components, making development modular, easier to maintain, and scalable.
- Virtual DOM: React creates a lightweight copy of the DOM and updates only the changed elements, ensuring faster rendering and better performance.
- Declarative: You describe the desired UI state, and React automatically handles updates, making the code more predictable and easier to debug.
- JSX (JavaScript XML): JSX blends HTML-like syntax with JavaScript, making UI code more intuitive, readable, and closer to the final output.
- Unidirectional Data Flow: Data flows in a single direction, from parent to child components via props, ensuring clear data handling and simpler debugging.
Installation:
1. Using Create React App
 bashnpx create-react-app my-app
cd my-app
npm start
2. Using Vite (Modern & Faster)
Vite is lightweight and builds faster than CRA. Recommended for most new projects because of its speed and simplicity.
bash
npm create vite@latest my-app
cd my-app
npm install
npm run dev
Step 2: JSX Essentials
JSX (JavaScript XML) allows you to write HTML-like syntax inside JavaScript. It makes React components more intuitive and keeps logic + UI together.
Key Rules of JSX
| Concept | Description | Example |
| Embedding JS | Use { } to insert JavaScript expressions | <p>{2 +2}</p> |
| Attributes | Use camelCase | <div className="container"></div> |
| Inline Styles | Use object syntax inside { } | <div style={{ color: 'red' }}>Text</div> |
| Fragments | Wrap multiple elements without adding extra nodes | <> <h1>Title</h1> <p>Para</p> </> |
| Conditional Rendering | Use ternary (? :) or logical AND (&&) to render conditionally {isLoggedIn ? <User /> : | {isLoggedIn ? <User /> : <Login />} |
Step 3: Components of React
What are React Components?
React Components are the building blocks of a React application. They are reusable, independent pieces of UI that make apps easier to build and maintain.
Key Features of Components
- Reusability:Components can be used multiple times across the application, reducing code duplication and improving consistency.
- Composable: Components Combine small components to build complex UIs.
- Maintainability: Since each component handles its own logic and UI, debugging and updating become easier.
- Isolation: Changes inside one component don’t affect others, ensuring stability and cleaner architecture.
- Testability: Independent components are simpler to test, making applications more reliable.
Types of Components
1. Functional Components in react (Modern Standard)
- It is simple JavaScript functions that return JSX.
- It is easy to write, and can use React Hooks for state and lifecycle.
function Welcome() {
  return <h1>Hello, Functional Component </h1>;
}
2. Class Components (Older Approach)
- ES6 classes that extend React.Component.
- Use lifecycle methods (componentDidMount, render, etc.).
import React, { Component } from "react";
class Welcome extends Component {
  render() {
    return <h1>Hello, Class Component</h1>;
  }
}
Step 4: Props and State Management
Props (Properties)
Props in react are read-only inputs passed from a parent component to a child component, allowing components to receive and display dynamic data.
Key points :
- Immutable: They cannot be changed by the child component.
- They enables component reusability by allowing the same component to render different data.
- They helps to maintain unidirectional data flow (parent → child).
- Ideal for configuration and passing data between components.
State
State in react is internal, mutable data managed within a component that determines how the component renders and behaves over time.
Key Points:
- Mutable: Can be updated by the component itself using useState or setState.
- Drives dynamic and interactive UI (e.g., counters, form inputs, toggles).
- Changes in state trigger re-rendering of the component.
- Managed locally: Each component can have its own state independent of others.
Props vs. State
| Features | Props | State |
| Definition | Data passed from parent | Data managed internally in component |
| Mutability | Immutable (read-only) | Mutable (can change over time) |
| Ownership | Controlled by parent component | Controlled by the same component |
| Usage | For passing data/configuration | For dynamic or interactive UI |
| Update | Cannot be updated by child | Can be updated using setState or useState |
| Purpose | Communication between components | Internal component behavior |
Step: 5 React Lifecycle Methods
What are React Lifecycle Methods?
React lifecycle methods are built-in functions in class-based components that run at specific stages—mounting, updating, and unmounting—allowing developers to control what happens when a component is created, updated, or removed.. They help manage side effects, data fetching, and cleanup.
Phases of Component Lifecycle
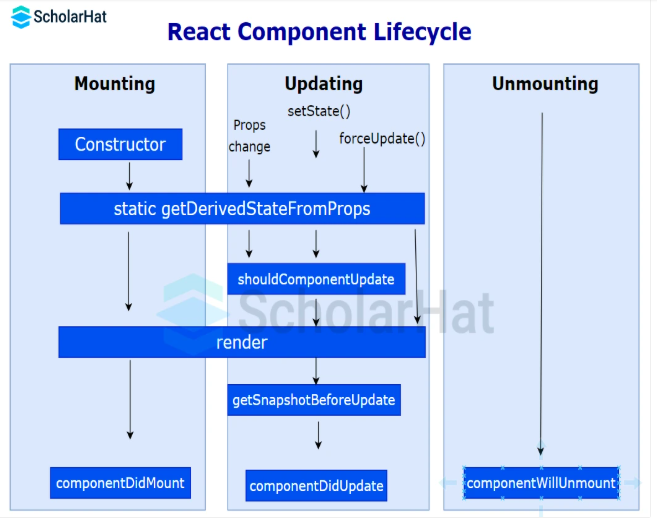
1. Mounting
When a component is created and inserted into the DOM.
Methods:
- constructor(): Initialize state and bind methods.
- static getDerivedStateFromProps(): Sync state with props before render.
- render(): Returns JSX to render the UI.
- componentDidMount(): Runs after component is added to DOM; ideal for API calls.
2. Updating
When a component re-renders due to state or props changes.
Methods:
- shouldComponentUpdate(): Decide if component should re-render.
- getSnapshotBeforeUpdate():Capture DOM info before update.
- componentDidUpdate(): Runs after update; good for DOM operations or fetching new data.
3. Unmounting
When a component is removed from the DOM.
Method:
- componentWillUnmount(): Cleanup (timers, subscriptions, listeners).
Step 6: React Hooks
What are React Hooks?
React Hooks are operations that let you leverage React capabilities in functional components, like state and lifecycle methods. Hooks allow function components to have access to state and other React features.
Common React Hooks:
| Hook | Purpose | Example |
| useState | Manage local state in a functional component | const [count, setCount] = useState(0); |
| useEffect | Perform side effects (API calls, timers) | useEffect(() => { fetchData(); }, [ ]); |
| useContext | Access context values without prop drilling | const theme = useContext(ThemeContext); |
| useRef | Reference DOM elements or store mutable values | const inputRef = useRef(); |
| useMemo | Memoize expensive calculations | const memoizedValue = useMemo(() => compute(), [dep]); |
| useCallback | Memoize functions to avoid unnecessary re-renders | const memoFunc = useCallback(( ) => { }, [dep]); |
| useReducer | Manage complex state logic | const [state, dispatch] = useReducer(reducer, initialState); |
Step 7: Context API
The Context API in react allows React applications to share data globally across components without passing props through every level. It’s ideal for themes, user info, or settings that many components need.
Steps to Use Context API
1. Create Context
const MyContext = React.createContext();
2. Wrap Components with Provider
<MyContext.Provider value={value}>
  <Child />
</MyContext.Provider>
3. Consume Context in Child
import { useContext } from "react";
const data = useContext(MyContext);
Context API vs Redux
| Feature | Context API | Redux |
| Purpose | Simple global state sharing | Large-scale state management |
| Setup | Minimal, built-in | Requires library, boilerplate code |
| Best For | Themes, user info, small global state | Complex apps with many interdependent states |
| Performance | Good for small state, can re-render more | Optimized with middleware, selectors |
Step 8: Routing with React Router
What is React Router?
React Router is a library for handling navigation in React apps. It enables single-page applications (SPA) to have multiple views without full page reloads.
Key Components of React Router
- <BrowserRouter>: It wraps your app and enables routing using the HTML5 history API.
- <Routes>: It is a container for all route definitions inside the app.
- <Route>: It defines a path and the component to render when the path matches.
- <Link>: It navigate between routes without reloading the page (replaces <a>).
- <NavLink>: Like <Link> but allows styling for the active route.
- useNavigate: Hook for programmatic navigation inside components.
- Nested Routes: Define child routes inside parent routes for complex UI layouts
Step 9: Forms and Validation
Forms in React
- React forms are controlled components, meaning form data is managed by component state.
- Each input field is bound to a state variable, updated via onChange, ensuring the UI and state stay in sync.
Simple Form with Validation:
import { useState } from "react";
function SimpleForm() {
  const [name, setName] = useState("");
  const [error, setError] = useState("");
  const handleSubmit = (e) => {
    e.preventDefault();
    if (!name) {
      setError("Name is required!");
    } else {
      setError("");
      alert(`Hello, ${name}!`);
    }
  };
  return (
    <form onSubmit={handleSubmit}>
      <input
        type="text"
        value={name}
        onChange={(e) => setName(e.target.value)}
        placeholder="Enter your name"
      />
      {error && <p style={{ color: "red" }}>{error}</p>}
      <button type="submit">Submit</button>
    </form>
  );
}
export default SimpleForm;
How it Works:
- State Management: name stores input; error stores validation messages.
- Validation: Checks if name is empty on submit.
- User Feedback: Displays an error message if validation fails; shows an alert if successful.
Step 10: Conditional Rendering & Lists
Conditional Rendering: React allows components to render different UI elements based on certain conditions.
Techniques of Conditional Rendering:
1. Ternary Operator – Render one element or another:
{isLoggedIn ? <h2>Welcome Back!</h2> : <h2>Please Log In</h2>} 2. Logical AND (&&) – Render only if condition is true:
{isLoggedIn && <h2>Welcome Back!</h2>}
3. If-Else in Function – Return different JSX:
function Greeting() {
  return isLoggedIn ? <h2>Welcome Back!</h2> : <h2>Please Log In</h2>;
}
Rendering Lists
- Use map() to render arrays dynamically.
- Always provide a unique key to help React track elements efficiently.
Example: Dynamic List Rendering
const names = ["User", "React", "Learner"];
function NameList() {
  return (
    <ul>
      {names.map((name, index) => (
        <li key={index}>{name}</li>
      ))}
    </ul>
  );
}
Key Points
- Conditional rendering ensures the UI adapts to different states.
- Lists render multiple elements efficiently with proper keys.
- Combine conditions and lists for dynamic, interactive interfaces.
Step 11: Error Handling and Boundaries
What is Error Handling in React?
React uses Error Boundaries to catch JavaScript errors anywhere in the component tree, log them, and display a fallback UI instead of breaking the entire app.
Key Points
- Error boundaries catch runtime errors in child components.
- They do not catch errors in event handlers, asynchronous code, or server-side rendering.
- Usually implemented as class components with componentDidCatch and getDerivedStateFromError.
Step 12: Performance Optimization
React apps can slow down when rendering large lists, complex UIs, or frequent state updates. Optimizing ensures smooth, fast, and responsive apps.
Key Techniques of Performance Optimization:
1. React.memo:
Wrap functional components to prevent unnecessary re-renders when props haven’t changed.
const MyComponent = React.memo(function MyComponent({ data }) {
  return <div>{data}</div>;
});
2. useCallback:
Memoize functions to avoid re-creating them on every render.
const memoizedFunc = useCallback(() => doSomething(), [dependencies]);
3. useMemo:
Memoize expensive calculations to avoid recalculating on every render.
const memoizedValue = useMemo(() => computeHeavyTask(data), [data]);
4. Lazy Loading Components:
Load components on demand using React.lazy and Suspense.
const LazyComponent = React.lazy(() => import("./LazyComponent"));
<Suspense fallback=<div>Loading...</div>>
  <LazyComponent />
</Suspense>
Step 13: Testing in React
Testing ensures your React app works correctly, prevents bugs, and improves maintainability. It helps catch errors before deployment and makes refactoring safer.
Types of Testing:
| Type | Description | Tools/Examples |
| Unit Testing | Test individual components or functions | Jest, React Testing Library |
| Integration Testing | Test how components work together | Jest, React Testing Library |
| End-to-End (E2E) | Test the full app from user perspective | Cypress, Selenium |
Testing Components Example
Using React Testing Library & Jest:
import { render, screen } from "@testing-library/react";
import userEvent from "@testing-library/user-event";
import MyButton from "./MyButton";

test("button click updates count", () => {
  render(<MyButton />);
  const button = screen.getByRole("button");
  expect(button).toHaveTextContent("Count: 0");
  userEvent.click(button);
  expect(button).toHaveTextContent("Count: 1");
});
Explanation:
- render() mounts the component.
- screen.getByRole() queries elements by role (accessibility-friendly).
- userEvent.click() simulates user interaction.
- expect() asserts the expected behavior.
Step 14: Best Practices and Common Pitfalls
Best Practices
1. Component Design
- Keep components small, focused, and reusable to simplify development and maintenance.
- Separate UI and logic clearly to make code more readable and easier to debug.
2. State Management
- Use state efficiently to avoid unnecessary re-renders and maintain performance.
- Lift state up only when necessary; otherwise, prefer local component state for simplicity.
3. Props and Data Flow
- Pass props as read-only data from parent to child to ensure predictable behavior.
- Avoid prop drilling by using Context API when multiple levels need the same data.
4. Hooks Usage
- Follow Rules of Hooks: only call hooks at the top level and inside functional components.
- Use useMemo and useCallback to optimize performance and prevent unnecessary re-renders.
5. Code Quality
- Write clean, readable, and modular code to improve maintainability.
- Comment complex logic and follow consistent naming conventions for clarity.
6. Testing and Debugging
- Write unit and integration tests for critical components to ensure reliability.
- Use React Developer Tools to debug components, inspect state, and monitor performance.
Common Pitfalls
- Mutating state directly instead of using setState or useState.
- Overusing Context for data that doesn’t need to be global.
- Ignoring keys when rendering lists, causing re-rendering issues.
- Over-rendering components by not optimizing with React.memo, useMemo, or useCallback.
- Violating rules of hooks, such as calling inside loops or conditions.
- Not handling async side effects properly, causing memory leaks or errors.
Conclusion
This React cheat sheet covers everything from React basics, JSX, components, props & state, hooks, routing, forms, lifecycle methods, performance optimization, testing, to best practices.
React powers 95% of modern web apps, and certified developers earn up to 40% higher salaries. Join our React JS Online Course, and earn a certificate that opens doors to top Frontend and Full-Stack Developer roles.
FAQs
React is a JavaScript library developed by Facebook for building fast and interactive user interfaces using a component-based architecture.
JSX (JavaScript XML) is a syntax extension that allows you to write HTML-like code inside JavaScript, which React then transforms into React elements.
React Components are reusable, self-contained pieces of UI. They can be Functional Components or Class Components.
Hooks are functions that let you use state and lifecycle features in functional components, e.g., useState, useEffect, useContext.
Take our React skill challenge to evaluate yourself!

In less than 5 minutes, with our skill challenge, you can identify your knowledge gaps and strengths in a given skill.