


04
JulWhat is Render in React? Beginner’s Tutorial with Examples
11 Sep 2025
Beginner
6.08K Views
19 min read

Learn with an interactive course and practical hands-on labs
Free React JS Online Course with Certificate - Start Today
React rendering is the process of turning React components into visible UI elements in the browser or on mobile devices. It happens in two phases:
- Render Phase: React runs your components to figure out what the UI should look like based on the current state and props. It compares the new UI with the previous one to detect changes.
- Commit Phase: React applies the necessary updates to the actual DOM or native UI, making sure the user sees the latest version of the interface.
70% of front-end job listings now require React.js expertise. Don’t get left behind—join our Free React Course with Certificate and build in-demand skills!
Read More - Top 50 React Interview Question & Answers
What are React elements?
The most basic components of React applications are React elements. They stand in for the user interface that you want to see on the screen. Simple JavaScript objects known as "React elements" explain what you want to view, such as HTML tags, components, and other React elements.
DOM elements and React elements are not the same. React elements are separate from the DOM and may be efficiently constructed and managed by React, whereas DOM elements are a component of the HTML structure.
Render in React
In the React framework, rendering refers to the process of converting JSX (JavaScript XML) into real HTML elements that are displayed in the browser. React uses a virtual DOM to efficiently detect changes in the UI and updates only the components that need to be re-rendered. This approach minimizes unnecessary DOM updates and results in fast, responsive, and optimized user interfaces.
React Elements VS. React Components
The difference between React components and elements are as follows:
| Feature | React Element | React Component |
| Definition | A plain JS object describing UI | A function or class that returns elements |
| Purpose | Tells React what to display | Defines behavior, structure, and logic |
| Reusability | No | Yes |
| Can manage state? | No | Yes |
| Accepts props? | No | Yes |
| Lifecycle methods? | No | Yes |
The Basics of Render in React
How does React rendering work?
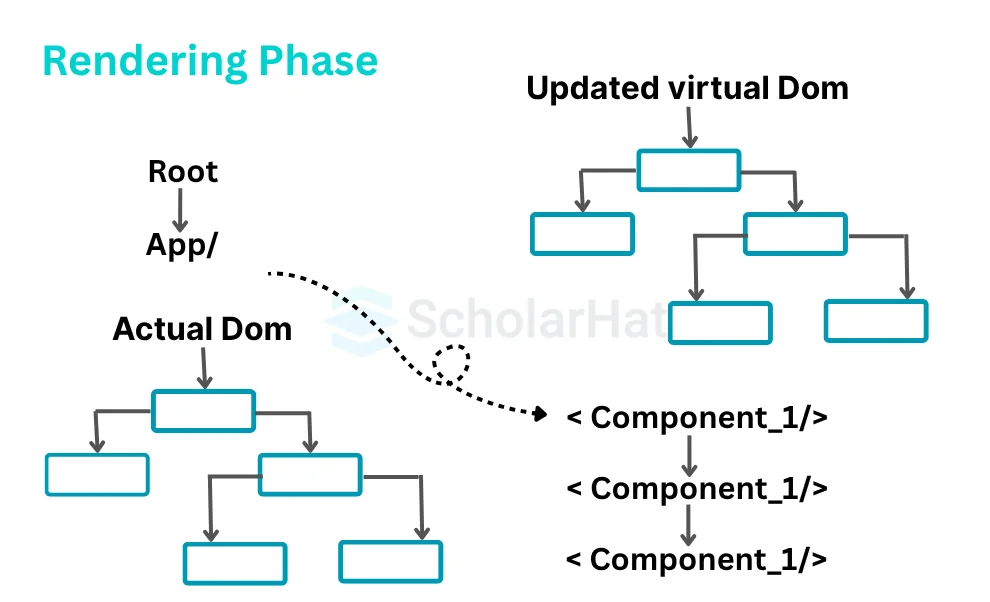
In React, rendering is the process of converting React elements (written in JSX) into actual HTML elements that are displayed in the browser. To manage this efficiently, React uses a virtual DOM—a lightweight copy of the real DOM.
When a component is rendered:
- React creates a virtual representation of the user interface.
- It then compares this virtual DOM to the previous version using a process called reconciliation.
- React calculates the minimum number of changes needed to update the real DOM.
- These updates are then applied efficiently, improving performance and ensuring the UI reflects the latest state.
- This intelligent diffing and updating process makes React fast, responsive, and ideal for building dynamic web applications.
Here is a simple example of how an element render in react:
import React from 'react';
import ReactDOM from 'react-dom';
const element = <h1>Hello, World!</h1>;
ReactDOM.render(element, document.getElementById('root'));
Here, we import the libraries for React and ReactDOM. Hello, World! is a React element that we create and store. We render the element to the 'root' HTML element using ReactDOM.render(). This results in the heading "Hello, World!" to appear on the web page.
Read More - React developer salary in India
Using the ReactDOM.render() function
In React (versions prior to React 18), the ReactDOM.render() function is used to render React elements into the DOM. This function accepts two arguments:
- The React element or component to render (usually written in JSX)
- The target DOM element where the UI should be mounted
Syntax example:
ReactDOM.render(, document.getElementById('root'));
Understanding the root DOM node
All of the React elements are typically rendered in a single root DOM node in a React application. Your React application's entry point is this root DOM node. Usually, an <div> element with the id "root" serves as the root DOM node. React can quickly locate and handle the rendered elements in the DOM due to this convention.
<div id="root">/div>
Rendering Simple Elements
1. Creating a Basic React Element-In React, you can create a simple element using JSX, a syntax extension that allows you to write HTML-like code directly within JavaScript. JSX makes it easier to define what the user interface should look like, especially for simple elements like headings, paragraphs, or buttons.
2. Rendering the Element into the DOM-Once the React element is created, it needs to be displayed in the browser. React provides the ReactDOM.render() function (for versions before React 18), which takes two inputs: the React element and the target HTML element in the DOM where it should appear. This is how the content becomes visible to the user.
In newer versions of React (React 18 and above), the createRoot() API is used instead of ReactDOM.render() to support modern rendering features like concurrent mode.
Immutability in React Native Elements and UI Updates
In React Native, just like in React for the web, elements are immutable. This means that once a React element (like a UI component) is created, it cannot be modified. If you want to change what appears on the screen, you don’t alter the existing element—instead, you create a new one.
This immutability brings predictability and consistency to the UI. Since the elements don’t change after creation, React Native can efficiently determine what needs to be updated by comparing the new tree of elements with the previous one (using its diffing algorithm).
How React Native Handles UI Updates
In React Native:
State or Props Change
Updates happen when a component's state or props change.
Trigger Re-render
React automatically re-renders the component with updated data.
Virtual DOM / Virtual UI Tree
React compares the new virtual representation of the UI with the old one.
Efficient Update
React Native then updates only the parts of the actual native UI that changed—this process is handled internally without directly calling something like ReactDOM.render() (which is used in React DOM for web apps).
Creating a new element for updates
React requires updating the component's state or props, causing a re-render, and rendering the changed element into the DOM using ReactDOM.render() to create a new element for changes.
Here is an easy example showing how to add a new element for update react native:
import React from 'react';
import ReactDOM from 'react-dom';
 // Define a functional component
 const Timer = () => {
  const [count, setCount] = React.useState(0);
  React.useEffect(() => {
   const timer = setInterval(() => {
   setCount(prevCount => prevCount + 1);
   }, 1000);
   return () => {
   clearInterval(timer);
   };
  }, []);
  return <h1>{count}</h1>;
 };
 // Render the Timer component into the root element of the HTML
 ReactDOM.render(<Timer />, document.getElementById('root'));
This example imports React and ReactDOM, defines a Timer component that updates a count variable using the useState and useEffect hooks once every second, renders the count value in an h1 element, and makes use of ReactDOM.Real-time updates of the count in the DOM are produced by using the render() method to display the Timer component in the designated root element.
Re-rendering and updating the UI
React will quickly update the DOM to reflect the changes by comparing the updated element with the original one when the modified element is re-rendered using ReactDOM.render(). You can make interactive and dynamic UIs with React by updating elements & re-rendering them. Performance is optimized because only the relevant UI elements are updated thanks to React's effective rendering technology.
Here is an easy example showing how to update react native:
import React from 'react';
 import ReactDOM from 'react-dom';
 class App extends React.Component {
  constructor(props) {
   super(props);
   this.state = {
    count: 0
   };
  }
  handleClick() {
   this.setState(prevState => ({
    count: prevState.count + 1
   }));
  }
  render() {
   return (
    <div>
     <h1>Count: {this.state.count}</h1>
     <button onClick={() => this.handleClick()}>Increment</button>
    </div>
   );
  }
 }
 ReactDOM.render(<App />, document.getElementById('root'));
In this example, a React component named App that monitors a count state is used. By using the handleClick method and utilizing setState(), the count value, which is initially set to 0, is updated when the button is clicked. This causes the component to be re-rendered, updating the count to be shown on the screen. For an in-depth learning, consider taking a React JS Training.
The Efficiency of React Rendering
React is renowned for its effective rendering abilities since it makes use of the virtual DOM & an effective diffing algorithm.
The power of the virtual DOM
- React makes use of a virtual DOM, which is a simplified version of the real DOM. React determines the minimal set of modifications required when an element is modified or re-rendered by comparing the virtual DOM with the current state of the actual DOM.
- React can effectively update only the DOM elements that have changed thanks to this diffing approach, which has a minimal performance impact.
- The rendering process is optimized by React's virtual DOM, which serves as a barrier between the user interface and the real DOM.
Benefits of React Rendering
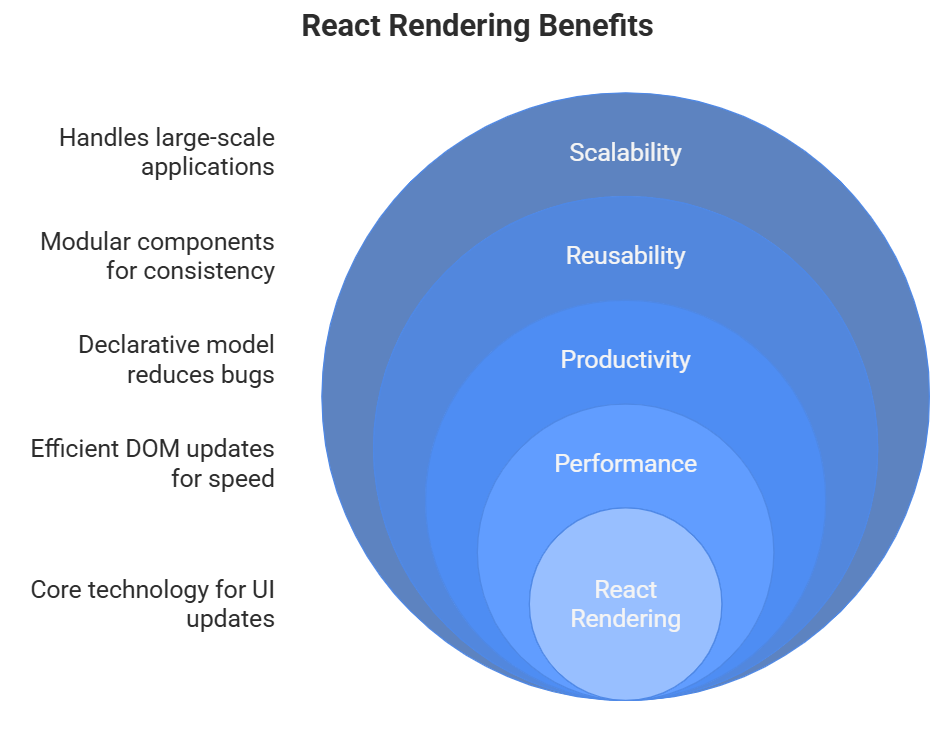
For developers, React's effective rendering system has various advantages:
1. Better Performance-React uses a virtual DOM to track changes in the user interface. Instead of updating the entire DOM every time a change occurs, React only updates the parts that have actually changed. This reduces the number of expensive DOM operations and makes apps run faster and smoother.
2. Improved Developer Productivity-React’s declarative programming model allows developers to focus on writing logic and describing the UI, while React takes care of rendering and DOM updates. This minimizes bugs and speeds up the development process.
3. Code Reusability-React’s component-based architecture enables developers to build modular UI components that can be reused across the application. This not only saves development time but also ensures consistency and maintainability in large projects.
4. Scalability-React’s efficient rendering process makes it ideal for building large-scale and high-traffic applications. Its ability to handle complex UI updates without performance degradation ensures that apps remain fast and responsive as they grow.
5. Faster Updates with Reconciliation-React uses a process called reconciliation, where it compares the new virtual DOM with the previous one and applies only the minimum set of changes to the real DOM. This smart diffing algorithm improves update speed and app responsiveness.
6. Seamless Integration with State Management-React rendering works efficiently with popular state management libraries like Redux, Context API, or Recoil, allowing for optimized UI updates when application state changes.
7. Easier Testing and Debugging-Since React’s rendering is predictable and based on data (state and props), it’s easier to test components in isolation. Tools like React Developer Tools allow developers to inspect component hierarchy and rendering behavior.
Here is a simple example of how effectively React renders:
import React, { useState } from 'react';
 const ParentComponent = () => {
  const [items, setItems] = useState(['Item 1', 'Item 2', 'Item 3']);
  const handleClick = () => {
   // Simulating an update to the list of items
   const updatedItems = [...items, 'New Item'];
   setItems(updatedItems);
  };
  return (
   <div>
    <button onClick={handleClick}>Add Item</button>
    <ul>
     {items.map((item, index) => (
      <ChildComponent key={index} item={item} />
     ))}
    </ul>
   </div>
  );
 };
 const ChildComponent = React.memo(({ item }) => {
  console.log(`Rendering ${item}`);
  return <li>{item}</li>;
 });
 export default ParentComponent;
The ParentComponent in the example uses map() to render a list of elements. Each item is sent to ChildComponent as a prop, and React.memo() is used to wrap each component for memorization. The list is updated when the "Add Item" button is clicked, adding a new item. The list is only updated and reordered when necessary thanks to React.memo() and unique key props. Rendering is made more efficient by leveraging key props and React.memo(). By eliminating wasteful re-rendering of the full list, only the new item is displayed.
Advanced Rendering Techniques
React offers a variety of modern rendering techniques that can improve your UI's adaptability and interactivity.
- Conditional rendering: You can render elements or components based on particular circumstances or states using conditional rendering. You can dynamically control what is rendered based on user interactions, the availability of data, or any other criteria by using conditional statements or logical operators.
- Arrays of elements to be rendered and mapped: With React, you can render arrays of elements by iterating through the array and rendering each element dynamically using the map() function.
- Rendering elements with props: Data can be passed from a parent component to its child components via props. As a result, you may make customizable and reusable React components.
Best Practices of Rendering Elements in React:
The following are some best practices for rendering elements in React:
- Make use of JSX: JSX enables you to create JavaScript code that is similar to HTML, making it simpler to read and manage.
- Encapsulate Logic in Components: Break your user interface down into smaller, reusable components, and then encapsulate logic within each one. This enhances the comprehension and modularity of the code.
- Prefer Functional Components: Use functional components rather than class components unless you require lifecycle methods or state. They are less complicated and simpler to comprehend.
- Avoid Direct DOM Manipulation: React should handle component rendering and updates using the virtual DOM to avoid direct DOM manipulation. Avoid using jQuery or other direct DOM modifications unless necessary.
- Give Lists Unique Keys: Give each element of the list a different "key" argument when drawing lists with a map(). In response to changes, this optimizes list updating and reordering.
- Use React Fragments or Short Syntax: When rendering many objects without a parent container. By doing this, extra wrapper elements in the DOM are avoided.
- Use Conditional Rendering: To conditionally rendered components based on specified conditions, use conditional statements (if-else or ternary operators). This enables material to be displayed dynamically depending on the status of the application.
- Optimise Re-renders: Use PureComponent or shouldComponentUpdate() to compare props and state to determine whether an update is required, and avoid needless re-renders.
- Use React's Memoization Techniques: Memoize components, values, as well as functions using React.useCallback(), memo(), and useMemo(), accordingly. When dealing with the same inputs again, memorization reduces superfluous computations and re-rendering.
- Profile and Optimize Performance: Make regular use of internal or external performance tools to profile and improve the performance of your React application. To enhance rendering performance, locate performance bottlenecks and implement the required optimizations.
Summary
We have covered all the essentials of React's rendering parts in this extensive overview. We began by defining React elements, render in React, and how they differ from components. The fundamentals of updating rendered elements and the effectiveness of render in react were then covered in depth.
React.js experts are landing ₹20–30 LPA roles while others struggle. Upgrade your skills with our React JS Online Training and secure your future.
Take our React skill challenge to evaluate yourself!

In less than 5 minutes, with our skill challenge, you can identify your knowledge gaps and strengths in a given skill.