


19
JunThe Webpack Primer in React
11 Sep 2025
Advanced
4.67K Views
15 min read

Learn with an interactive course and practical hands-on labs
Free React JS Online Course with Certificate - Start Today
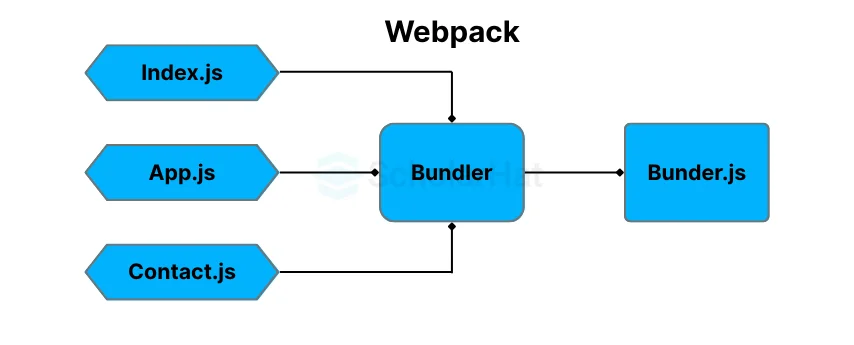
Webpack in React is a tool to help to build and organize React applications. Webpack takes all your files like JavaScript, CSS, and images and combines them into one or a few smaller files so they load faster in the browser. In modern React projects, Webpack makes it easier to manage code, speed up the app, and improve the development process with features like splitting the code into smaller parts, removing unused code, automatic updates during development, and helpful tools for debugging.
In this React tutorial, we will explore how to effectively use Webpack in React—from understanding its core purpose, configuring loaders and plugins, to optimizing builds for production-ready applications. React.js is the #1 framework for modern web apps. Don’t stay stuck with outdated skills—Enroll now in our free react js certification and level up!
What is Webpack in React?
Webpack is a popular tool used in React projects to bundle different types of files, like JavaScript, CSS, and images, into smaller, optimized files. These bundles are easier and faster for the browser to load. Webpack helps React applications run more smoothly by managing dependencies, organizing the build process, and allowing features like code splitting, which loads only the parts of the app needed at a given time. This makes the app faster and more efficient, both during development and in production.

Read More - React Interview Questions For Freshers
Why is Webpack used?
Webpack is used in React projects to efficiently bundle and optimize assets, automate the build process, and enhance both performance and developer experience. When used with React, it offers several key benefits for developers, such as:
- Build process streamlined: Webpack can automatically combine all of the JavaScript files in your React application into a single file, which can greatly streamline the build procedure.
- Code splitting: By just loading the code required for the current page, Webpack can enhance efficiency by dividing your JavaScript code into smaller bundles.
- Improved performance: Webpack can optimize your JavaScript code for production, which will help your React application run more quickly.
- Better developer experience: Webpack offers several capabilities, such as source maps and hot reloading, that can enhance the developer experience.
- Support for ES6: By transpiling ES6 code with Webpack, you can use the most recent JavaScript capabilities in your React apps.
- Hot reloading: You may make changes to the code and see them take effect right away without having to restart the server by using Webpack to hot reload your React application. This can speed up the development process significantly.
- Source maps: Webpack may produce source maps, which are files that link the original source code of JavaScript with the minified version. For troubleshooting your React applications, this can be useful.
Understanding webpack.config.js and its role in configuring webpack
We need to understand the function of the webpack.config.js file to utilize Webpack to its fullest potential. The entry points, output destinations, loaders, plugins, and various other settings are defined in this configuration file, which serves as the brain of Webpack. It offers a centralized area where we can adjust webpack behavior to suit the needs of our project.
The webpack.config.js file is used in React apps to:
- Be specific about your application's entry points.
- Set uploaders to handle your assets.
- Create plugins to give Webpack extra capabilities.
- Set up the output options, including the output directory's location and the output file's name.
Install Webpack in a React project
Let's first install and configure webpack in our React project before delving into the webpack setup.
- A Create React App tool can be used to launch a new React project if Node.js and npm are already installed.
- Once the project is configured, we can use npm to install webpack and any other dependencies.
- After installation, we can begin customizing Webpack by creating the webpack.config.js file in the project's root directory.
Read More - React developer salary
Exploring the different webpack loader and their significance in the webpack config
For processing and altering files, loaders are essential in the Webpack config for React. With the help of the webpack loader, you may handle a variety of file types and use Webpack to optimize them for React projects. The following are some common webpack loaders with their significance:
- Babel Loader: Converts current JavaScript to a format that is compatible with older browsers.
- CSS Loaders: Manage CSS files, handle import resolution, and inject CSS into HTML.
- File loaders: Take control of resources like graphics and fonts by copying or repurposing them as data URLs.
- Image loaders: Compress or turn images into data URLs to handle and optimize them.
- SVG Loaders: These programs handle SVG files and transform them into data URLs or React components.
- ESLint Loader: Integrates ESLint to enforce code quality during the build.
Configuring loaders for handling JSX and React components in Webpack
Components in React are written using the JavaScript syntax extension (JSX). We must configure the proper loaders in our webpack configuration to handle JSX files. We will concentrate on setting up Babel, a well-known JavaScript compiler, to translate JSX and contemporary JavaScript features into code that is compatible with browsers.
Here is an easy example of how to set up a Webpack loader to handle JSX & React components:
- Install the required packages as dev dependencies:
- npm install webpack webpack-cli babel-loader @babel/core @babel/preset-react react react-dom --save-dev
- Create a webpack.config.js file with the following settings in the project directory:
const path = require('path');module.exports = {
  entry: './src/index.js',
  output: {
   path: path.resolve(__dirname, 'dist'),
   filename: 'bundle.js',
  },
  module: {
   rules: [
    {
     test: /\.(js|jsx)$/,
     exclude: /node_modules/,
     use: 'babel-loader',
    },
   ],
  },
  resolve: {
   extensions: ['.js', '.jsx'],
  },
};
In this example, the entry point is set to ./src/index.js, and the output path is set to ./dist/bundle.js. Using the Babel loader, which will transpile the files using Babel, we construct a rule to handle JavaScript & JSX files.
- In the project directory, create a .babelrc file with the parameters described below:
{
 "presets": ["@babel/preset-react"]
}
By doing this, you may set up Babel to use the @babel/preset-react preset, which makes JSX and React syntax support possible.
- Make a simple src/index.js file that renders and imports a React component:
import React from 'react';
import ReactDOM from 'react-dom';
import App from './App';
ReactDOM.render(<App />, document.getElementById('root'));- Make a file called src/App.js that defines a basic React component:
import React from 'react';const App = () => {
  return <h1>Hello, React!</h1>;
};export default App;- Use the terminal to run the webpack build command:
npx webpack --mode productionThis will start the Webpack build procedure, which will transpile the JSX and React components using the set loaders. The dist directory will be the location of the created bundle of JavaScript. To gain a deeper understanding of this process and other advanced Webpack configurations in React projects, consider enrolling in a specialized React JS Course for comprehensive training and hands-on practice.
Optimizing webpack configuration
You might think about the following methods to optimize your Webpack setup for effective module bundling in React:
- Code splitting: Use code-splitting to divide your application into manageable portions. This decreases the initial load time by enabling users to only download the code they require. Create dynamic imports using tools like Webpack's dynamic import() or React's lazy() and Suspense.
- Production Mode: To optimize the packed output, switch Webpack's mode to production. This makes it possible for built-in optimizations to reduce bundle size and enhance speed, such as minification, tree shaking, as well as scope hoisting.
- Shaking of the Tree: Enable shaking of the tree to remove unneeded code from the finished bundle. Make careful to utilize ES6 modules when writing your code so that Webpack can examine the dependencies and eliminate unnecessary imports when bundling the code.
- SplitChunks Plugin: The SplitChunks plugin can be set up to divide common dependencies into distinct chunks. This lessens the size of the bundle overall and helps prevent duplication. Adjust the settings to achieve the ideal harmony between caching & network performance.
- Minification and Compression: Use plugins like the terser-webpack-plugin & optimize-css-assets-webpack-plugin to minify and compress your JavaScript and CSS files. This lessens the file size & accelerates loading.
- Cache Busting: Use cache-busting methods like adding a unique hash to the bundled filenames using Webpack's output.filename option as well as plugins like webpack-md5-hash. This makes sure that, even when the code is updated, the browser always downloads the most recent version of the bundle.
- Budgeting for Performance: Set budgets for performance using webpack-bundle-analyzer or the budget settings included in Webpack (performance.maxAssetSize, performance.maxEntrypointSize). This aids in keeping an eye on and managing the size of your bundles and establishes cutoff points for acceptable performance levels.
- Production-ready Builds: Take into account additional optimization plugins like webpack, ImageminWebpackPlugin, or OptimizeCSSAssetsPlugin to compress images and improve CSS. To define environment-specific variables and get rid of unnecessary code, use definePlugin.
Working with webpack plugins
Beyond what the webpack loader can do, webpack plugins offer more functionality. They can be used for many different things, including producing HTML templates, separating CSS into separate files, asset optimization, and more. Here are a few webpack plugins that are frequently used in React projects:
- HtmlWebpackPlugin: This makes it easier to create HTML files with bundled CSS and JavaScript files. The required script tags can be automatically injected while creating an HTML template.
- MiniCssExtractPlugin: When CSS is being packaged, MiniCssExtractPlugin separates it into distinct files. This enhances performance and enables greater separation of CSS & JavaScript.
- DefinePlugin: Allows you to define global constants that your code can access. During the build process, this is useful for setting environment-specific variables or switching feature flags.
- CopyWebpackPlugin: Moves files or folders throughout the building process from one place to another. It is frequently used to transfer static resources (such as fonts or graphics) to the output directory.
- CleanWebpackPlugin: Before each build, it cleans the output directory. This helps prevent the buildup of outdated files and guarantees that only the relevant files are present in the output.
- HotModuleReplacementPlugin: Enables live module updating and reloading without requiring a complete page refresh during development.
- CompressionWebpackPlugin: Reduces the size of the packaged assets and speeds up load times by compressing the output files using gzip or other compression techniques.
- BundleAnalyzerPlugin: Offers a visual depiction of the size and make-up of your bundles. You can use it to analyze the effects of various dependencies and identify potential optimization opportunities.
Implementing Hot Module Replacement
A strong feature called Hot Module Replacement (HMR) enables us to update our code in real-time while developing without losing the state of the application. Due to the quick feedback loop it offers, development efficiency is greatly increased.
The steps below explain how to use Webpack to perform Hot Module Replacement (HMR) and enable live reloading in development for a React project:
- Using your package manager (npm or yarn), install the webpack-dev-server package as a development requirement.
- Install the package react-hot-loader as a development dependency.
- Add the following code to your webpack.config.js configuration file:
const webpack = require('webpack');module.exports = {
  // ... other webpack config settings
  devServer: {
   hot: true, // Enable hot module replacement
  },
  plugins: [
   new webpack.HotModuleReplacementPlugin(), // Add HMR plugin
  ],
};- Add the following code to your React application's main entry point file (such as index.js):
import React from 'react';
import ReactDOM from 'react-dom';
import { AppContainer } from 'react-hot-loader'; // Import AppContainer from react-hot-loader

import App from './App';

const render = (Component) => {
 ReactDOM.render(
  <AppContainer>
   <Component />
  </AppContainer>,
  document.getElementById('root')
 );
};

render(App); // Initial render

// Enable hot module replacement
if (module.hot) {
 module.hot.accept('./App', () => {
  const NextApp = require('./App').default;
  render(NextApp);
 });
}- Start the development server by running the command webpack-dev-server.
- You ought to be able to see live reloading enabled when you open your application in a web browser.
- Any modifications you make to your React components or other modules will cause hot module replacement, which means that the changes won't require a complete page refresh in the browser.
Best practices and tips for mastering webpack configuration in React
- Keep these guidelines in mind to master React's webpack configuration:
- Recognize the fundamental ideas behind webpack, including entry points, output configurations, webpack loaders, webpack plugins, & modules.
- Start out simple and gradually make your settings more complex.
- Utilise configuration presets like Next.js or Create React App.
- For simpler management, divide your configuration into different files.
- Use the live reloading & hot module replacement features of webpack-dev-server for local development.
- Enable minification, tree shaking, & code splitting to optimize for production.
- Utilise resources like webpack-bundle-analyzer to analyze bundle size.
- Use task runners or scripts to automate tasks.
- Keep up with the most recent changes and recommended techniques for webpack.
- For information on typical problems and solutions, consult the documentation and online community resources.
Summary
In this tutorial, we explored how Webpack helps in building fast and optimized React applications. We covered its setup, use of loaders and plugins, and features like code splitting and hot module replacement. With this knowledge, you can streamline your React development and create efficient, production-ready apps.
90% of tech giants prefer React.js experts for high-impact roles. Enroll in our React Certification Course today or risk being overlooked.
FAQs
Webpack is used in React projects to bundle JavaScript, CSS, images, and other assets into optimized files. It simplifies the build process, improves loading speed, supports modern JavaScript features via Babel, and allows enhancements like code splitting and hot module replacement.
Loaders in Webpack help transform files before bundling them. For React, they allow processing JSX, ES6 code, CSS, images, and other file types. For example, babel-loader converts JSX and ES6 into browser-compatible JavaScript.
The webpack.config.js file acts as the blueprint for how Webpack processes files. It defines entry points, output paths, loaders, plugins, and other configurations needed to control how your app is bundled and optimized.
HMR allows you to see changes in your React app in real-time without a full page refresh. This maintains the component's state while updating only the changed modules, which significantly boosts developer productivity.
To optimize Webpack for production, enable code splitting, tree shaking, and minification. Use plugins like TerserPlugin, MiniCssExtractPlugin, and HtmlWebpackPlugin, and turn on production mode to reduce bundle size and improve load times.
Take our React skill challenge to evaluate yourself!

In less than 5 minutes, with our skill challenge, you can identify your knowledge gaps and strengths in a given skill.