


09
JulHow to Learn Spring Boot: A Complete Guide for Beginners and Beyond
22 Aug 2025
Beginner
1.74K Views
27 min read

Learn with an interactive course and practical hands-on labs
Free Spring Boot Course For Beginners
Got Java? Then you are ready for Spring Boot the fast track to building real-world apps. With minimal setup and maximum power, Spring Boot lets you go from idea to deployment in record time. If Java is your toolkit, Spring Boot is the turbo engine that makes your projects fly.
Spring Boot is a popular Java-based framework used to build web applications and microservices with ease. It simplifies the configuration and development of Spring applications by providing production-ready defaults and auto-configuration. Learning spring boot will boost your career. And with this game changing skill you might get end up with high package job. So let's start to learn.
Learn Spring Boot Step-by-step
|
1. What is Spring Boot?
Spring Boot is an open-source Java-based framework built on top of the Spring Framework, designed to simplify the development of production-ready applications. It provides a streamlined way to create stand-alone, web-based, and microservices-based applications with minimal configuration. Spring Boot eliminates the need for complex XML configurations, which were common in traditional Spring applications, by leveraging conventions, defaults, and auto-configuration.

Spring Boot was introduced by Pivotal (now part of VMware) to address the complexity of setting up and configuring Spring applications. It follows a "convention over configuration" philosophy and the "opinionated defaults" approach, enabling developers to focus on writing business logic rather than dealing with boilerplate code. It is widely used for building RESTful APIs, microservices, and enterprise applications due to its flexibility, scalability, and robust ecosystem.
2. Why Use Spring Boot?
Spring Boot is popular among developers for several reasons:
- Simplified Configuration: Spring Boot’s auto-configuration feature reduces manual setup by automatically configuring dependencies based on the project’s needs.
- Rapid Development: It provides starter dependencies and embedded servers (e.g., Tomcat, Jetty), enabling developers to create applications quickly.
- Microservices Support: Spring Boot is ideal for building microservices due to its lightweight nature and integration with tools like Spring Cloud.
- Production-Ready Features: Built-in tools like Spring Boot Actuator provide monitoring, metrics, and health checks for production environments.
- Large Ecosystem: It integrates seamlessly with other Spring projects (e.g., Spring Data, Spring Security) and third-party libraries.
- Community and Documentation: Spring Boot has a vast community, extensive documentation, and regular updates, ensuring long-term support.
- Flexibility: It supports various databases, messaging systems, and deployment models, making it versatile for different use cases.
- Reduced Boilerplate: Annotations and starters minimize repetitive code, improving productivity.
3. Prerequisites
To start with Spring Boot, you need:
- Java Knowledge: Proficiency in Java (version 8 or higher, with Java 17 recommended for recent Spring Boot versions).
- Build Tools: Familiarity with Maven or Gradle for dependency management and project builds.
- IDE: An IDE like IntelliJ IDEA, Eclipse, or Spring Tool Suite (STS) for streamlined development.
- Basic Spring Concepts: Understanding of Spring Framework basics (e.g., Dependency Injection, IoC container) is helpful but not mandatory.
- REST and HTTP: Knowledge of RESTful web services and HTTP protocols for building APIs.
- Database Basics: Familiarity with relational databases (e.g., MySQL, PostgreSQL) or NoSQL databases for data persistence.
- Command Line (Optional): Basic knowledge of command-line tools for running Spring Boot applications or managing dependencies.
No prior experience with the Spring Framework is strictly required, as Spring Boot abstracts much of its complexity.
4. Spring Boot Architecture
Spring Boot's architecture is layered and modular, extending the Spring Framework's inversion of control (IoC) container. It's designed for extensibility and scalability. Let's break it down:

This diagram illustrates a typical layered architecture in a Spring Boot application, following the Model-View-Controller (MVC) pattern with extensions for data persistence. It emphasizes the flow of a request from a client through various components to the database and back, incorporating key Spring Boot concepts like dependency injection, repositories, and CRUD operations. The architecture promotes separation of concerns, making the application modular, testable, and scalable.
I'll break it down step by step, following the flow from left to right and top to bottom in the diagram. Each step corresponds to how data and control move through the system during a typical HTTP request (e.g., creating, reading, updating, or deleting data in a RESTful API).
Step 1: Client Initiates the Request
The process starts with an external client (e.g., a web browser, mobile app, or another service) sending an HTTPS request to the Spring Boot application. This request could be a GET (to retrieve data), POST (to create data), PUT (to update), or DELETE (to remove data).
Key Details:
- HTTPS ensures secure communication (encrypted via SSL/TLS).
- The request includes details like URL path (e.g., /api/users), headers, query parameters, and possibly a JSON body.
- Flow Transition: The request is received by the embedded web server (e.g., Tomcat in Spring Boot) and routed to the Controller layer.
- Why This Matters: This is the entry point, isolating the application from direct client interactions and allowing for centralized request handling.
Step 2: Controller Handles the Incoming Request
The Controller acts as the front-facing layer, responsible for receiving and processing HTTP requests. It maps the request to specific methods using annotations like @RestController, @GetMapping, or @PostMapping.
Key Details:
- It parses the request (e.g., extracts path variables, request body via @RequestBody).
- Performs initial validation or authentication if needed.
- Does not contain business logic; instead, it delegates to the next layer.
- Returns responses (e.g., JSON data, HTTP status codes) back to the client.
- Flow Transition: After processing, the Controller calls the Service Layer (bidirectional arrow between Controller and Service Layer).
- Why This Matters: Controllers enforce RESTful principles, keeping the API clean and focused on HTTP interactions.
Step 3: Service Layer Processes Business Logic
This is the core business layer where application logic resides. Services are annotated with @Service and handle operations like calculations, transformations, or orchestrating multiple components.
Key Details:
- It receives data from the Controller (e.g., a user object to save).
- Applies business rules (e.g., checking if a user's age is valid).
- Uses dependency injection (more on this below) to access other components.
- Transactional management (via @Transactional) ensures operations are atomic.
- Flow Transition: The Service Layer interacts with the Model (bidirectional arrow) and, indirectly, the Repository (via dependency injection). It also connects downward to the Database.
- Why This Matters: This layer decouples business logic from presentation (Controller) and data access, making it reusable across multiple controllers or even microservices.
Step 4: Dependency Injection Integrates the Repository
The Repository is a data access layer, typically an interface extending CrudRepository or JpaRepository from Spring Data JPA. It provides out-of-the-box CRUD (Create, Read, Update, Delete) methods without manual implementation.
Key Details:
- Dependency Injection (DI): Spring's IoC (Inversion of Control) container injects the Repository into the Service Layer (or sometimes Controller) using @Autowired. This arrow in the diagram shows how the Repository is "injected" to provide CRUD capabilities without tight coupling.
- The Repository abstracts database interactions, allowing custom queries via @Query or method naming conventions (e.g., findByName).
- It extends CRUD services, meaning it inherits methods like save(), findAll(), deleteById().
- Flow Transition: The injected Repository is used by the Service Layer to interact with the Model and Database.
- Why This Matters: DI promotes loose coupling and testability (e.g., mock the Repository in unit tests). Extending CRUD reduces boilerplate code.
Step 5: Model Represents the Data
The Model refers to the domain entities or data objects (annotated with @Entity in JPA). These are POJOs (Plain Old Java Objects) representing database tables, like a User class with fields (id, name, email).
Key Details:
- It holds the data being manipulated (e.g., a User object created from the request body).
- Mapped to database tables via JPA annotations (e.g., @Id, @Column).
- The Service Layer populates or modifies the Model before passing it to the Repository.
- Flow Transition: The Model is persisted to or retrieved from the Database via the Repository.
- Why This Matters: Models encapsulate data structure, ensuring consistency across layers.
Step 6: Database Persistence and Retrieval
The final layer is the actual database (e.g., MySQL, PostgreSQL, H2). Data is stored or queried here.
Key Details:
- JPA/Spring Data: The arrow labeled "JPA/Spring Data" indicates the use of Java Persistence API (JPA) with Spring Data for ORM (Object-Relational Mapping). This maps Model objects to SQL queries automatically (e.g., Hibernate as the JPA provider).
- The Repository translates CRUD operations into database actions (e.g., repository.save(model) generates an INSERT SQL).
- Bidirectional flow: Data flows from Model to Database (write) and back (read).
- Flow Transition: After database operations, the response flows back through the layers (Database -> Repository -> Service -> Controller -> Client).
- Why This Matters: This ensures persistent storage with minimal SQL coding, supporting transactions and scalability.
5. Spring Boot Vs Spring Framework
| Feature | Spring Framework | Spring Boot |
| Configuration | Requires manual XML or Java-based config | Auto-configuration with minimal setup |
| Dependency Management | Manual dependency configuration | Simplified with starters |
| Server Setup | Requires external server (e.g., Tomcat) | Embedded server (Tomcat, Jetty, etc.) |
| Boilerplate Code | More boilerplate code | Reduced with annotations and defaults |
| Development Speed | Slower due to manual setup | Faster due to conventions and starters |
| Production Readiness | Limited built-in monitoring | Actuator for monitoring and metrics |
| Use Case | General-purpose framework | Web apps, microservices, rapid prototyping |
Key Difference: Spring Boot is an extension of the Spring Framework, designed to simplify its usage by providing defaults and reducing configuration overhead.
6. Setting Up a Spring Boot Project
To set up a Spring Boot project:
Using Spring Initializer
- Visit start.spring.io.
- Select project metadata (Group, Artifact, Java version).
- Choose a build tool (Maven or Gradle).
- Add dependencies (e.g., Spring Web, Spring Data JPA).
- Generate and download the project ZIP.
- Import into your IDE.
Manual Setup
- Create a Maven/Gradle project.
- Add spring-boot-starter-parent (for Maven) or equivalent Gradle configuration.
- Include necessary dependencies in pom.xml or build.gradle.
- Create a main class with @SpringBootApplication.
Main Class Example
import org.springframework.boot.SpringApplication;
import org.springframework.boot.autoconfigure.SpringBootApplication;

@SpringBootApplication
public class MyApplication {
    public static void main(String[] args) {
        SpringApplication.run(MyApplication.class, args);
    }
}
Run the Application
Use the IDE’s run feature or command line: mvn spring-boot:run (Maven) or ./gradlew bootRun (Gradle).
7. Key Features of Spring Boot
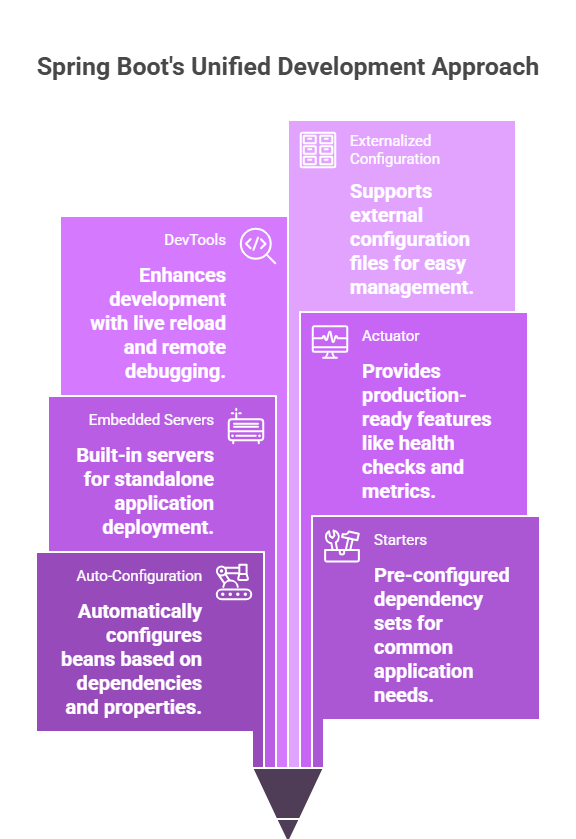
- Auto-Configuration: Automatically configures beans based on dependencies and properties.
- Starters: Pre-configured dependency sets (e.g., spring-boot-starter-web, spring-boot-starter-data-jpa).
- Embedded Servers: Built-in Tomcat, Jetty, or Undertow for standalone applications.
- Spring Boot Actuator: Provides production-ready features like health checks and metrics.
- Spring Boot DevTools: Enhances development with live reload and remote debugging.
- Externalized Configuration: Supports application.properties or application.yml for configuration.
- Profiles: Allows environment-specific configurations (e.g., dev, prod).
- Spring Boot CLI: Command-line tool for rapid prototyping with Groovy scripts.
8. Spring Boot Annotations (Detailed)
Spring Boot leverages annotations to simplify configuration and development. Key annotations include:
- @SpringBootApplication: Combines @Configuration, @EnableAutoConfiguration, and @ComponentScan to mark the main application class.
- @RestController: Marks a class as a RESTful controller, combining @Controller and @ResponseBody.
- @RequestMapping: Maps HTTP requests to handler methods (supports @GetMapping, @PostMapping, etc.).
- @Autowired: Injects dependencies automatically.
- @Service: Marks a class as a service component in the business layer.
- @Repository: Marks a class as a data access component, enabling exception translation.
- @Entity: Marks a class as a JPA entity for database mapping.
- @Configuration: Defines a class that provides bean definitions.
- @Bean: Declares a method that produces a bean to be managed by the Spring container.
- @Component: Generic annotation for Spring-managed components.
- @EnableAutoConfiguration: Enables Spring Boot’s auto-configuration.
- @Profile: Specifies beans to be loaded for specific profiles.
- @Valid: Enables validation for method parameters or fields.
- @ExceptionHandler: Handles specific exceptions thrown by controller methods.
Example
@RestController
@RequestMapping("/api")
public class UserController {
    @Autowired
    private UserService userService;

    @GetMapping("/users/{id}")
    public User getUser(@PathVariable Long id) {
        return userService.findById(id);
    }
}
9. Spring Boot Starter Dependencies
Starters are dependency descriptors that bundle related dependencies. Common starters include:
- spring-boot-starter-web: For building RESTful APIs and web applications (includes Spring MVC, Tomcat).
- spring-boot-starter-data-jpa: For JPA-based data access with Hibernate.
- spring-boot-starter-security: For authentication and authorization.
- spring-boot-starter-test: For unit and integration testing (includes JUnit, Mockito).
- spring-boot-starter-actuator: For monitoring and management endpoints.
- spring-boot-starter-jdbc: For JDBC-based database access.
- spring-boot-starter-data-mongodb: For MongoDB integration.
Example (Maven)
  org.springframework.boot
  spring-boot-starter-web
Starters simplify dependency management by including all required libraries and their compatible versions.
10. Spring Boot Auto-Configuration
Auto-configuration automatically configures Spring beans based on the classpath, dependencies, and properties. For example:
- If spring-boot-starter-web is in the classpath, Spring Boot configures a DispatcherServlet and embedded Tomcat.
- If a database driver (e.g., MySQL) is detected, it configures a DataSource.
How It Works
- Spring Boot scans the classpath for libraries and beans.
- It applies conditional configurations using @Conditional annotations (e.g., @ConditionalOnClass, @ConditionalOnMissingBean).
- It uses application.properties or application.yml to customize settings.
Example: Including spring-boot-starter-data-jpa and a MySQL driver triggers auto-configuration of a DataSource, EntityManagerFactory, and TransactionManager.
11. Spring Boot Application Properties & YAML
Spring Boot supports externalized configuration via application.properties or application.yml.
application.properties
server.port=8080
spring.datasource.url=jdbc:mysql://localhost:3306/mydb
spring.datasource.username=root
spring.datasource.password=password
application.yml
server:
  port: 8080
spring:
  datasource:
    url: jdbc:mysql://localhost:3306/mydb
    username: root
    password: password
Key Properties
- server.port: Sets the application port.
- spring.datasource.*: Configures database connections.
- spring.jpa.*: Configures JPA/Hibernate settings.
- logging.level.*: Sets logging levels.
YAML is preferred for hierarchical configurations, while properties are simpler for flat key-value pairs.
12. Spring Boot Profiles
Profiles allow environment-specific configurations (e.g., dev, prod, test).
Example
- Create application-dev.properties and application-prod.properties.
- Set the active profile in application.properties:
spring.profiles.active=dev - Or via command line: java -jar app.jar --spring.profiles.active=prod
Use Case
- dev: Use an in-memory H2 database.
- prod: Use a MySQL database.
Annotation Example
@Profile("dev")
@Configuration
public class DevConfig {
    @Bean
    public DataSource dataSource() {
        return new EmbeddedDatabaseBuilder().setType(EmbeddedDatabaseType.H2).build();
    }
}
13. Creating RESTful APIs with Spring Boot
To create a RESTful API:
- Add spring-boot-starter-web.
- Create a @RestController:
@RestController @RequestMapping("/api/users") public class UserController { @GetMapping("/{id}") public User getUser(@PathVariable Long id) { return new User(id, "John Doe"); } @PostMapping public User createUser(@RequestBody User user) { return user; } }- Use @GetMapping, @PostMapping, @PutMapping, @DeleteMapping for CRUD operations.
- Return JSON responses using Jackson (included in spring-boot-starter-web).
Example Response
{
    "id": 1,
    "name": "John Doe"
}
14. Spring Boot and Spring Data JPA
Spring Data JPA simplifies database operations by providing a repository abstraction.
Setup
- Add spring-boot-starter-data-jpa and a database driver (e.g., MySQL).
- Configure the datasource in application.properties.
- Create an entity:
@Entity public class User { @Id @GeneratedValue(strategy = GenerationType.IDENTITY) private Long id; private String name; // Getters and setters } - Create a repository:
public interface UserRepository extends JpaRepository { List findByName(String name); } - Use in a service:
@Service
public class UserService {
    @Autowired
    private UserRepository repository;

    public User saveUser(User user) {
        return repository.save(user);
    }
}
Spring Data JPA provides built-in methods like save, findById, and delete.
15. Spring Boot with H2, MySQL, and PostgreSQL
H2 (In-Memory Database)
- Add spring-boot-starter-data-jpa and com.h2database:h2.
- Configure:
spring.datasource.url=jdbc:h2:mem:testdb spring.datasource.driverClassName=org.h2.Driver spring.jpa.database-platform=org.hibernate.dialect.H2Dialect - Ideal for testing and prototyping.
MySQL
- Add mysql:mysql-connector-java.
- Configure:
spring.datasource.url=jdbc:mysql://localhost:3306/mydb
spring.datasource.username=root
spring.datasource.password=password
spring.jpa.hibernate.ddl-auto=update
PostgreSQL
- Add org.postgresql:postgresql.
- Configure:
spring.datasource.url=jdbc:postgresql://localhost:5432/mydb
spring.datasource.username=postgres
spring.datasource.password=password
spring.jpa.hibernate.ddl-auto=update
Spring Boot auto-configures the datasource based on the driver in the classpath.
16. Spring Boot Exception Handling
Handle exceptions globally using @ControllerAdvice:
@ControllerAdvice
public class GlobalExceptionHandler {
    @ExceptionHandler(ResourceNotFoundException.class)
    @ResponseStatus(HttpStatus.NOT_FOUND)
    public ResponseEntity handleNotFound(ResourceNotFoundException ex) {
        return new ResponseEntity<>(ex.getMessage(), HttpStatus.NOT_FOUND);
    }

    @ExceptionHandler(Exception.class)
    @ResponseStatus(HttpStatus.INTERNAL_SERVER_ERROR)
    public ResponseEntity handleGeneralException(Exception ex) {
        return new ResponseEntity<>("An error occurred", HttpStatus.INTERNAL_SERVER_ERROR);
    }
}
Custom Exception
public class ResourceNotFoundException extends RuntimeException {
    public ResourceNotFoundException(String message) {
        super(message);
    }
}
Use @ExceptionHandler for specific controllers or globally via @ControllerAdvice.
17. Spring Boot Validation
Validate input using Bean Validation API and Hibernate Validator:
- Add spring-boot-starter-validation.
- Use annotations like @NotNull, @Size, @Email:
public class UserDTO { @NotNull(message = "Name cannot be null") @Size(min = 2, max = 50, message = "Name must be between 2 and 50 characters") private String name; @Email(message = "Invalid email") private String email; }- Enable validation in controllers:
@PostMapping("/users") public ResponseEntity createUser(@Valid @RequestBody UserDTO user) { return ResponseEntity.ok(user); } - Handle validation errors:
@ExceptionHandler(MethodArgumentNotValidException.class)
public ResponseEntity> handleValidationErrors(MethodArgumentNotValidException ex) {
    Map errors = new HashMap<>();
    ex.getBindingResult().getFieldErrors().forEach(error ->
        errors.put(error.getField(), error.getDefaultMessage()));
    return new ResponseEntity<>(errors, HttpStatus.BAD_REQUEST);
}
18. Spring Boot Security
Spring Security secures applications with authentication and authorization.
Setup
@Configuration
@EnableWebSecurity
public class SecurityConfig {
    @Bean
    public SecurityFilterChain securityFilterChain(HttpSecurity http) throws Exception {
        http
            .authorizeHttpRequests(auth -> auth
                .requestMatchers("/api/public").permitAll()
                .anyRequest().authenticated()
            )
            .formLogin();
        return http.build();
    }

    @Bean
    public UserDetailsService userDetailsService() {
        UserDetails user = User.withUsername("user")
            .password("{noop}password")
            .roles("USER")
            .build();
        return new InMemoryUserDetailsManager(user);
    }
}
Features
- Secure endpoints with roles and permissions.
- Support for OAuth2, JWT, and LDAP.
- CSRF protection and session management.
19. Spring Boot Actuator
Actuator provides production-ready endpoints for monitoring.
Setup
- Add spring-boot-starter-actuator.
- Configure endpoints in application.properties:
management.endpoints.web.exposure.include=health,info,metrics
Common Endpoints
- /actuator/health: Application health status.
- /actuator/info: Application metadata.
- /actuator/metrics: Performance metrics.
Custom Health Check
@Component
public class CustomHealthIndicator implements HealthIndicator {
    @Override
    public Health health() {
        return Health.up().withDetail("custom", "All good").build();
    }
}
20. Spring Boot DevTools
DevTools enhances development with:
- Live Reload: Automatically restarts the application on code changes.
- Remote Debugging: Connects to remote applications.
- Default Settings: Optimized for development (e.g., caching disabled).
Setup
Add spring-boot-devtools (optional dependency in Maven).
21. Spring Boot Testing (Unit & Integration)
Spring Boot supports testing with spring-boot-starter-test.
Unit Testing
@SpringBootTest
class UserServiceTest {
    @Autowired
    private UserService userService;

    @Test
    void testSaveUser() {
        User user = new User(1L, "John");
        assertEquals(user, userService.saveUser(user));
    }
}
Integration Testing
@SpringBootTest(webEnvironment = SpringBootTest.WebEnvironment.RANDOM_PORT)
class UserControllerTest {
    @Autowired
    private TestRestTemplate restTemplate;

    @Test
    void testGetUser() {
        ResponseEntity response = restTemplate.getForEntity("/api/users/1", User.class);
        assertEquals(HttpStatus.OK, response.getStatusCode());
    }
}
Annotations
- @SpringBootTest: Loads the full application context.
- @MockBean: Mocks dependencies.
- @Test: Marks test methods.
22. Building Microservices with Spring Boot
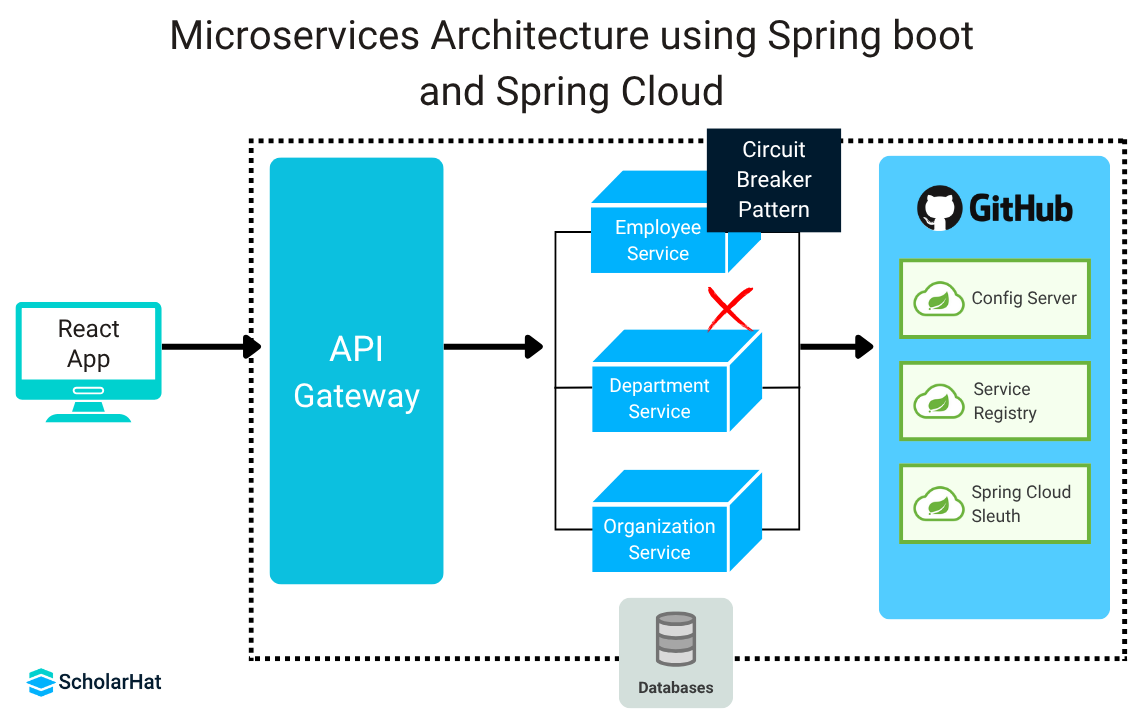
Spring Boot is ideal for microservices due to:
- Lightweight Nature: Minimal resource usage.
- Spring Cloud Integration: Tools for service discovery (Eureka), configuration (Spring Cloud Config), and API gateways (Spring Cloud Gateway).
- Independent Deployment: Each microservice runs as a standalone application.
Example
- Create a service with spring-boot-starter-web.
- Register with Eureka for service discovery.
- Use Feign clients for inter-service communication.
23. Deploying Spring Boot Applications
Deployment options:
- JAR File:
- Build: mvn package.
- Run: java -jar target/myapp.jar.
- WAR File: Deploy to an external server like Tomcat.
- Cloud Platforms: Deploy to AWS, Azure, or Heroku using Docker or native integrations.
- Docker:
FROM openjdk:17
COPY target/myapp.jar /app.jar
ENTRYPOINT ["java", "-jar", "/app.jar"]
24. Best Practices
- Use Profiles: Separate configurations for different environments.
- Leverage Starters: Avoid manual dependency management.
- Centralize Exception Handling: Use @ControllerAdvice for consistency.
- Enable Actuator: Monitor production applications.
- Secure APIs: Use Spring Security for authentication and authorization.
- Optimize Auto-Configuration: Customize only when necessary.
- Write Tests: Include unit and integration tests.
- Use Logging: Configure logging levels for debugging and monitoring.
25. Learning Resources
- Official Documentation: docs.spring.io/spring-boot
- Spring Initializr: start.spring.io
- Books:
- Spring Boot in Action by Craig Walls.
- Spring Microservices in Action by John Carnell.
- Online Courses and programs:
- Java Solution Architect Certification Training
- Udemy: “Spring & Hibernate for Beginners” by Chad Darby.
- Community:
- Stack Overflow for Spring Boot questions.
- Spring Boot GitHub repository for examples.
- Blogs:
- Spring Blog (spring.io/blog).
- DZone’s Spring Boot section.
| Read More: Top 50 Spring Boot Interview Questions and Answer |
Conclusion
Spring Boot has revolutionized the way Java applications are developed by minimizing configuration overhead and enabling developers to focus on building robust, scalable applications quickly. Whether you're creating RESTful web services, integrating databases, or deploying microservices to the cloud, Spring Boot provides all the essential tools and features to make development seamless and efficient.
By mastering the concepts outlined in this guide from project setup and annotations to security, testing, and deployment you are well on your way to becoming a confident Spring Boot developer. Keep experimenting, build real-world projects, and explore the vibrant Spring ecosystem to take your skills even further. If you have no clue where to start just start with our FREE Java course. Or if you are already a professional and want to upgrade your career with spring boot then, start with Java Solution Architect Certification Training.
Happy coding!
FAQs
Yes, Spring Boot is great for beginners who want to learn how to build web apps and REST APIs in Java. It makes things easier by setting up a lot of stuff for you and by including servers right in the app, so you don't have to deal with complicated setups.
On average, learners can expect to become proficient in Spring Boot within 3 weeks, dedicating a few hours per week.
Spring Boot gives an easier, quicker path to set up, configure, and run apps. It eliminates the heavy lifting of configuration that is required for setting up most Spring-based apps. Developers can jump right in and use Spring Boot without ever having to learn the underlying Spring framework