

10
JulPods in Kubernetes: Explained in Simple Words
21 May 2025
Advanced
2.73K Views
20 min read

Learn with an interactive course and practical hands-on labs
Free Docker Online Course with Certificate - Beginner Level
Pods in Kubernetes are like small homes for your application’s containers; a place where they live, work, and share resources. Think of a Pod as a tightly connected group of one or more containers that need to function as a team. They share the same network, storage, and lifecycle, which makes it easier to manage and scale applications.
In the Kubernetes tutorial, we are going to learn about Pods in Kubernetes, Pod Structure, Pod Lifecycle, Pod Networking, Volumes in Pods, and many more.
What is a Pod in Kubernetes?
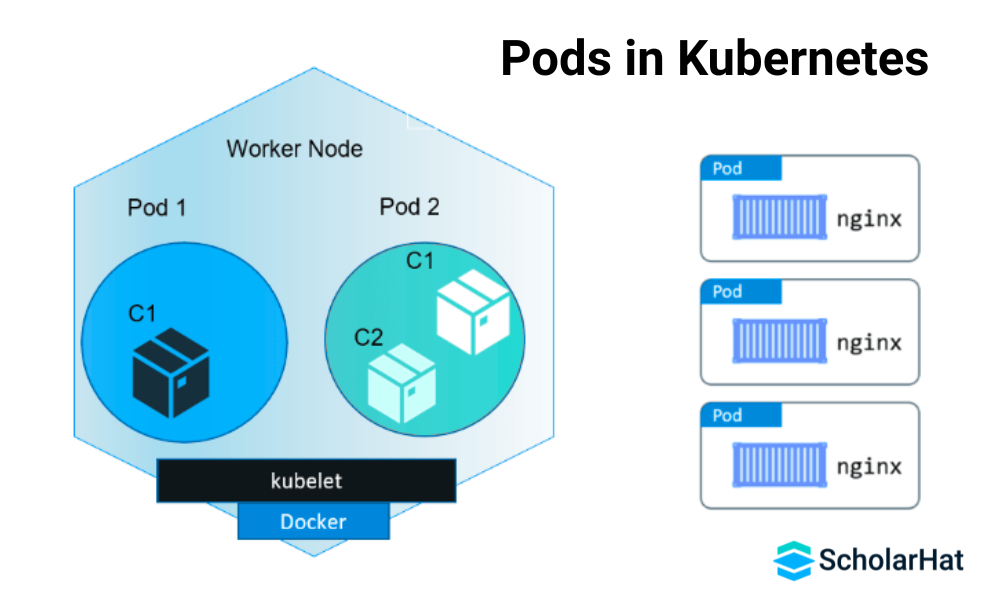
Pods in Kubernetes are the smallest units of deployment. They contain one or more containers that share the same network, storage, and resources and work together as a single unit. Pods in Kubernetes help organize containers that need to run together and make managing applications easier within a Kubernetes cluster.
Why are pods the smallest deployable unit in Kubernetes?
Pods are the smallest deployable unit in Kubernetes because:
- Pods in Kubernetes are the smallest deployable unit used to run applications.
- A Pod can have one or more containers that work together and share the same network and storage.
- Containers inside a Pod can easily communicate with each other because they live in the same environment.
- Kubernetes uses Pods to group containers, making it easier to manage, deploy, and scale applications.
- Instead of handling each container separately, Kubernetes treats a Pod as a single unit, which keeps things simple and organized.
Pod's Structure in Kubernetes
Dear learners, I hope you’ve now got a basic understanding of Pods in Kubernetes. Now, let’s move a little further and learn about the Pod structure in Kubernetes to see how it all works inside. Let's start:
1. Containers
The primary components of a Pod in Kubernetes are its containers. While a pod can encapsulate multiple containers, it's common to have just one. When multiple containers are present, they are tightly coupled and share resources, facilitating close cooperation.
2. Storage (Volumes)
Pods in Kubernetes can specify storage volumes that are accessible to all containers within the Pod. This shared storage allows containers to persist data and share files.
3. Network
Each Pod is assigned a unique IP address within the cluster. All containers within the Pod share this network namespace, meaning they can communicate with each other using localhost and share port space, eliminating port conflicts.
4. Metadata
Pods in Kubernetes include metadata such as a name, unique identifiers (UIDs), and labels. This metadata aids in managing and organizing Pods within the cluster.
Difference Between Single-Container Vs. Multi-container Pods
Let's understand the difference between Single-container vs multi-container Pods
| Features | Single-Container Pod | Multi-container Pods |
| Number of Containers | Contains one container. | Contains two or more containers. |
| Use Case | Used for simple, standalone applications. | Used when multiple containers need to work closely together. |
| Resource Sharing | All resources are dedicated to the single container. | Containers share resources like network, storage, and CPU. |
| Communication | The container communicates with external services or systems. | Containers communicate through localhost within the same Pod. |
| Scaling | Scaling is done by duplicating Pods, each with one container. | Scaling is done by duplicating the entire Pod, all containers inside it. |
| Management Complexity | Simpler to manage and deploy. | More complex, but allows tighter coupling of related containers. |
| Examples | Web server with a single container. | A main app container with a logging or monitoring container. |
Pod's Lifecycle in Kubernetes
A Pod's lifecycle in Kubernetes includes several phases, such as Pending, Running, and Terminated. Kubernetes manages the Pod’s state, from creation to termination, ensuring it functions smoothly within the cluster.
Phases of a Pod in Kubernetes
Each Pod in Kuberneteshas different phases during its life cycle. These phases show the pod's current state, from creation to completion or failure.
1. Pending
Kubernetes has accepted the Pod, but one or more of its containers haven’t started yet. This could be because the scheduler is still selecting a node or the container image is still being downloaded.
2. Running
The Pod has been scheduled to a node, and all containers are running or starting up. The Pod is actively working during this phase.
3. Succeeded
All containers in the Pod have completed successfully and have exited. This usually happens with short-lived Pods like those in a Job.
4. Failed
One or more containers in the Pod have exited with an error, and the Pod is not expected to restart.
5. Unknown
The state of the Pod can’t be determined. This may happen if the node hosting the Pod is unreachable or there’s a communication issue.
How Pods are Created, Scheduled, and Terminated in Kubernetes
Pods in Kubernetes go through a full life cycle, from creation to termination. Let's learn how it works in simple steps:
1. Creation of Pods in Kubernetes
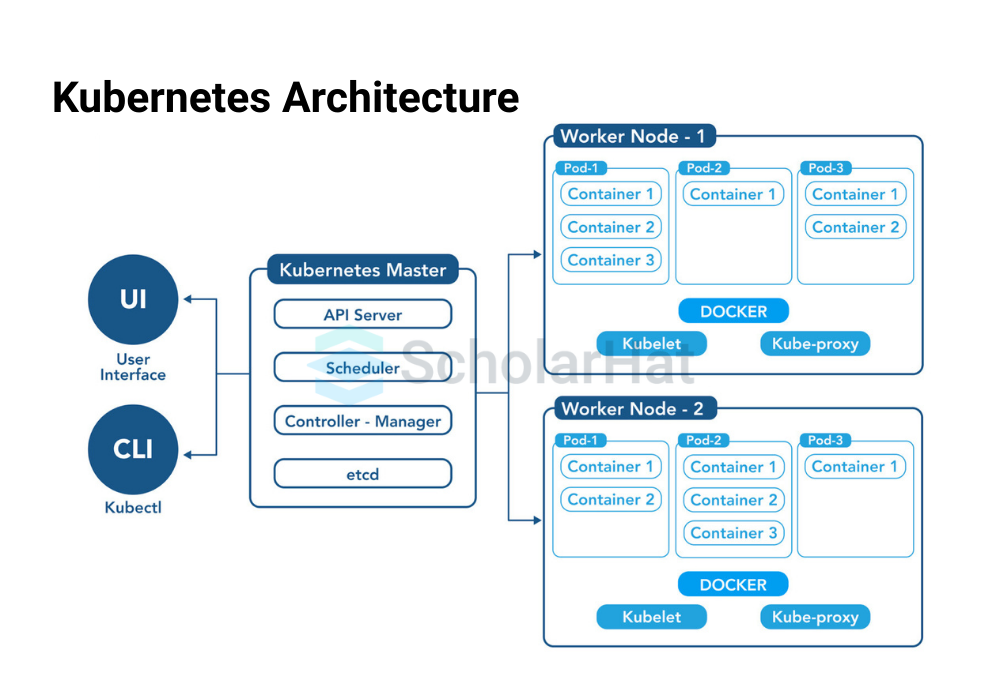
When you define a Pod using a YAML or JSON file and apply it using kubectl apply, the Kubernetes API Server receives the request. The Pod specification includes details like the container image, resources, and labels.
2. Scheduling of Pods in Kubernetes
Once created, the Kube-scheduler checks the cluster to find the best node to run the Pod. It looks at resource availability (CPU, memory), node conditions, and any constraints (like node selectors or taints).
3. Running of Pods in Kubernetes
After a node is selected, the Kubelet (the agent on that node) pulls the container image, creates the container(s), and starts the Pod. The Pod now enters the Running phase.
4. Termination of Pods in Kubernetes
A Pod is terminated when you delete it manually, or when it’s no longer needed (like in a Job after it finishes). Kubernetes sends a graceful shutdown signal to the containers, allowing them some time (default: 30 seconds) to clean up before being forcefully killed.
5. Restart or Recreate (if managed by a controller)
If a Pod fails and it's part of a Deployment, ReplicaSet, or StatefulSet, Kubernetes automatically recreates it to maintain the desired state.
Pod Networking in Kubernetes
Pods in Kubernetes share the same network space, which means all containers inside a Pod can talk to each other using localhost. This networking model makes Pods in Kubernetes work like a single machine, allowing Pods to handle internal communication easily.
How do containers inside a Pod communicate?
Containers inside a Pod in Kubernetes communicate with each other using localhost, because they share the same network namespace. This means they can easily connect over ports without needing a separate IP or external networking setup.
How Pods in Kubernetes Share IP and Use Localhost
In Pods in Kubernetes, all containers inside a Pod share the same IP address and network space. This means they can talk to each other using localhost, just like programs running on the same computer. For example, imagine a Pod has two containers:
- One container is a web server running on port 8080.
- The second is a logging service that needs to access the web server.
The logging container can simply connect to localhost:8080 to talk to the web server; no need for an external IP or complicated networking.
Volumes in Kubernetes Pods
Volumesin Kubernetes podsallow containers to store and share data. They helpPodskeep data safeeven if a container restarts.
Using Volumes for Shared Storage in Pods
In Kubernetes, volumes allow containers inside the same Pod to share data easily. Since all containers in a Pod can access the same volume, they can read and write files together, just like sharing a common folder.
For example, if one container generates logs and another processes them, both can use a shared volume to exchange those files smoothly. This makes teamwork between containers simple and reliable inside a Pod.
Difference Between Persistent Vs. Ephemeral Storage in Kubernetes
In Kubernetes, storage can be persistent or ephemeral, depending on how long you want the data to last. Let's understand the differences.
| Features | Persistent Storage | Ephemeral Storage |
| Data Lifespan | Keeps data even if the Pod is deleted | Data is lost when the Pod is removed or restarted |
| Use Case | Good for databases or long-term data storage | Best for temporary files or short-term tasks |
| Backed By | Uses PersistentVolume (PV) or cloud storage | Uses emptyDir or the container’s local storage |
| Shared Across Pods? | Yes, it can be shared if needed | Only used within the life of one Pod |
| Survives Node Failure? | Yes (if backed by external storage) | No, the data is gone if a node fails |
Multi-Container Pod Use Cases in Kubernetes
Sometimes, a single container isn’t enough. Pods in Kubernetes can hold multiple containers that work closely together. Here are two common use cases:
1. Sidecar Pattern
This is like having a helper container next to your main app. For example, the main container runs the app, and the sidecar container handles logging or monitoring. They share the same Pod, so they can efficiently work together.
2. Init Containers
These are special containers that run before the main app starts. They’re used for setup tasks, like loading configs, checking database connections, or downloading files, and they finish their job before the main container runs.
Pod vs Other Kubernetes Objects
In Kubernetes, a Pod is the basic unit, but managing Pods directly can be limiting. That’s why we often use higher-level objects like Deployments to manage them more effectively.
| Feature | Pod | Deployment |
| Definition | The smallest unit that runs containers | A controller that manages Pods automatically |
| Management | Must be created and managed manually | Automatically manages the lifecycle of Pods |
| Scaling | Can’t scale on its own | Easily scales Pods up or down |
| Self-healing | Not self-healing (if it crashes, it stays down) | Auto-recreates Pods if they fail |
| Use Case | Suitable for testing or learning | Best for production and long-running apps |
Why do we rarely create Pods directly in real projects?
While you can create a single Pod in Kubernetes manually using YAML, it’s not practical for real-world projects. The reasons are:
- No Auto-restart: If the Pod crashes, it won't restart unless you do it manually.
- No Scaling: You can’t easily add more replicas of the same Pod.
- No Updates: It’s hard to roll out updates or roll back if something goes wrong.
- No Health Checks or Monitoring: Deployments handle these automatically.
Creating and Managing Pods in Kubernetes
Pods in Kubernetes are usually created using YAML files. These files describe the Pod’s configuration, like the container image, ports, and name. Once you have the YAML, you can use kubectl commands to create, view, or delete the Pod.
YAML Example: Creating Pods in Kubernetes
 apiVersion: v1
 kind: Pod
 metadata:
   name: my-first-pod
 spec:
  containers:
    - name: my-container
      image: nginx
      ports:
        - containerPort: 80
This creates a Pod named my-first-pod with one nginx container running on port 80.
kubectl commands to create, view, and delete Pods in Kubernetes
Let's learn useful kubectl commands to create, view, and delete Pods in Kubernetes:
1. Create a Pod from YAML: Creates a Pod using the YAML configuration file.
kubectl apply -f pod.yaml2. View All Pods:Lists all the running Pods in the current namespace.
kubectl get pods3. View Detailed Info of a Pod: Shows detailed information about a specific Pod.
kubectl describe pod my-first-pod4. Check Pod Logs: Displays the logs from the container running inside the Pod.
kubectl logs my-first-pod5. Delete a Pod: Deletes the specified Pod from the cluster.
kubectl delete pod my-first-podCommon Issues and Troubleshooting Pods in Kubernetes
When working with Pods in Kubernetes, you might face common issues like scheduling problems, container crashes, or network errors. Let's learn some quick troubleshooting tips to help you fix these Pod problems efficiently:
- Pod stuck in Pending state: This usually means the node does not have enough resources or the scheduler can’t place the pod. Check node availability and resource requests.
- CrashLoopBackOff error:Your container keeps crashing and restarting. Look at the container logs (kubectl logs) to find the root cause.
- Image pull errors:Kubernetes can’t download the container image. Verify the image name, tag, and credentials if it’s from a private registry.
- Pod not reachable or no network connectivity:Check if the Pod’s network policies or service configurations block traffic. Also, ensure CNI plugins are properly installed.
Advantages of Pods in Kubernetes
Let's learn some simple and apparent advantages of using Pods in Kubernetes that make your application easier to run and manage.
- Share network efficiently: All containers in a Pod share the same IP, so they can talk to each other using localhost.
- Share storage: Containers in a Pod can share files using volumes.
- Easy to manage and scale: You can quickly scale Pods up or down using Kubernetes tools.
- Handles restarts:If a Pod crashes, Kubernetes can restart it automatically.
- Perfect for side tasks:You can run helper tools (like log collectors) alongside your main app in the same Pod.
- Works well with Kubernetes features:Pods work smoothly with Deployments, Services, and other Kubernetes tools.
Dear Learners, If you haven't checked:- What is Kubernetes Architecture?Just go and check this out..
Boost your cloud career with our Azure Solution Architect Certification Training, designed to help you master real-world architecture skills using simple and clear concepts. Join now and learn how to build reliable, scalable solutions on Azure just like a pro!
Conclusion
In simple words, Pods in Kubernetes are the basic units that run one or more containers together with shared network and storage. They make it easy to manage, scale, and connect your apps smoothly. Overall, using Pods in Kubernetes helps build reliable and efficient cloud-native applications.
If you are preparing for Kubernetes Interviews, this Kubernetes Interview Questions and Answers Free Book can really help you. It has simple questions and answers that are easy to understand, download and read it for free today!
Kubernetes Pods Quiz
🚀 Boost your Kubernetes knowledge by testing your understanding of Pods!
Q1: What is the smallest deployable unit in Kubernetes?
FAQs
Yes, a Pod can run multiple containers. These containers work closely together and share the same IP and storage, which is common in sidecar patterns.
If a Pod is created manually, it won’t restart automatically. But if it's managed by a Deployment, Kubernetes will recreate it.
Use commands like kubectl logs <pod-name> to see logs and kubectl describe pod <pod-name> to view detailed status.
No, Pods are usually temporary. They can be replaced or deleted anytime, which is why persistent storage is managed separately.
Take our Kubernetes skill challenge to evaluate yourself!

In less than 5 minutes, with our skill challenge, you can identify your knowledge gaps and strengths in a given skill.