


25
JunAngular Dependency Injection | Types of dependency injection in Angular
14 Aug 2025
Beginner
6.97K Views
14 min read

Learn with an interactive course and practical hands-on labs
Angular Course Free with Certificate - Beginner Level
Dependency Injection in Angular means providing needed things (like services) to a component instead of creating them inside. It’s a core concept that helps manage how parts of the app depend on each other. Angular automatically gives these objects when needed, which makes the code cleaner, easier to test, and well-organized. It also helps in building flexible and reusable applications.
In the Angular tutorial, you will get the complete guide on Dependency Injection in Angular.
What Is Dependency Injection?
Dependency Injection is a design pattern that promotes the separation of concerns by decoupling components and their dependencies. In Angular, dependencies are typically services, but they can also be values, such as strings or functions. DI is used to inject instances of services, components, and other objects into classes that depend on them, promoting modularity, reusability, and testability within the application.

There are three types of classes in Dependency Injection:
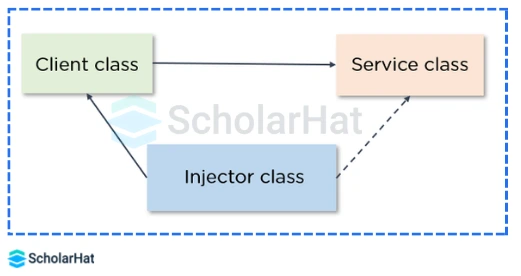
- Client Class - This is the dependent class, which depends on the service class.
- Service Class - Class that provides the service to the client class.
- Injector Class - Injects the service class object into the client class.
Key Concepts of Dependency Injection in Angular
Let’s learn the key concepts of Dependency Injection in Angular.
1. Injector
Injector in Angular is a part of the Dependency Injection system that is responsible for creating and providing the required service or object to a component or another service. It plays an important role because it controls how and where the dependencies are delivered in the app.
- Creates and provides services: The injector is responsible for creating the service only once and giving it wherever it is needed.
- Supports reusability: It does not create new objects again and again; it shares the same instance to save memory and improve performance.
- Controls dependency flow: It decides how and where the services are injected, keeping the app structure clean and easy to manage.
2. Providers
Providers in Angular tell the Injector how to create or deliver a service when a component or class needs it. They act like instructions or rules for giving the right dependency at the right place.
- Define How to Create a Service: Providers give instructions to the Angular Injector on how to create or deliver a service when it's needed. This ensures that dependencies are managed automatically and correctly.
- Control the Scope of a Service: Providers can be registered at different levels, such as the module, component, or service level. This controls where and how long the service will be available within the application.
- Support Multiple Provider Types: Angular supports different types of providers like useClass, useValue, useFactory, and useExisting. These options give developers flexibility to customize how a service is provided and reused.
3. Injectable Decorator
The @Injectable() decorator in Angular is used to mark a class as available for Dependency Injection. It tells Angular that this class can have dependencies injected into it, and it can also be injected into other components or services.
- Enables Dependency Injection: It allows Angular to inject other services into the class or make the class available to be injected somewhere else.
- Used Mostly with Services: Services in Angular are usually decorated with @Injectable() so they can be shared and reused across components.
- Supports Tree-shaking and ProvidedIn: You can use providedIn: 'root' inside @Injectable() to automatically register the service in the root injector, helping with efficient loading and automatic service registration.
Types of Dependency Injection in Angular
In Angular, there are three types of Dependency Injection (DI):
- Constructor injection
- Setter injection
- Interface injection
Let's explore each type in detail:
1. Constructor injection
Constructor injection is the most common type of DI in Angular. Dependencies are injected through the constructor of a class, typically a component or a service. The Angular framework automatically resolves and provides the required dependencies when creating an instance of the class.
import { Injectable } from '@angular/core';

@Injectable({
  providedIn: 'root',
})
export class MyService {
  constructor(private dependencyService: DependencyService) {
    // ...
  }
}
In the example above, DependencyService is injected into the MyService class through its constructor.
2. Setter injection
Setter injection involves injecting dependencies through setter methods. Instead of receiving dependencies through the constructor, the class provides setter methods that can be called to set the dependencies after the instance is created.
import { Injectable } from '@angular/core';

@Injectable({
  providedIn: 'root',
})
export class MyService {
  private dependencyService: DependencyService;

  setDependencyService(dependencyService: DependencyService): void {
    this.dependencyService = dependencyService;
  }
}
Setter injection can be useful in scenarios where injecting dependencies through the constructor is not feasible or desirable.
3. Interface injection
Interface-based injection involves creating an interface for a service and injecting the interface rather than the concrete implementation. This allows for greater flexibility and easier substitution of implementations, especially during testing.
import { Injectable } from '@angular/core';

interface DependencyInterface {
  // Define methods and properties
}

@Injectable({
  providedIn: 'root',
})
export class DependencyService implements DependencyInterface {
  // Implementation of the interface
}

@Injectable({
  providedIn: 'root',
})
export class MyService {
  constructor(private dependency: DependencyInterface) {
    // ...
  }
}
In this example, MyService depends on the DependencyInterface, which the DependencyService implements. During testing, a mock implementation of the interface can be provided to isolate the unit being tested.
How To Implement Angular Dependency Injection?
Implementing Angular Dependency Injection involves the following steps to set up and use services within your components.
1. Create a Service
First, create a service that will provide functionality or data to other components. You can use Angular CLI to generate a service:
ng generate service my-serviceThis will create a my-service.service.ts file. Open the file and define your service:
import { Injectable } from '@angular/core';

@Injectable({
  providedIn: 'root', // Provides the service at the root level
})
export class MyService {
  // Implement your service logic here
}
2. Inject the Service into a Component
Now, you can inject the service into a component that needs to use its functionality. Open the component file (e.g., app.component.ts) and inject the service through the constructor:
import { Component } from '@angular/core';
import { MyService } from './my-service.service';

@Component({
  selector: 'app-root',
  templateUrl: './app.component.html',
  styleUrls: ['./app.component.css'],
})
export class AppComponent {
  constructor(private myService: MyService) {
    // Use myService in the component
  }
}
3. Register the Service in a Module
Angular needs to know about the service and how to create an instance of it. Register the service in the providers array of an Angular module. If you want the service to be available throughout the entire application, use the root module (app.module.ts):
import { NgModule } from '@angular/core';
import { BrowserModule } from '@angular/platform-browser';
import { AppComponent } from './app.component';
import { MyService } from './my-service.service';

@NgModule({
  declarations: [AppComponent],
  imports: [BrowserModule],
  providers: [MyService], // Register the service here
  bootstrap: [AppComponent],
})
export class AppModule {}
4. Use the Service in the Component
Now that the service is injected into the component, you can use its methods and properties within the component:
import { Component } from '@angular/core';
import { MyService } from './my-service.service';

@Component({
  selector: 'app-root',
  templateUrl: './app.component.html',
  styleUrls: ['./app.component.css'],
})
export class AppComponent {
  constructor(private myService: MyService) {
    // Use myService in the component
    const data = this.myService.getData();
    console.log(data);
  }
}
In this example, assume that MyService has a method called getData().
5. Optional: Use Dependency Injection in Templates
You can also use dependency injection directly in templates by accessing injected services using the *ngIf directive. For example:
<div *ngIf="myService.someCondition()">Content to show based on service condition</div>Benefits of Angular Dependency Injection
- Modularity: DI promotes modularity by encapsulating the functionality of each component and service. This makes it easier to develop, test, and maintain individual parts of the application independently.
- Testability: With DI, it becomes straightforward to replace real services with mock services during testing. This facilitates unit testing, ensuring that each component can be tested in isolation.
- Maintainability: Dependency injection helps create loosely coupled components, making it easier to modify and extend the application without affecting other parts. This enhances the overall maintainability of the codebase.
- Reusability: Thanks to the decoupling facilitated by dependency injection, components and services can be reused across different parts of the application or even in multiple projects.
Read More:
- What's new in Angular 16: A Developer Guide to Angular 16 New Features
- What's new in Angular 17: A Developer Guide to Angular 17 New Features
- Angular vs. React vs. Blazor: Which Framework is Best?
- Angular Developer Skills
- 10 Angular Dev tools! You Must Know
- React vs. Angular: Which Career Option is More Promising in 2025?
Summary
Angular Dependency Injection is a powerful mechanism that contributes significantly to the framework's architecture. By promoting modularity, testability, maintainability, and reusability, Dependency Injection plays a vital role in building scalable and robust Angular applications. Implementing this design pattern into your development behaviors and understanding its fundamental ideas will surely result in simpler and easily maintained code.
FAQs
Angular Dependency Injection (DI) is a design pattern and mechanism in the Angular framework that manages the creation and injection of dependencies into components, services, and other objects. DI promotes modularity, testability, and maintainability by decoupling components from their dependencies.
Dependency Injection is crucial in Angular for several reasons. It promotes modular and maintainable code by decoupling components, enables easy testing through the substitution of dependencies, and enhances code reusability.
The benefits of using Dependency Injection in Angular include modularity, testability, maintainability, and reusability. It simplifies code organization, allows for easier unit testing, makes code more maintainable by reducing coupling, and enables the reuse of components and services across different parts of the application.
ngular supports three types of Dependency Injection: constructor injection, setter injection, and interface-based injection.
Take our Angular skill challenge to evaluate yourself!

In less than 5 minutes, with our skill challenge, you can identify your knowledge gaps and strengths in a given skill.