


01
AugConditional Rendering in React: Creating Dynamic User Interfaces
11 Sep 2025
Intermediate
7.41K Views
22 min read

Learn with an interactive course and practical hands-on labs
Free React JS Online Course with Certificate - Start Today
Conditional rendering in React is the technique of displaying different UI elements or components based on certain conditions, such as application state, user interactions, or data values. It enables developers to dynamically update the interface, ensuring that only relevant content is shown to the user at any given time.
React.js developers earn 50% more than basic JavaScript coders. Don’t wait—enroll in our free react js course with certificate and unlock your earning potential!
What is Conditional Rendering?
Conditional rendering in React refers to the process of dynamically displaying different UI elements or components based on certain conditions — such as state, props, user actions, or data.
It’s similar to how conditions work in regular JavaScript (like if, else, or switch). In React, you use those conditions to control what gets shown in the UI.
The following are the basics of React's conditional rendering:
- The conditional operator and other JavaScript operators are used to render conditions.
- Depending on the state of your application, you can use conditional rendering to render various components, elements, or texts.
- It is possible to implement access levels, toggle program functionality, and show or conceal items using conditional rendering.
- It's necessary to utilize conditional rendering carefully because it can complicate your code.
- Make sure your code is still productive even when conditional rendering is used.
Read More - Top 50 Mostly Asked React Interview Question & Answers
Why is Conditional Rendering important in React?
Conditional rendering is a core concept in React because it enables dynamic user interfaces that respond to changes in state, props, and user interactions. Rather than displaying a static UI, React applications often need to show or hide components, update layouts, or change content based on specific conditions. Here’s why it matters:
- Enhances User Experience-Users expect interactive and personalized interfaces. Conditional rendering allows React apps to show content that is relevant and timely, such as login/logout views, loading indicators, or error messages.
- Improves Application Logic-It helps developers clearly define different UI paths based on application logic. For example, rendering different dashboards for admin and regular users improves maintainability and clarity.
- Reduces Code Duplication-Instead of writing separate components or pages, you can reuse the same component structure and conditionally control what gets rendered—making the code DRY (Don’t Repeat Yourself).
- Enables Real-Time Updates-React’s state-driven architecture means that UIs need to react instantly to data changes. Conditional rendering makes it easy to update views in real time, such as showing new chat messages or search results.
- Supports Responsive Design Logic-It allows developers to render different layouts or components based on screen size or device type, improving responsiveness and accessibility.
Implementing Conditional Rendering
There are numerous ways to achieve conditional rendering in React. Each technique has its own syntax and usage cases. Let's study the most popular techniques:
- The if/else Statement: React's if/else statement functions similarly to JavaScript's treatment of circumstances. React will alter the user interface in accordance with elements created using JavaScript operators like if and else.

Here's an example:
import React from 'react';
 const ExampleComponent = ({ isLoggedIn }) => {
  if (isLoggedIn) {
   return <h1>Welcome, User!</h1>;
  } else {
   return <h1>Please log in to continue.</h1>;
  }
 };

 export default ExampleComponent;
The isLoggedIn prop is sent to the ExampleComponent component so it may determine whether the user is logged in. According to the isLoggedIn value, it employs an if/else statement to render the headings "Welcome, User!" if true and "Please log in to continue" if false. In React, conditional rendering is a standard technique.
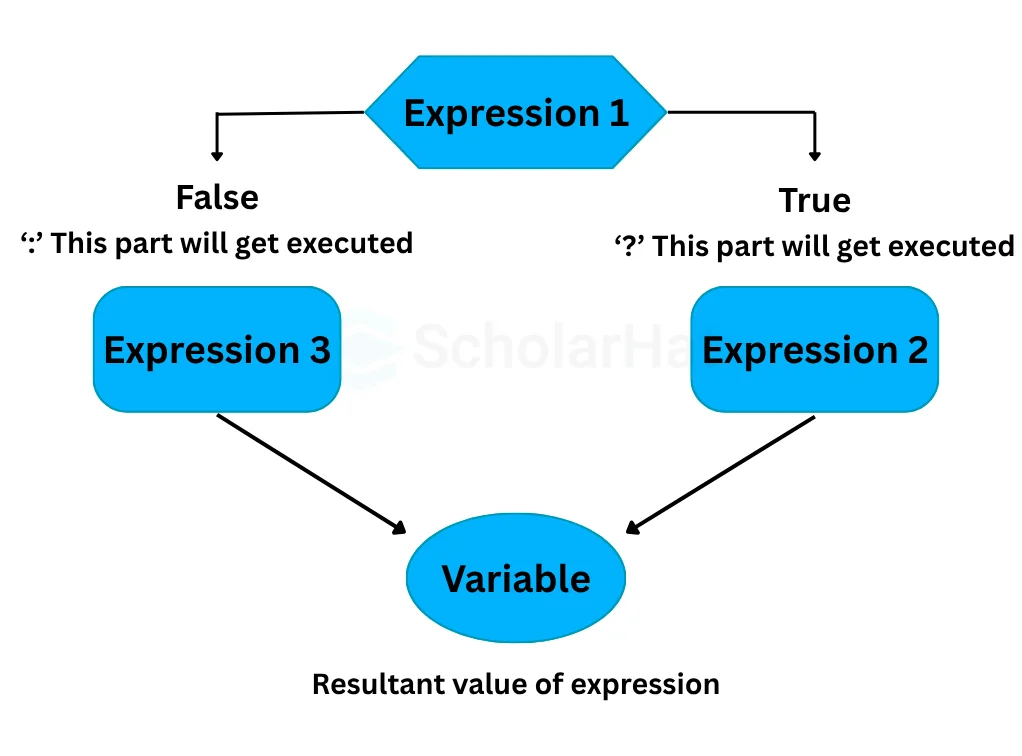
- The Ternary Operator: Another often used technique for conditional rendering in React is the ternary operator. It enables simpler conditionally rendering of items.
Here's an example:
import React from 'react';
 const ExampleComponent = ({ isLoggedIn }) => (
  <div>
   {isLoggedIn ? (
    <h1>Welcome, User!</h1>
   ) : (
    <h1>Please log in to continue.</h1>
   )}
  </div>
 );

 export default ExampleComponent;
The isLoggedIn prop is sent to the ExampleComponent component so it may determine whether the user is logged in. It renders several JSX expressions depending on the value of isLoggedIn using the ternary operator isLoggedIn? (...): (...): "Welcome, User!" if true and "Please log in to continue" if false. This is a typical method for conditional rendering in React.
- Inline IF with Logical && Operator: React supports inline conditional rendering using the logical && operator. Based on the criteria, you can use it to conditionally include or exclude a JSX element. Here's an example:
import React from 'react';
 const ExampleComponent = ({ isLoggedIn }) => (
  <div>
   {isLoggedIn && <h1>Welcome, User!</h1>}
  </div>
 );

 export default ExampleComponent;
The isLoggedIn prop is sent to the ExampleComponent component so it may determine whether the user is logged in. It executes the inline if statement along with the logical && operator to conditionally render the JSX expression <h1>Welcome, User!</h1> if isLoggedIn is true. React components can render under certain conditions thanks to this short method.
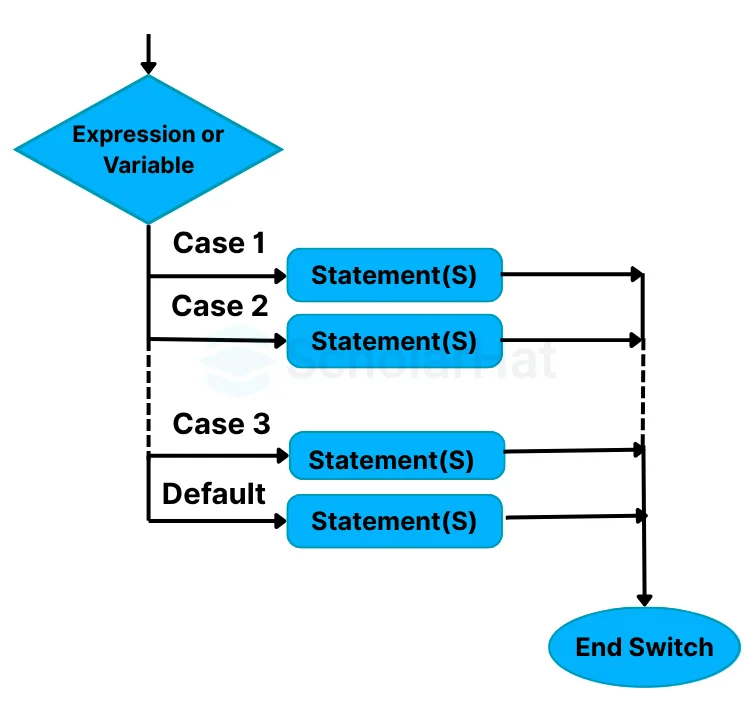
- Switch Case Operator: React's switch case operator can be used for conditional rendering scenarios that are more complicated. It enables you to manage various situations and render various components based on particular circumstances.
Here's an example:
import React from 'react';
 const MyComponent = ({ status }) => {
  let componentToRender;
  switch (status) {
   case 'loading':
    componentToRender = <div>Loading...</div>;
    break;
   case 'success':
    componentToRender = <div>Success!</div>;
    break;
   case 'error':
    componentToRender = <div>Error occurred.</div>;
    break;
   default:
    componentToRender = <div>Unknown status.</div>;
  }
  return (
   <div>
    <h1>Conditional Rendering Example</h1>
    {componentToRender}
   </div>
  );
 };

 export default MyComponent;
A status prop is used by the MyComponent to render various components. It uses a switch case to verify the prop value before assigning the JSX component and rendering it. This makes status-based conditional rendering possible.
- Conditional Rendering with Enums: Enums give JavaScript programmers a means to define a collection of named constants. Enums can be used in React conditional rendering to provide more organized and legible code. Here's an example:
import React from 'react';
 const StatusEnum = {
  LOADING: 'loading',
  SUCCESS: 'success',
  ERROR: 'error'
 };
 const MyComponent = ({ status }) => {
  let componentToRender;
  switch (status) {
   case StatusEnum.LOADING:
    componentToRender = <div>Loading...</div>;
    break;
   case StatusEnum.SUCCESS:
    componentToRender = <div>Success!</div>;
    break;
   case StatusEnum.ERROR:
    componentToRender = <div>Error occurred.</div>;
    break;
   default:
    componentToRender = <div>Unknown status.</div>;
  }
  return (
   <div>
    <h1>Conditional Rendering Example</h1>
    {componentToRender}
   </div>
  );
 };

 export default MyComponent;
To represent status values, a StatusEnum object is created. The component to render is chosen by MyComponent using the status attribute. The switch case enables conditional rendering after comparing the prop to the enum values and assigning the JSX component appropriately.
- Higher-Order Components: React's Higher-Order Components (HOC) pattern lets you reuse component logic. By enclosing components in additional logic, they can also be utilized for conditional rendering. HOCs offer a technique to improve components with certain circumstances and behaviors.
Here's an example:
import React from 'react';
 const withConditionalRendering = (WrappedComponent) => {
  return ({ condition, ...props }) => {
   if (condition) {
    return <WrappedComponent {...props} />;
   } else {
    return null;
   }
  };
 };
 const MyComponent = ({ name }) => {
  return <div>Hello, {name}!</div>;
 };
 const ConditionalComponent = withConditionalRendering(MyComponent);
 const App = () => {
  const showComponent = true;
  return (
   <div>
    <h1>Conditional Rendering Example</h1>
    <ConditionalComponent condition={showComponent} name="John" />
   </div>
  );
 };

 export default App;
WithConditionalRendering is a HOC that we define that accepts a wrapped component and renders it conditionally based on a condition prop. Using withConditionalRendering, we create ConditionalComponent, which displays a greeting on MyComponent. We render ConditionalComponent with a name prop conditionally in App. If you're aiming to solidify your React skills and gain recognition for your expertise, consider pursuing a React JS Certification to showcase your proficiency in React development.
Read More - React developer salary in India
Conditional Rendering with Multiple Conditions in React
In real-world applications, it's common to render components based on more than one condition. React allows you to handle multiple conditions using various JavaScript techniques directly within JSX.
1. Using Multiple if-else Statements-When your app needs to make decisions based on more than one condition, multiple if-else blocks are useful.
Example:
- If the user is not logged in, show the login page.
- If the user is logged in and is an admin, show the admin panel.
- Else, show the user dashboard.
This structure helps in checking conditions in order and deciding what to render step by step.
if (!isLoggedIn) {
  return ;
} else if (userRole === 'admin') {
  return ;
} else {
  return ;
}
2. Using the && Operator (Short-Circuit Evaluation)-This is a clean and quick way to show something only when a condition is true.
Example: Show a welcome message only if the user is logged in.
{isLoggedIn && <p>Welcome back!</p>}
3. Combining Multiple Conditions-You can combine conditions using logical operators like && (AND) or || (OR).
Example: Only show the admin panel if the user is logged in and has admin rights.
{isLoggedIn && userRole === 'admin' && }
4. Using the Ternary Operator (? :)-The ternary operator is useful for simple if-else conditions directly inside JSX.
Example: Show a loading spinner while data is loading; otherwise, show the content.
{isLoading ? <LoadingSpinner /> : <MainContent />}Best Practices for Conditional Rendering
To build dynamic and user-friendly interfaces, conditional rendering plays a vital role in React development. However, if not implemented carefully, it can make your components messy and hard to maintain. Here are some best practices to follow for writing clean, scalable, and high-performing conditional rendering logic in React:
Choose the Right Technique for the Situation-React offers several ways to implement conditional rendering, such as if-else blocks, ternary operators, logical &&, and switch statements. Use them wisely:
- Use ternary operators for simple true/false decisions.
- Use if-else statements or helper functions for more complex logic.
- Avoid over-nesting ternaries as they reduce readability.
- Always evaluate the complexity and clarity of your condition before selecting the method.
Keep the Code Clean and Maintainable-Poorly written conditional logic can make components bloated and hard to manage. To keep your codebase clean:
- Break complex logic into reusable functions or smaller components.
- Use meaningful variable names that describe the condition clearly.
- Avoid deeply nested conditions inside JSX — it hurts readability.
- Organized code is easier to debug, test, and maintain over time.
Use Early Returns to Simplify JSX-Instead of nesting multiple conditions inside your JSX, use early return statements in your component to handle different scenarios. This reduces visual clutter and improves readability.
Test All Conditional Paths-It’s essential to test and debug all branches of your conditional logic:
- Make sure every possible UI state (loading, error, empty, success) is tested.
- Handle edge cases and fallbacks gracefully.
- Use tools like React Testing Library or Jest to automate UI logic tests.
- Well-tested conditions prevent bugs and improve the user experience.
Avoid Logic Inside JSX When Possible-Too much logic inside JSX can reduce the clarity of your code. Instead:
- Move conditional logic to variables before the return statement.
- Extract complex decisions into helper functions.
- This separation of concerns leads to more modular and readable components.
Document Complex Conditions-If your component includes multiple conditions or business rules, add comments to explain the logic. This is especially useful when collaborating with teams or revisiting the code later.
Conditional Rendering in react example:
Scenario – Conditional Rendering in React:
You are building a user interface that should respond based on the user’s login status. The goal is to:
- Display "Welcome back!" when the user is logged in.
- Display "Please log in." when the user is not logged in.
JSX Example (Using Ternary Operator):
function Greeting(props) {
  return (

      {props.isLoggedIn ? (
        Welcome back!
      ) : (
        Please log in.
      )}

  );
}
Conclusion
React’s conditional rendering is a powerful way to build dynamic and interactive user interfaces. By rendering components only when certain conditions are met, you can offer a more personalized user experience. In this post, we explored several techniques such as if/else, ternary operators, logical &&, switch cases, enums, and higher-order components.
The average React.js developer earns ₹15–25 LPA, but seniors earn more. Don’t wait—Enroll in our ReactJS Certification Course and unlock top-tier roles!
FAQs
Conditional rendering in programming, particularly in frameworks like React, refers to the ability to display or hide parts of the user interface based on specific conditions.
Conditional routing is similar to conditional rendering in that it controls what the user gets to see based on conditions such as the user or application state
Dynamic rendering involves changing the content based on variables, while conditional rendering controls whether elements appear or not.
Take our React skill challenge to evaluate yourself!

In less than 5 minutes, with our skill challenge, you can identify your knowledge gaps and strengths in a given skill.